Tales from the Remnant Bin – Sadie Slip, Olya Shirt and Rise Turtleneck

I had a week off work – and what can I say, I got productive!

This time I decided to challenge myself to sew from my seemingly endless stash (again) and also to sew an outfit using ‘remnant bin’ rescues.

For no particular reason… it just seemed like a good idea.

I was originally inspired by these two pieces I had found sitting alongside each other.

Rayon knit and khaki linen - looked so good together!

Rayon knit and khaki linen – looked so good together!

I had 1.6m of print rayon knit and 1.4m of khaki linen.

I played with several ideas for the top but eventually settled on the Rise Turtleneck by Papercut Patterns. I had this pattern in my stash, having made the Fall Turtleneck a couple of years ago.

There isn’t much to say about this! It’s an easy make, I cut and finished this in about 90 minutes – extra time spent on hems. I was between sizes and decided to make up the Small instead of the Extra Small. It’s a looser fit – but not baggy. I think I will add more of these basics to my wardrobe. Easy, comfortable and practical.

Rise Turtleneck by Papercut Patterns in a rayon knit

Rise Turtleneck by Papercut Patterns in a rayon knit

I was prevaricating between a loose pinafore style dress, trousers or a straighter pinafore style… and in the end I chose none of these options.

I almost made trousers… well I actually did make trousers – just not khaki ones! I whipped up a test pair in my last piece of cotton/linen (see my Pipit post) and decided while I didn’t hate the trousers, I would like them much less in a solid, prone-to-crinkle linen. And I didn’t think a fitted turtleneck would pair very well with front-pleat trousers and elastic in the back waist.

Testing trouser patterns

This was just a test with my leftover linen. Pull-on pants with front pleats and elastic back waist. Pattern from Kana’s Standard

I was SO tempted to put the fabric aside and move onto something else… however that’s not really the point of a challenge. The challenge is to finish.

I got up the next morning and pulled out my Tessuti Patterns, Sadie and Claudia. I umm-ed and ahh-ed and decided I would prefer the neckline of the Sadie with a turtleneck for autumn layering. This was a real squeeze on 1.4m of fabric – however as I am 5 foot 3-ish, I’ve shortened my Sadie pattern pieces considerably and it ‘just’ fit.

I’ve made this dress four times now! After my first version, I lengthened the facing pieces to be much longer – a similar length to the Ogden Cami by True Bias.

I discovered with my first version, that the neckline facing wanted to roll outwards a lot – despite understitching. I’ve also seem this on other Sadies and even saw someone at The Fabric Store wearing one with the facing stitched down from the outside – which probably helps but the visible stitching would annoy me. I’ve found by lengthening the facing, almost a half lining, the rolling is minimised. I still use the original facing pieces and just cut interfacing using these and apply the interfacing to the top of the facing pieces.

Sadie Slip Dress, Tessuti Patterns. Inner lining/facing

Sadie Slip Dress, Tessuti Patterns. Inner lining/facing

I added the optional back fisheye darts as the linen has much less drape than my versions in lightweight tencel denim and silk.

Sadie Slip Dress, Tessuti Patterns.

Very windy afternoon – sorry! There are fisheye darts in my back!

I left the hem raw. I will run a line of stitching around the edge to keep fraying slightly under control – however I love a bias frayed hem and in linen it adds some rustic charm.

Sadie Slip Dress, Tessuti Patterns.

A linen Sadie Slip Dress. Taken on a windy afternoon!

I’m surprised just how much I like this! An incredible simple, versatile sundress. Or slip under a shirt or jacket – or layered with a turtleneck. Will look great with a faded denim jacket and sneakers.

It’s been very warm for late autumn, today it as 28 degrees – so no photos with the turtleneck other than a garage selfie (currently dance studio and gym).

Sadie Slip Dress

garage selfie late in the evening

Sadie Slip Dress and a Rise Turtleneck

Sadie Slip Dress and a Rise Turtleneck – hoping this works for layering for autumn

And finally I pulled about ANOTHER piece of remnant bin yarn-dyed linen in mushroom pink and it also seemed to pair beautifully with the khaki linen (khaki is a fabulous neutral!) so decided to add it to the challenge…

I made myself a Paper Theory Olya Shirt. I needed determination to make this one happen!!

Firstly there was an epic pattern Tetris episode to fit it on the piece of linen I had chosen. I even photographed by leftover scraps because I was so proud of myself!

Fabric scraps after pattern tetris to make an Olya shirt

Fabric scraps after pattern tetris to make an Olya shirt

Then I realised when I went to attach the cuffs (late in construction)… I had only cut out one set. I felt like crying. I lay awake in bed, contemplating if having contrasting cuffs was cheating… and if I did that, should I add contrast collar band and button plackets… yes, I like to overthink things.

Whew - two pieces large enough for cuff pieces

Whew – two pieces large enough for cuff pieces

Fortunately I found two pieces and squeezed out two more cuffs pieces. Whew!

THEN I unpinned my collar bands to discover I was missing a chunk of fabric from one of the bands (the perils of block fusing and then cutting out on the fold!). There was definitely no.more.fabric to cut another band. Cue more overthinking…. and then I decided to just ‘patchwork’ a piece onto the collar band. Not ideal but it worked.

collar band - rescue patchwork

Agreed. The grainline of the piece is not ideal… however it was the only option.

This is a slightly more complex shirt in some ways – there are hidden pockets in the front seams and the front yoke extends into the sleeve. I highly recommend following along with the Paper Theory sewalong online for attaching the sleeve. There is a pivot point, which is a little tricky and then you need to figure out where to go next and where to stop. Hard to explain however the best advice I can offer you is to just slow down – or even walk away for a while if you are finding it perplexing. There is nothing to invites disaster more than exhaustion and frustration!

Olya Shirt, Paper Theory & Sadie Slip Dress, Tessuti Patterns

Olya Shirt, Paper Theory & Sadie Slip Dress, Tessuti Patterns

Olya Shirt, Paper Theory & Sadie Slip Dress, Tessuti Patterns

Olya Shirt – it is a very roomy shirt, boxy and airy.

Olya Shirt, Paper Theory & Sadie Slip Dress, Tessuti Patterns

Love these colours together!

I made this pattern up as a shirtdress last year. Sorry it hasn’t made it onto the blog… I left off the front pockets on this version. While I like the dress in itself, it feels like a massive pyjama shirt due to the colour/stripe and I’m not sure what to do with it. Maybe dye it… or wear it open as a duster coat. Or just put it aside for a while. I did that with my Flint Pants and now wear them regularly.

Olya Shirt dress

Olya Shirt dress

Anyway… I’m pretty pleased I hung in there and finished off these three remnant bins garments. Challenging myself to use a piece of fabric, find a suitable pattern from my stash and turn them into versatile wardrobe additions is a real win.

Fabric: 1.4m Rayon print knit, cost $3.80; 1.4m khaki premium linen suiting, cost $10.40, 1.5m dusky pink yarn dyed linen $10. Total cost $24.20

Patterns used: Rise turtleneck, Papercut Patterns; Sadie Slip Dress, Tessuti Patterns; and Olya Shirt, Paper Theory.

So there you have it. Three new wardrobe staples in 4 days. All unloved pieces from a remnant bin!

Banjo on the beach during COVID-19

I’ve had people asked me if I get embarrassed taking photos at the beach. Well this one is 9kms long, you are always excessively socially distanced on this one! Yes, that’s old Banjo who always made regular and popular appearances on this blog and Instagram. He will be 11 in August!

The Tale of Two Turtleneck – Monroe and Fall

Tessuti Patterns Monroe Turtleneck
vs
Fall Turtleneck Papercut Patterns

On a cold winter day, a snuggly turtleneck holds endless appeal. And this year it has been a cold winter, bitter mornings and colder winds than I’m used to. No bare feet at the beach this winter!

This Aussie winter, Tessuti Fabrics spoilt us with a free pattern – the Monroe turtleneck. It was an obvious choice to try.

Monroe - Tessuti Patterns

Monroe – Tessuti Patterns

The drafting & style of this one reminds me of the pared back & minimalistic Japanese sewing patterns. There is minimal shaping and plenty of ease. I find the neckline to be a little tight and requires a ‘tug’ to pull it over my head. I love the 3/4 sleeve length option.

Monroe - Tessuti Patterns

Monroe – Tessuti Patterns

The length of the body of the Monroe is slightly longer than the Papercut Patterns Fall.

Monroe - Tessuti Patterns

Monroe – Tessuti Patterns. This one has lots of ease – for me.

To contrast, as I already had it in my stash, I also made the Fall Turtleneck from Papercut Patterns. Still a turtleneck with drop shoulders, the Fall however quite a different fit and style to it.

Comparison of the Monroe (left) and Fall (right) armhole and shoulder pattern lines

Comparison of the Monroe (left) and Fall (right) armhole and shoulder pattern lines

The armholes and shoulder lines are much more shaped – and as a result, of course, the sleeves also have more shape to their cap and a noticeable ‘front’ and ‘back’ to the sleeve draft.

papercut_fall1

The neck is much higher and turns over into a delightfully snuggly but not-too-tight turtleneck to ward off those cold winter winds.

Fall Turtleneck - Papercut Patterns

Fall Turtleneck – Papercut Patterns

Thoughts

I found both patterns to be quite short in the body – but the Monroe less so. I would have added length to the Papercut Patterns Fall body however I only ‘just’ had enough to cut the Fall pattern. I originally purchased this piece of merino knit to make a Monroe (Monroe requires 120cm, the Fall 130cm).

I need some new jeans – perhaps some of the high waisted variety… will I succumb to the Persephone Pants fever gripping Instagram? I may one day ‘tuck in’ my tops… who knows!

I’ve worn both turtlenecks quite a lot, perhaps the Monroe more due to the longer body length which is better on the cold days. I think I prefer the Fall for it’s heavier neckline and fit. Then again… it is considerably more expensive than the free Monroe!

Merino leftovers – sew a buff!

I did have long thin off-cuts after cutting out both patterns I turned into a ‘winter buffs’. These have been great on cold mornings when I’m out running (running when frost settles is not fun – especially when frost isn’t something you see very often – if ever!). I’ve been surprised how much I’ve used them – who knew that a random tube of fabric was so useful! Check out the YouTube clips on the multiple ways you can wear them.

Patterns: Monroe Turtleneck, Tessuti Patterns (free) & Fall Turtleneck, Papercut Patterns
Fabric: Merino knit, The Fabric Store, Brisbane

Vogue 9204 – a simple shirt for a complicated skirt

Note: I didn’t make the skirt!

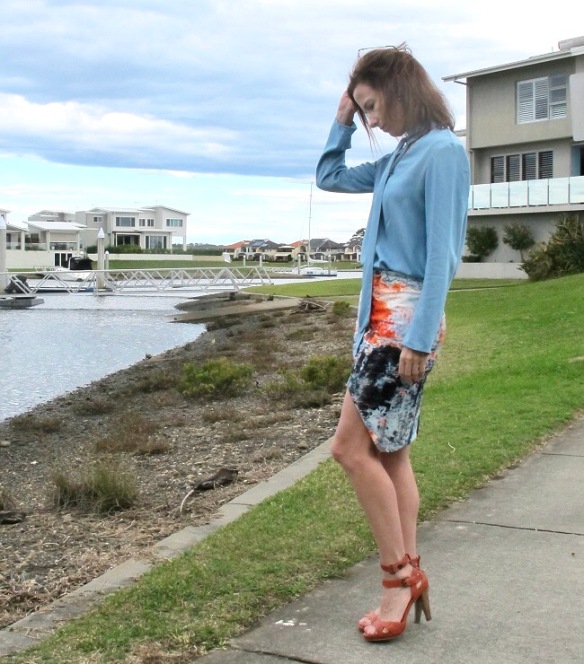
Vogue 9204 – the shirt… the skirt was a fortune ‘find’ and shows more of my legs then usual!

I did however make the blouse to pair with the skirt.

This pattern is a bit of an ugly duckling – or perhaps more kindly, a hidden gem. Vogue 9204 is a Very Easy Vogue pattern with somewhat uninspiring envelope art and a sample garment in a busy print that disguises the garment’s design lines.

Vogue 9204 - image from Vogue Patterns, McCalls

Vogue 9204 – image from Vogue Patterns, McCalls

It’s a simple pullover top with a collar that extends into ties, lined yoke with back pleats and a shirt tail hemline.

Vogue 9204 - back view

excuse the creases – car travel to somewhere without a strong onshore wind required! Bad hair day to top it off… all the running means I pay less attention to my hair lol… true story…

There are no darts and the front v-neck is finished with a simple facing.

The fabric…

I’ve made this in a woven tencel chambray which I purchased on holiday from Ruche Fabrics in Launceston, Tasmania. If you happen to be in Launceston you should pop into Ruche. It’s the Tessuti Fabrics of Tasmania in terms of fabric quality & style.

While I love this fabric, it does show every crease and seems to amplify the shadows/ripples as it falls over your body or with movement. I don’t notice this when I’m wearing it but it’s obvious in photography.

Regardless of these gripes, the fabric is divine and very fluid.

Vogue 9204 - side view

Vogue 9204 – side view

The skirt… not made-by-me

The skirt… it’s hard not to notice isn’t it?! It was called the ‘fire & ice skirt’ by Bec & Bridge. It is fully lined and has a very deep back hem facing so the front cut away doesn’t show the reverse of the fabric at the back of the skirt. It’s some type of scuba-like fabric. I paid next-to-nothing for it, one of my unexpected finds, the fabric print drew my eye on the rack and cost me less than a coffee (yes really). It’s shorter than I usually wear but maybe it will be ok for a ‘night out’ or drinks with friends, we will see. I’m sure it will be readily adopted by my teenage daughters in due time.

Thoughts…

I deliberately chose this shirt design for its austere simplicity combined with a slightly sassy neck tie. I wanted something to quietly complement the skirt rather than compete with it.

I haven’t quite decided how I prefer to tie this… and I haven’t tried a low loose bow. The ties seem longer than the pattern illustration and I’m toying with the idea of unpicking the hand stitching on the inside back neckline and shortening them slightly… but maybe not.

I really like this simple pattern. I think I may make another in silk and/or rayon to wear as casual tops with jeans. It would also pair beautifully with a pencil skirt for work. It’s a nice change from a collared shirt yet not totally lacking in interest.

It’s a very fast make and if you can ‘burrito’ your shirt yokes, even faster. There is a small amount of hand stitching around the back neck to finish the tie neck.

Pattern: Vogue 9204
Fabric: Tencel chambray, Ruche Fabrics Launceston. Purchased in January while on holidays.
Skirt: RTW, Bec & Bridge, not current range

Thanks to my friend Susan of Measure Twice, Cut Once who lightened up my photos for me to actually show the top & skirt in their true colours (I’m not technical in this regard) and saved me taking more (clouds descended and the weather turned nasty/cold as these were taken making the colours very murky).

RUNNING

Still running! Park Run official time down to 26.02 minutes and I recently finished 10kms in 55.03 minutes. It’s four months since I attempted to run/walk my first Park Run. It’s been a lesson in persistence and perhaps sheer bloody mindedness 🙂

I’m trying to fit 20+ kms into my week. Yesterday I did Park Run (5kms) and then a steady 11.5kms with friends in the late afternoon as I had a hockey game at night. We trotted out for another 5kms as the sunset this evening so I could tick off 21.5km this weekend and a total of 29.5kms over the week.

I’m slowly learning to approach different runs differently. Some are more about pace, others about distance and others about time on my feet. Sometimes I run and chat with friends. It’s been a really interesting process. I’m not terribly scientific about it, I simply do what works for me and feels right/sensible.

I had a complete brain fart & upgraded my July 10km event to a half marathon… I decided I just need to finish my ‘first one’ and then I can work on my time over this new-to-me distance… can’t be that hard… can it???

The Unblogged: Waffle Pattern Vanilla and Cali Faye Collections Rumi Top

So yet more tops, this time some knits.

While I was feeling out-of-sorts this year, I resorted to sewing lots of simple tops to sate my craving to sew – which it really didn’t. Although I do have a collection of tops to wear so all is not lost. In hindsight I should have sewn more complicated garments, I find while I love simple garments, I find sewing challenging garments more relaxing – which is what I needed in 2016. However these little garments were about all I could fit in. Such is life!

Vanilla Top, Waffle Patterns

First up the Waffle Pattern Vanilla top.

I hate these photos so probably why it’s been hovering in the Neverland of Unblogged.

Vanilla Top, Waffle Patterns

Vanilla Top, Waffle Patterns

One thing I really don’t like about this top is how the perfectly neat neckline hits the stripes at an odd angle (due to the slightly-off-beat stripe directions with the drape) and looks messy. It really annoys my eyeballs like dust on a dry windy afternoon! I’ve often worn a scarf with it for that reason because it visually drives me bonkers. But I can be precious.


I do find the sleeves an odd length but I also think in a different weight fabric they wouldn’t bother me so much.

Waffle Patterns, Vanilla Top

If you like stripes doing odd things, you will love this

So another easy-to-wear-with-jeans garment as hence got a lot of wear throughout the colder months as a ‘house’ jumper with jeans.

Yes, you may recognise the fabric from my first Penny Raglan. I managed to squeeze a Penny Raglan and this top out of 2m of this fabric.

I think this fabric choice is too heavy for this design BUT very easy to make and rather fun to wear. My eldest daughter has declared that this will be her top when I tired of it.

This is the second Waffle Patterns pattern I have made and I must say I do enjoy them. Nicely presented, comprehensive but not excessive instructions well illustrated with diagrams, and an A0 copy shop sheet printing option… and you can turn off layers to print as many or as few sizes as you like. I’d love to try some of her jacket patterns, the details are thoughtful and they have intrigued me for some time.

Pattern: Waffle Patterns, Vanilla top
Size: Size 34
Fabric: Make It Fabrics, Brisbane

RUMI TOP by Cali Faye Collections

Next up a Cali Faye Collection Rumi Top which was released a few months ago.

I volunteered to pattern test for this and found the process really interesting. I’ve always quite liked the design aesthetic of this designer, simple and modern. Although the pattern price point is quite high.

Rumi Top, Cali Faye Designs

Rumi Top, Cali Faye Designs

Cali Faye Collections have a closed facebook group for their testers. Throughout testing period, testers post their versions, comment about the design, instructions and so on. The pattern did changed several times in response to feedback from testers and it was interesting seeing different fabrics being used. I thought it was a thorough, open and interesting community sewing process.

Rumi Top - Side view

Rumi Top – Side view

I sewed up the final version which you can see here. It’s a large over-sized boxy top with fitted sleeves. I’ve worn it a lot, it is easy to wear and great with skinny jeans or fitted pants. It is a very simple design and reminds me of my Japanese pattern book top patterns.

The neckline is finished with woven bias tape. I haven’t finished a knit neckline in this manner before and would be curious how that works for a stretchier knit than this. With this rather stable cotton terry knit, it did provide a nice neat, flat finish.

I would advise sewing with a knit with nice drape. Anything too heavy and you may find yourself wearing a tent!

Rumi Top, Cali Faye Designs. Back view

Rumi Top, Cali Faye Designs. Back view

Pattern: Cali Faye Collections Rumi Top
Size: XS
Fabric: Cotton Terry Knit, Spotlight Australia
Note: I received this pattern as part of the testing process, all opinions my own.

And I think that’s all the Unblogged tops done now. Hooray!

The Unblogged – Grainline Willow Tank and True Bias Ogden Cami

As 2016 rapidly disappears, I’m determined to clear some of my projects out of my head and into the blog. So expect a slight rush of posts before I disappear again for a while.

I view my blog as a documentation of my makes and my sewing journey – I’ve frequently been sorry I haven’t blogged a few things as when I go back to a pattern I have no notes of the changes or size I may have made.

So for record-keeping sake for me (selfish blogging)… here are the Grainline Studio Willow Tank/Dress and the True Bias Ogden Cami.

No time for photos and I don’t think they really merit the time required, particularly since the Willow feels like a work-in-progress.

Most of my blog photos are taken while walking my dogs on the beach, however I simply haven’t had the time to be so organised to be achieving multiple things at once this year. And sometimes… I just don’t want a photo of ‘tired me’ on record.

True Bias Ogden Cami

I really don’t feel the need to write an epic blog post about the Ogden Cami as it has been blogged everywhere – and generally received a tsunami of universe love. With good reason. It’s simplicity can make it a very versatile winner if it’s your sort of thing and the dartless fit works for you. It must be said, I’ve seen several add darts to this pattern with great success.

Odgen Cami by True Bias.

Ogden Cami. Hot off the machine.

I’ve sewn this up with some leftovers from this skirt.

I made this ages ago and tried it on before I understitched the facings… the fit seemed a little too tight under my arms and across my upper bust. I assigned it to the naughty basket, upset to have wasted about $1 worth of leftover ‘op shop’ vintage fabric that I loved but felt unable to throw it out. Ridiculous but true.

I rescued it this week, understitched the facings and then pressed and pressed it… and for some reason… perhaps different underwear choice (!), the fit is much better and I now adore it. Another pretty little top to wear in summer with my favourite scruffy jeans. Lesson learnt: don’t give up too early!

Odgen Cami by True Bias

Ogden Cami ‘out in the wild’ sneak retail store mirror shot while Christmas shopping

I opted to just overlock/serge the lining lower raw edge and use a narrow hem on the outer hemline.

Described on the True Bias site as “The Ogden Cami is a simple blouse that can either be worn on its own or as a layering piece under blazers and cardigans. It has a soft V neck at both center front and center back necklines, and delicate spaghetti straps. The neckline and armholes are finished with a partial lining for a beautiful, high-end finish.”

And the suggested fabrics are “Light weight woven fabrics such as crepe, rayon challis, voile, and lightweight linen.”

Like so many before me, I do really like this pattern. I do struggle to tell the front from the back – which based on responses to my instagram post is a common theme and it’s agood idea to mark the back with the label or some stitches. I’m sure I have it on backwards in the above photo… no one noticed… so wear it however you fancy I say!

Pattern: Ogden Cami, by True Bias
Size: 0
Fabric: Vintage cotton I purchased for $3 from the op shop. It was only about 1m wide. I’m not sure whether it has a bit of rayon in it, or perhaps all rayon and maybe some polyester. Whatever it is, it’s cool to wear with nice drape and oh so pretty.

Grainline Willow Tank/Dress

I purchased this on impulse when I succumbed to the Penny Raglan. And also thought at the time… “Did I just pay that for a basic woven top pattern?”. However for me, Grainline is a good buy. Solid, reliable basics that are always in high rotation for everyday wear. Not necessarily ‘exciting’ sewing but highly wearable pieces that always seem to come together with little effort or fiddling.

The Grainline Willow Tank is described as “…fitted at the shoulders and falls into a relaxed fit below the bust. It’s unfussy and can be made into a dress or a tank top…  Techniques involved include sewing a straight seam, darts, hemming and applying bias facing. Pattern is nested to facilitate cutting between sizes if needed.

Suggested fabrics are: “Light to medium weight fabrics such as cotton, linen, silk, crepe de chine, charmeuse, voile, chambray, etc.”

Both my attempts at the Willow Tank have been made in leftover pieces of linen.

Willow Tank, pattern by Grainline Studio.

Willow Tank, pattern by Grainline Studio. My first attempt in a rayon/linen blend from Lincraft

I made my first Willow back in July!

The darts on my first Willow are at least 1/2inch, if not more, too low. Despite this, I do prefer the fit of this one compared the second Willow (below) as this linen is a linen/rayon blend and the fabric drapes in a slightly softer fashion. So much more forgiving of the low darts. Despite the slightly-off fit, I’ve worn it several times as it’s so darn pretty and a perfect partner to scruffy jeans on the weekend. It’s leftover from my Grainline Morris Blazer which I adore and love to wear.

Willow Tank, pattern by Grainline Studio

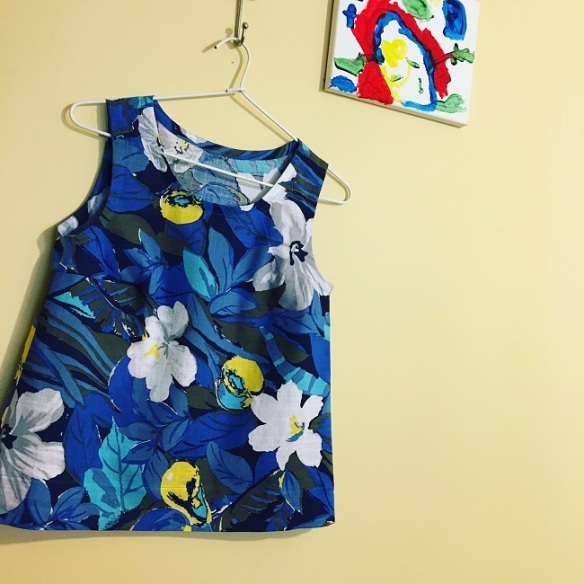
Willow Tank, take 2. Floral lightweight linen from The Fabric Store

The second I whipped up in a lightweight linen, leftovers from a Vogue dress I finished up tonight after dinner with some hand stitching. I shifted the darts up 1/2inch however I think they need to be higher. I simply folded up the excessive between the dart and armhole so as not to impact on the armhole size and did likewise on the back piece.

As this linen has less drape, despite being a finer fabric than my first Willow, it’s far more tentlike on me. My eldest daughter loves it, mainly because the fabric is so pretty I think. So perhaps I’m being too fussy… it’s been known to happen! Maybe paired with some skinny jeans or shorts I will feel differently.

Willow Bias Finishes

I used to hate bias finished neckline and armholes, however I am very pleased with the finish on these. They are lying beautifully flat and neat.

I did sew the bias stripes end to end with a 20mm seam, rather than the 4mm (1/4 inch) seam as directed. I found them a little long and I like to stretch them a little to fit as I find they sit flatter when finished – in my experience anyway. This does really depend on your fabric choice and the stretch of the bias though!

You do need patience to achieve a nice neat finish with bias strip finishes – and it’s worth it. I find it easier to press the edge of the bias stripe that will be turned to the inside before I attach the other edge to the neck or armhole. I find it’s easier to achieve a more consistent width of the bias tape –and avoids iron-steamed finger tips!

I whipped this one up on a Sunday morning.

Pattern: Grainline Studio, Willow Tank Dress
Size: 0
Fabrics: rayon/linen blend from Lincraft (blue/white) and lightweight linen from The Fabric Store (blue/khaki/white/yellow).

Final Thoughts

I love having these patterns that use minimal fabric lengths. I think there are a few more people out there with an ever-growing stash of fabric scraps that seem too big to throw out yet too little for another project.

I’m trying to make these little tops and whatnot with the ‘leftovers’ as I’m sewing other dresses or skirts to ensure I don’t end up with piles of short lengths that never get used for anything. It’s too easy to move onto the next project rather than tying up the ‘loose ends’ of the leftover pieces. Not to mention the fact if you whip up a little top in the same fabric you don’t need to change your machine threads!

I think they are also excellent for those irresistible remanent bin purchases and indulging in some gloriously expensive fabric as you don’t need much.

Not everything we sew needs to be a dress.