I first made the Named Asaka Robe in 2016… that one is still in circulation… it’s even been worn to Melbourne Frocktails and graces the guest ensuite.
I made a second and third in a cotton/linen blend, one as a Christmas gift for a friend and the other for me for hotter summer morning – silk can be sticky to wear in high humidity!
I made a fourth in block-printed cotton for a friend’s 40th birthday.
Hopefully they love them just as much as – perhaps not. I hope at least they are worn and appreciated for the thought.
This fabric!
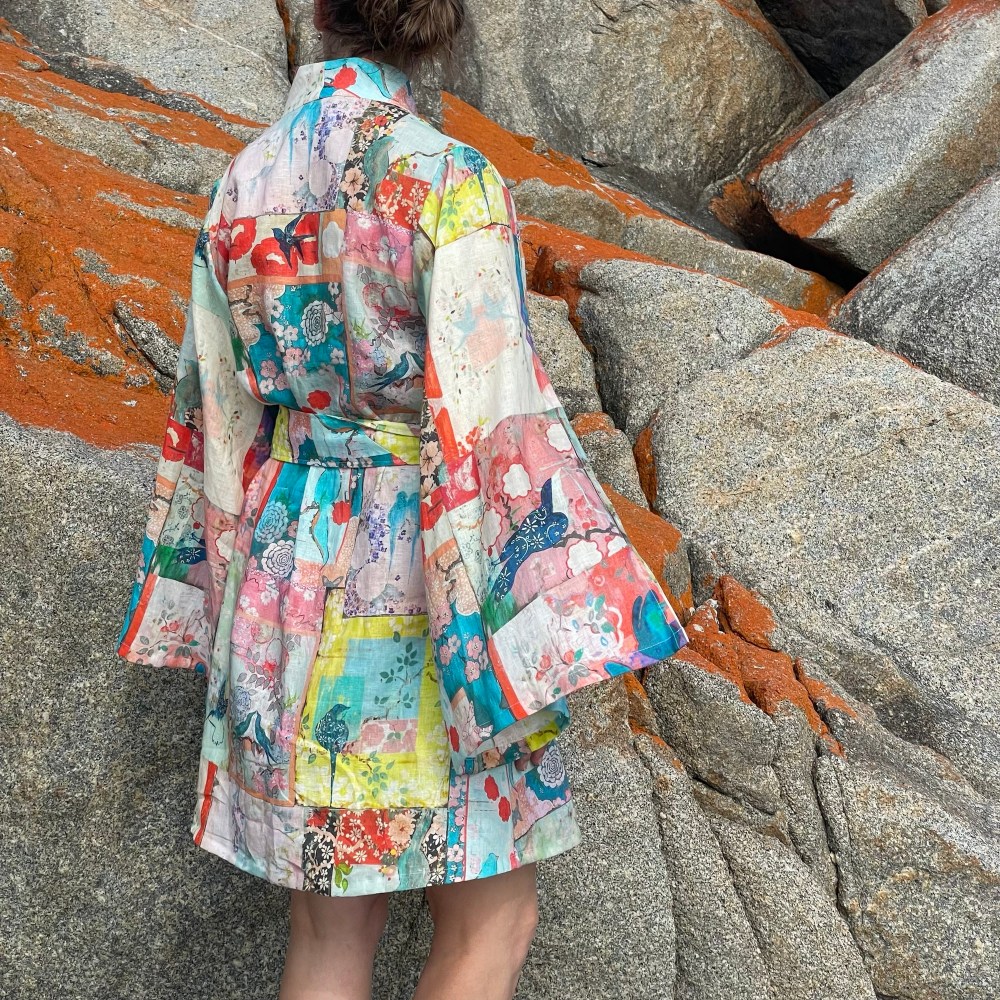
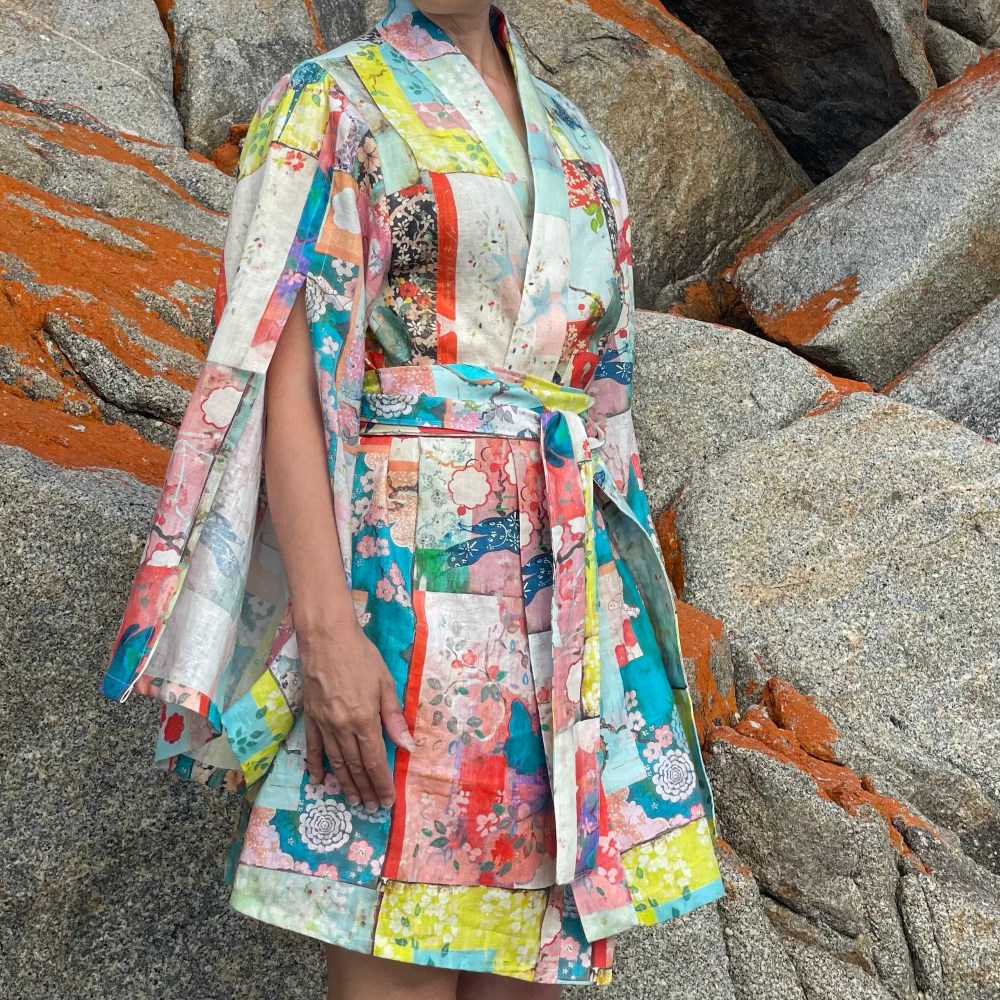
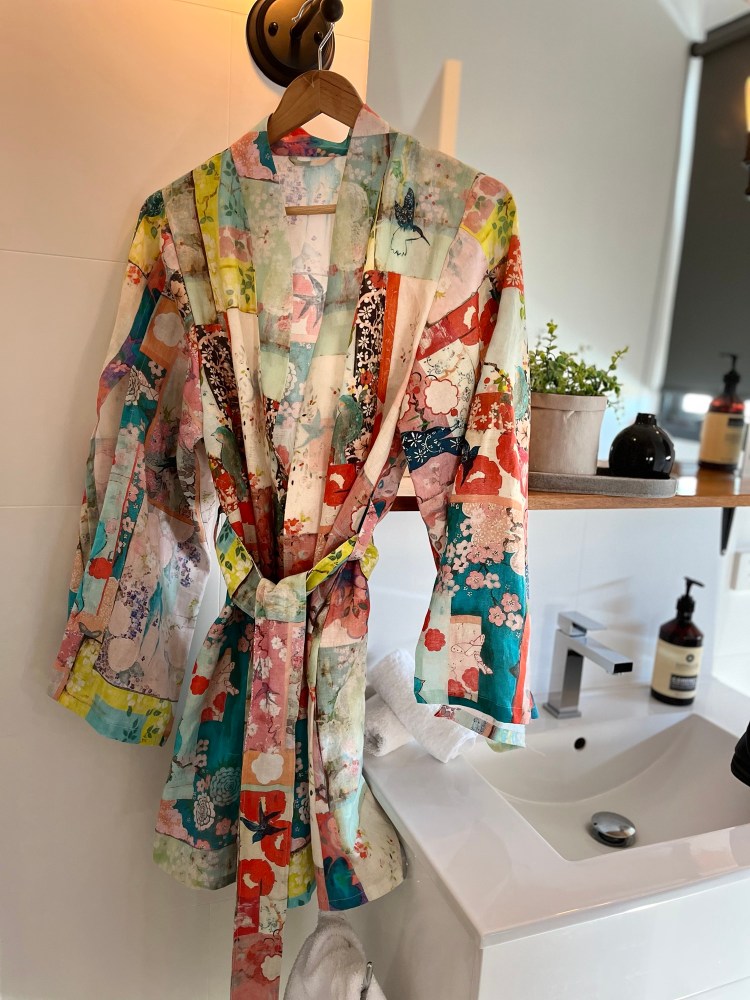
Last week I made my 5th Asaka in a stunning linen from Tessuti Fabrics. I purchased this fabric a few years ago. I fell in love with this print and I had a gift Visa card from long service employment recognition. I never knew how to spend these things. However spoiling myself with a practical dressing gown in fabulous fabric seemed a good enough idea!
I’ve just returned from a week on the central plateau in Tasmania – where I took some ‘time out’ and made this, amongst other things. I’m fortunate to be able to drop out of circulation for a week every year or so. Mobile phone coverage has caught up with this corner of the world… but it’s still remote enough to mean locking yourself away for a day or so… maybe a week… is entirely reasonable. There’s a basic sewing machine there. No overlocker/serger. So it was the perfect opportunity to finally make this dressing gown as I’ve always sewn this pattern with turned under raw edges (sleeve openings and hems, French seams (side seams and inset sleeves) and hand stitched down neck bands. No overlocker required.
A label and a hanging loop.
This dressing gown really is simpler than those decadent sleeves make it appear. I cut this out and sewed it up over two days – with plenty of chats with unexpected house guests in between!
I took longer than usual to cut it out as the print was directional. I ended up piecing the belt – but the nature of the print means it’s not obvious.
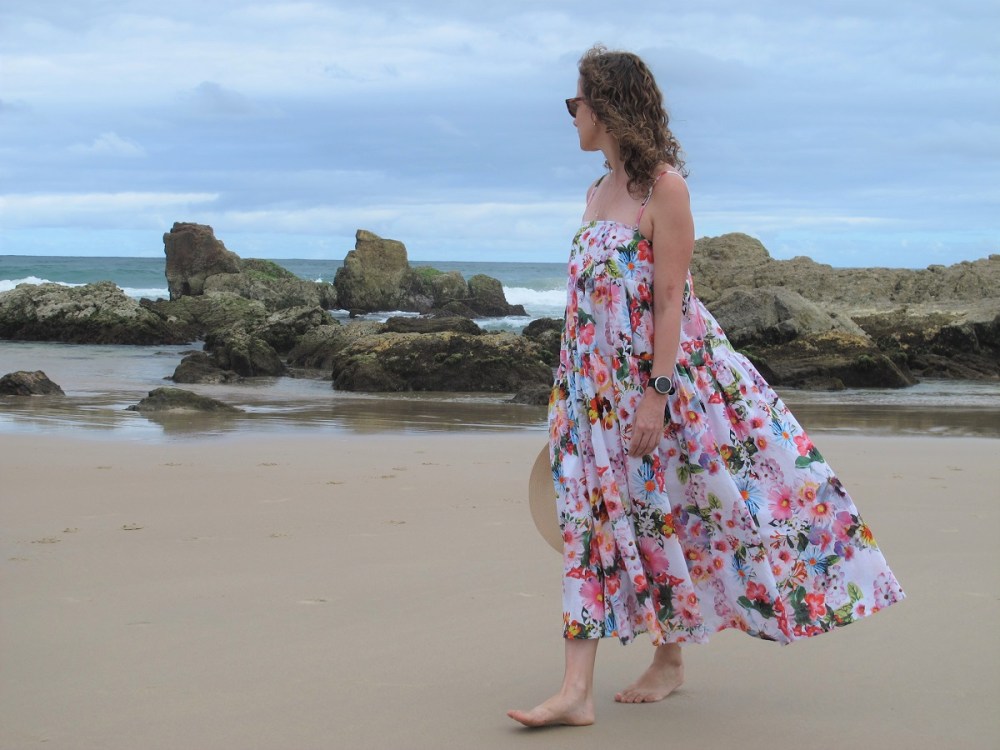
When the Tessuti Ophelia dress pattern was released this Monday, I immediately thought of this long-stashed blue printed linen.
So in no time, the pattern was purchased, downloaded, printed and traced. The linen was prewashed and I sewed this up in short sewing sessions over several evenings and finished on Friday (public holiday here).
Pattern purchased ✅ fabric ready to go ✅
I’m still wearing the Tessuti Claudia I made in 2018 – and have made three more since! My wardrobe is in need of a refresh and while I am much more mindful of overconsumption in all forms, I do feel a couple of new sundresses wouldn’t go astray! While I adore the Tessuti Claudia for hot summer days, I had been procrastinating between a number of other styles as I wanted a different easy-wearing summer style, and I’d been procrastinating between the Tessuti Annie, Sewhouse7 Sauvie and Ready to Sew Paloma. However when Tessuti posted a teaser on instagram about a soon-to-be-released pattern, I decided to wait and see if it was just what I had been looking for.
Description from the Tessuti website: The Ophelia Dress is the ultimate sundress designed for warm days and balmy nights. It is fitted above the bust with bust darts and wide, comfortable shoulder straps and neckband; subtly shaped at the waist and gently flared to the midi-length hem. Topstitching highlights the button through front; stitched down, inseam pockets; centre back seam and wide hem.”
Sizes 6 to 22 are available, bust 32-48inches, hip 36-52 inches.
I opted for A0 printing (2 sheets) because I hate sticking small sheets together!
Line drawing from Tessuti website. I really love the pocket construction.
Thoughts
I suspect the Ophelia may be a pattern repeater for me. The loose shaped fit, pockets, well suited to linen… a perfect Aussie sundress. Sometimes I fall in love immediately with wearing a new style, some times it is a slow burn. Let’s wait and see!
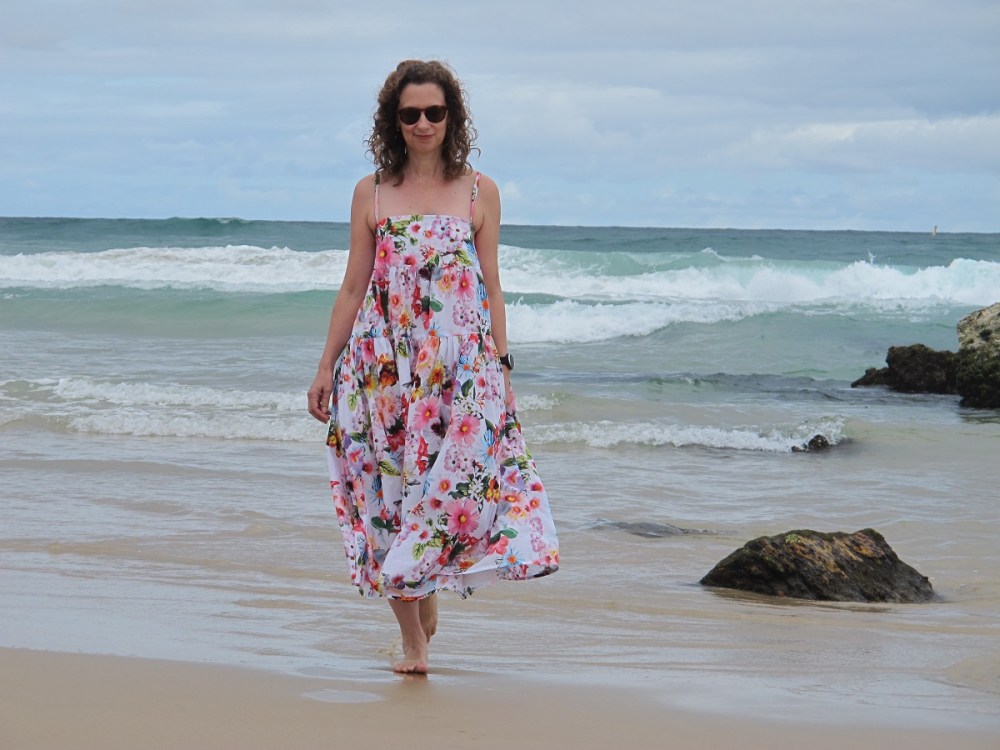
Tessuti Ophelia: a cloudy but very hot humid day.
The front button bands are not interfaced. The top band is – depending on your fabric choice you may want to consider lightly interfacing the band… as there are a lot of buttons and buttonholes!
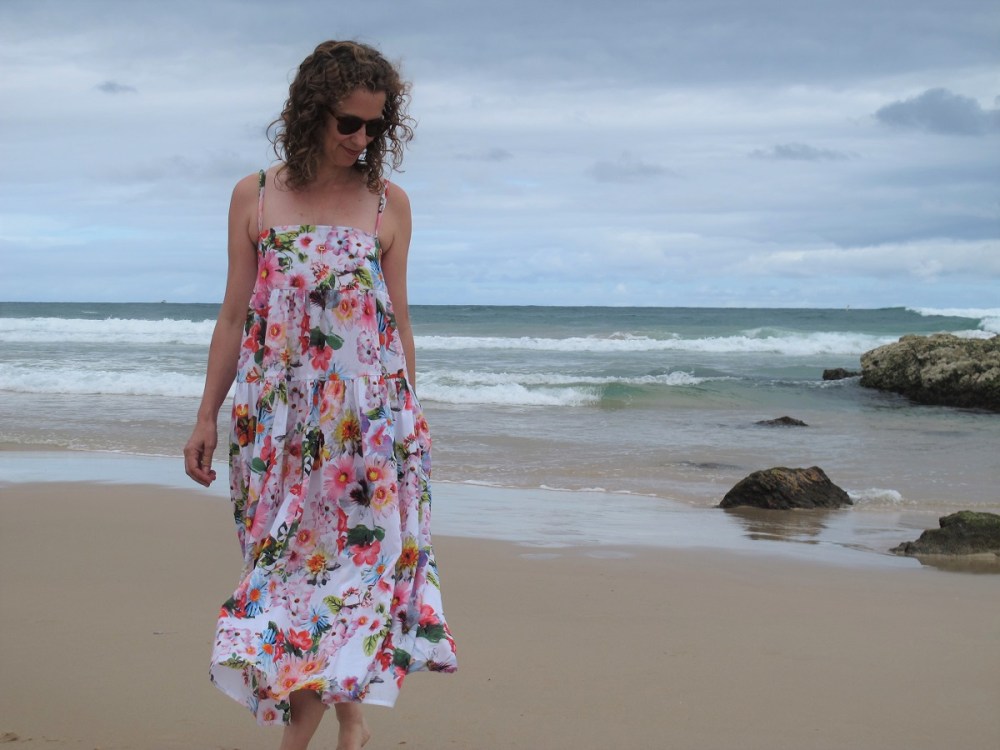
Tessuti Ophelia Dress: Side view
I have found my bra straps can slightly show, that may depend on your bra style of course.
I graded from 8 at the bust to 10 at the hip as per my measurements. I found the fit good and opted not to shorten the pattern (I’m 5 foot 3 for reference).
I had these buttons (gifted by my lovely friend Jen) and they were a great match. They were four-hole buttons so no machine sewing them on… I found handing sewing the buttons on to be the most tedious, time consuming element.
I confess, I’m tempted to try another in a solid colour linen… or stripes…. maybe a check…
Button testing…. I could not believe I had such a great match in my stash. Note: this is before I sewed the buttonholes.
Thanks for reading!
Tessuti Ophelia: back view
Pattern: Tessuti Ophelia Dress, PDF download, sizes 6-22.
Fabric: printed linen, The FabricStore (years ago sorry!)
Learning to make shirts has been one of my favourite sewing journeys. Why?
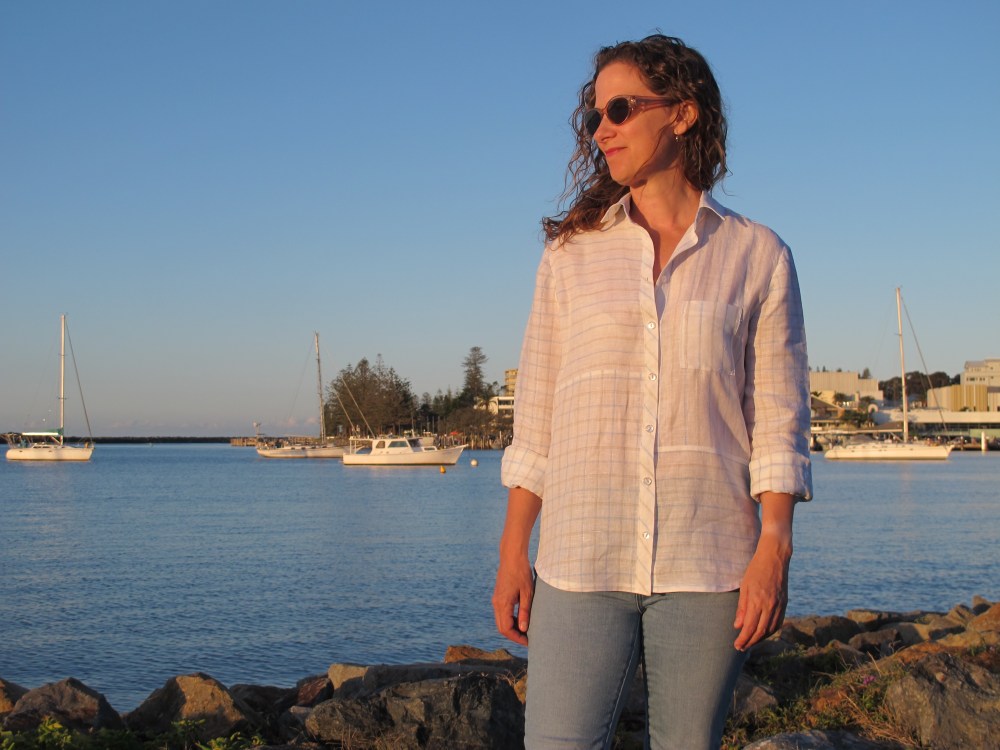
An Archer Button-up Shirt, sewn in two linens, checked and striped.
They are a practical garment that you can wear all year round
They are perfect for layering, perfect under jackets and jumpers, fantastic worn open over dresses and camisoles
They are the perfect step-by-step project that you can break up into 15 minute slots. I Love sewing a shirt over many, many sessions. I
and finally… the details… ah the details! The seemingly endless array of collar styles, sleeves, cuffs, plackets and more. They are a great canvas for your imagination – but still result in a wearable, practical outcome.
Earth & Sky Stripe and Earth & Sky Check from De Linum
I’ve seen a lot of mixed solid and print garments lately – it’s a perfect way to use up those odd lengths of fabric that we all hang onto… because it’s too much to throw away… but too little to make another garment. It’s also a brilliant way to combine sew up those remnant pieces we can’t seem to resist in the local fabric store!
I’ve pulled several of those smaller linen pieces out of my stash but never settled on a combination I thought I’d wear. Then I spied a lovely stripe and matching check in the De Linum range and thought they would make a perfect pair!
I wanted the shirt to be more subtle, but to play with stripes and break up the larger front panels. These fabrics presented the perfect opportunity.
Pattern: Grainline Archer Button-up
After my usual bout of extreme procrastination, I settled on the Grainline Archer Button-up as my pattern choice, one of the classic shirt patterns available online. I’ve also made this twice before – here and here.
This is a great pattern if you haven’t sewn a collar shirt before – or want to brush up on your shirtmaking skills. Grainline has an extensive number of free video available online, to walk you through the process, step by step. You can find them all online here.
Sleeves rolled up… because mine always are!Checked back and sleeves. Striped collar and yoke. Random thread which I noticed once i download the photos and the sun had gone down 😂.
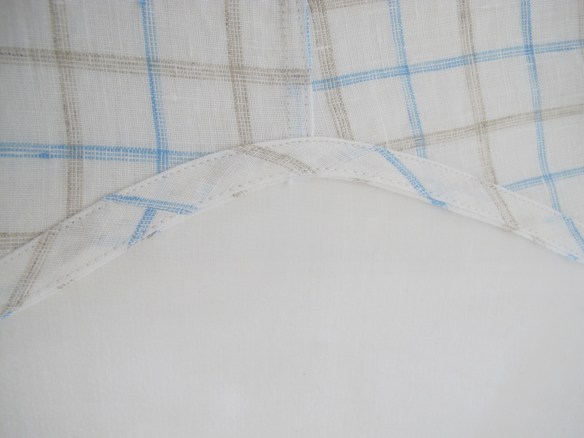
French Seams
This linen is very fine and well suited to French seams. This entire shirt is French seamed, the inside is immaculate (if I don’t say so myself!). The French seam finish isn’t part of the Archer instructions but a very easy seam finishing technique. There’s information aplenty out there about how to make French seams, including this post by Grainline Studios, so I don’t need to re-invent the wheel – or seam allownace as it may be – however here’s a little technique that I find really useful.
The Archer has a 5/8 inch seam allowance. To French seam this pattern…
Sew the first seam, wrong sides together, with a 3/8in seam.
Trim the seam to a very scant 1/4in – or about a 3/16in if you want to be very precise.
Press the seam open. This can be tricky when you have a hot, steaming iron and a tiny seam allowance. I’ve found if I use a seam presser tool, I achieve a much neater French seam. The Clover Finger Presser (see below) keeps your fingers off the fabric, away from the iron’s steam and helps gentle open the seam up while creating a nice gentle finger press. This technique works even better if you have been pressing fabric as the gentler heat of the board is very useful. Once the seam is open, I give it a light press with the iron and then use my clapper to set the seam open.
Then turn the fabrics right sides together. As you have pressed the first seam open, you will find it much easier to get a crisp, neat edge. Press.
Then sew a 1/4in seam, encasing the raw edges within.
Clover Finger Presser Tool – one of those weird tools you don’t realise you need until you own one. I got mine for $2 in a bargain bin… the only reason I have it!
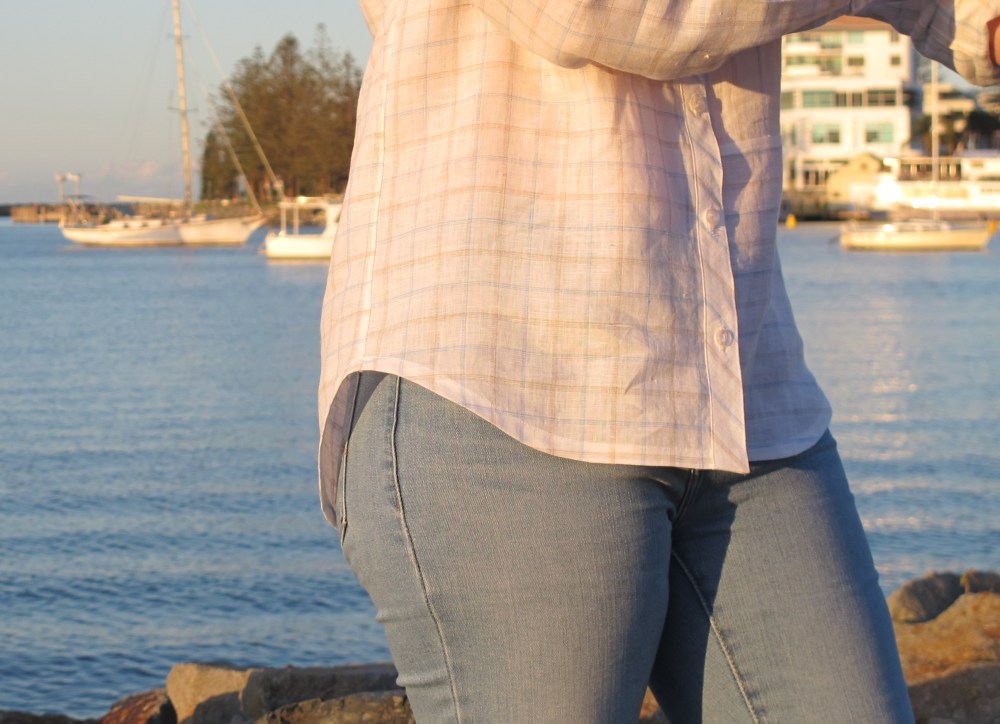
Bias Tape Hem
The Archer calls for a traditional double-turned 1/4in hem.
I did some research and opted for a bias tape hem due to the curved edge of this shirt pattern. This sewalong for the Closet Core Kalle Shirt/tunic is very useful if you haven’t sewn this hem finish before.
Bias Tape hem for the Archer Button-up shirt – soooo neat and flat!
I cut 1 inch bias strips from leftover fabric, joined them end-to-end to form a long strip and then used my Simplicity Bias Tape maker to create folded bias strips. This handy machine came back into production a couple of years ago and is a fantastic tool for the sewing room. I picked mine up on special and glad I did. It’s worth every penny.
I’m really delighted with this hem finish. It looks immaculate on the inside and outside – and the hemline sits perfectly flat. Well worth the little bit of extra effort.
Archer Button-up shirt with a bias hem finish
Small details
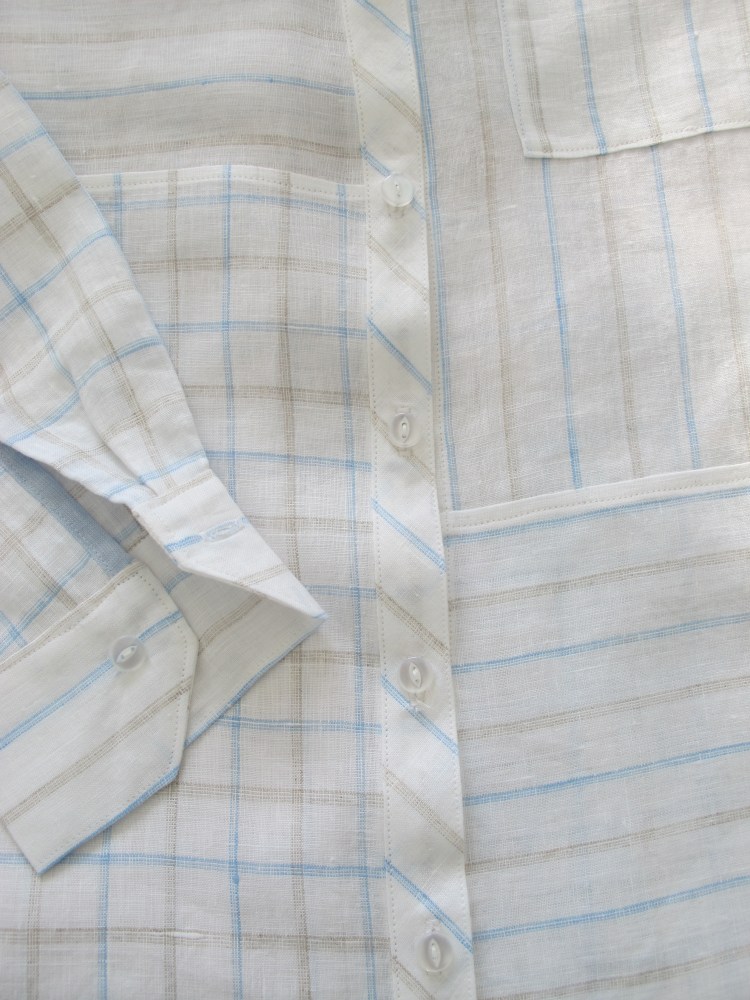
I was going to use just the checked and striped fabrics … but stumbled across a small sample of another De Linum linen in my stash which seemed like a perfect match, so added two very small touches, contrasting sleeve plackets and inner collar stand.
Contrasting inner collar and “one of the kind” label from Kylie & The Machine
I also cut the button band on the bias. The patch pocket appears to the pattern matched… and it is but I’ve offset it so the contrasting colours are matched. I decided on pocket placement while wearing the finished shirt, I attached it twice before I was happy.
Archer Button-up details. It looks a little hectic when you pause and REALLY look at it – but I think it works due to the subdued colour palette.
Minor pattern changes
I didn’t want to break the front panels at the bust point or under the potential pocket I might add. So I sliced the left front panel approximately 8 inches from the hemline and added 5/8 seam allowance to the upper and lower piece. I split the right front panel approximately 5 inches above this point and also added 5/8in seam allowance to these pieces.
I ran the stripes in different directions for interest and also used a check fabric piece for the larger lower portion. The yoke, collar and cuffs uses the stripe fabric. The sleeves and back are checked.
Archer Button-up – the finished product.
I absolutely loved making this. Considering how to use the fabric, sewing a step or two a day, researching how to better finish the garment – it was hugely satisfying. That’s the joy of sewing, not just the end product but also the process.
I don’t often toile my first-time pattern attempts. I tend to cross my fingers, send up a little prayer and hope for the best.
However when a first-time pattern calls for over 4 metres of fabric and the final fabric is absolutely scrumdiddlyumptious, I’m reluctant to risk destroying it in a risky game of sewing roulette.
Papercut Celestia Dress in cotton voile: a toile
So here we are in my toile of the Papercut PatternsCelestiaDress. 4m+ of some of the most extravagantly floral fabric I’ve worn! This fabric was an impulse purchase from the Spotlight bargain table for less than $4 a metre. I wasn’t quite sure why I bought it at the time, or why I thought 5m was a good idea and I’ve nearly destashed it several times… however here we are…
The Pattern
It a very straight forward sew. The bodice is very cropped and more of a ‘ledge’ for two tiers of fabric to cascade from. There are no bust darts or shaping.
I think the straps are too far set towards the sides. I’d bring them in approximately 10mm or slightly less next time. for some reason I thought I’d experiment with doubling the straps. While it’s got potential, the complex back tie arrangements needs more visual detail is not warranted.
Toile adjustment
The back ties…. I was drawn to this pattern because I loved the back view – however it’s my biggest gripe.
Fabric recommendations are mid-weight woven (cotton, rayon, linen and blends).
Papercut Celestia Dress – those back straps… not my friend. Also please ignore my bra back – I’ll sack the stylist… however I don’t have one to sack! And yes, there are pockets.
The straps definitely fell into a ‘call a friend’ category to adjust, pull in the back bodice to fit and tie the front straps evenly. I ended up fiddling and adjusting the straps myself before trying it on, multiple times. The back loops are one fabric strap, sewn into a casing at the top edge of the back bodice, with the ends pulled out at openings at either end of the casing to form loops. While I liked the overall effect, I found it very fiddly to put on to wear, and if I pre-organised the straps to fit, I found it tricky to get off over my shoulders. So much so, I popped the stitching holding the back strap loops in within the casing.
This could simply be an issue with my fabric having less ‘slip’ than other possible choices, the back loop didn’t want to easily pull through to gather up the back section between the loops and fit the bodice nicely to my upper bust.
To tackle this issue, I decided to secure the back loops at a set length and secured them with several machine stitches. I threaded a piece of elastic through the casing and pulled it up to my desired length to fit, and then secured the elastic ends within the casing with several rows of machine stitching.
I apologise for my lack of photos or illustrations to assist here – my phone app is not playing nice and allowing me to upload any more images. Next Celestia blog post, I’ll provide some more.
This adjustment has meant the design has lost its flexibility in determining fit for each wear, and potentially the ‘relaxed boho’ vibe of a looser back fit – however it pulls the bodice in firmly while still providing comfort. It’s also easier to put on by myself and easier to take off with requiring endless fiddling with the straps for every wear (tying a bow, while pulling up the back straps evenly with your arms twisted behind your back and between your shoulder blades is quite a challenge! I salute those who easily can!).
Papercut Celestia Dress – surprised at how much I like this very floral dress. Not my usual style but a change is always good!
Final thoughts…
I think I’ll risk my scrumdiddlyumptious fabric… I love the volume in this dress – and how it’s hanging from a cropped, fitted bodice. It’s got a lovely airy, careless, artless vibe when you are wearing it.
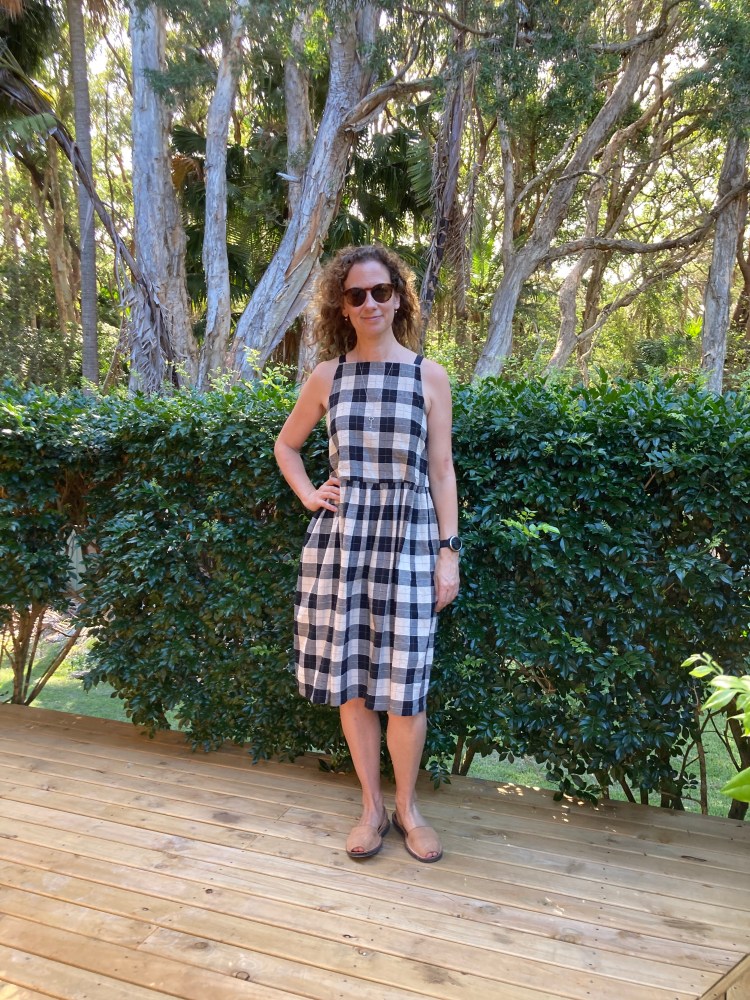
It wasn’t exactly what I had in mind… but sometimes you just gotta roll with what you’ve created and make it work. These photos taken on my back deck after a work-from-home day and in the midst of a horrendously disruptive and dusty kitchen demolition project.
I’m extremely weary. Christmas, a very large tree branch landing on my roof and cracking tiles, back to work and a kitchen demolition/renovation … it’s been a hectic few weeks. So if this lacks detail… or fails to make sense… I apologise.
“If Romy Was A Dress” she might have been a Gorman. This dress style is reminiscent of the iconic Australian brand which favours simple dress shapes which let the fabric sing – which are often artist collaborations. Google ‘Gorman Afternoon Tea Dress’ to see what inspired this dress.
The Tessuti Romy Top has been popular as a ‘dress hack‘ and it’s easy to see why. If Lisa’s gorgeous version a few year back wasn’t enough to seduce you – then the floaty summer dresses of late in stores might now.
Inspired by a Gorman dress from a few season ago, when I spied this delicious textural domino check at Minerva’s Bower I jumped at the opportunity to turn an idea buzzing around in my head into reality.
It’s more cream than white ‘in real life’ – link to site provided below.
I had Romy in my stash and had made it in a linen remnant when it was first released. The fit was good and I like how it’s a slip-on top with no zipper/buttons required. Sorry my photo opportunities and blogging is sorely lacking these days!
So I tried on my top, decided where I would like my dress waistline to be and added 1/2 inch seam allowance.
I only lined the bodice as I knew the waist ease would make the skirt voluminous enough.I hand stitched the lining to the waist seam. I love a tidy finish.
I used the outer bodice pieces as the lining pieces. I lined it with black lawn as the shepherds check is fairly textured and two layers would have added too much structure to the garment which already was going to have significant ease around the waist.
Inspired by the first Romy dress hack, I also used grosgrain ribbon for my shoulder straps. I made this during lockdown so I was just lucky to have some in my ‘stash’ to use.
Romy dress, back view
For the skirt, I used all of the remaining length, cut it in half lengthwise, sewed the two pieces together (selvedge a to selvedge a) and then gathered the full width of the fabric onto the bodice. I hand stitched a tiny hem to get the most out if the fabric length.
A narrow hand-stitched hem.
I wished I’d purchased 2m or slightly more instead of 1.75cm and this would be a tiny bit longer… but hindsight is a wonderful thing and the dress is lovely nevertheless. So after cursing myself for several months… I’ve forgiven it for my Scrooge-like purchasing and have finally decided I like it after all! How the checks met between the bodice and skirt does irritate me a little – but I’m learning to embrace my frugal habits and what comes with them!
If you put your hands on your waist… it doesn’t look quite as roomy as Romy can be!
I’ve well and truly embraced dresses with lots of ease, perfect for humid summer days… and just feeling comfortable and relaxed in, I struggle to imagine reverting to fitted styles now. Perhaps it’s the Covid lockdown, work-from-home lifestyle. Maybe it’s my age. Either way… I’m comfortable and relaxed – and happier.
Romy dress, side view – if you are seeking a waist-enhancing frock… this may not be for you!