Perfectly plain ‘Flared Pullover’ blouse – Clean and Natural

Now for an exceptionally simple top!

Flared Pullover from Clean & Natural (Japanese sewing book)

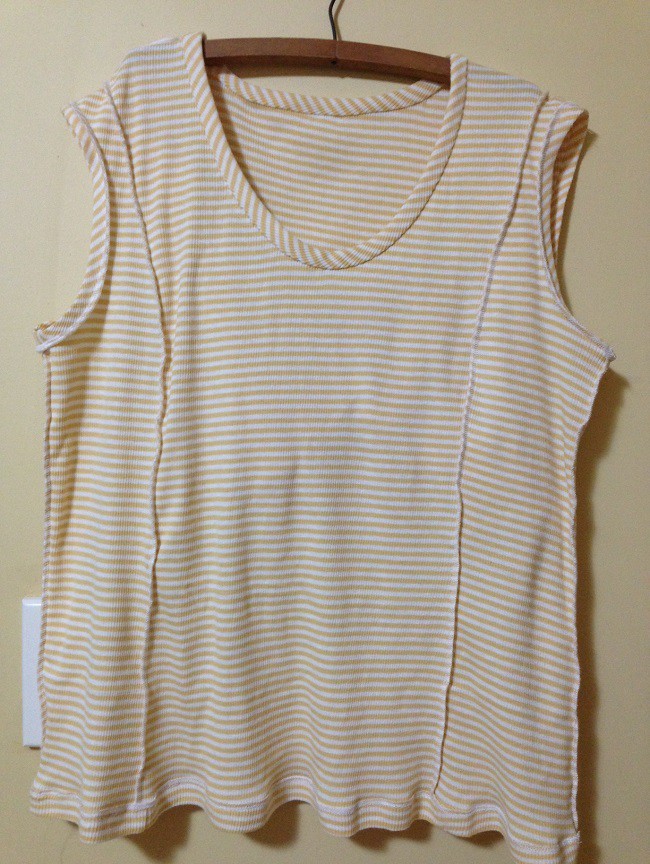
Flared Pullover from Clean & Natural (Japanese sewing book). Sewn in a light embroidered cotton.

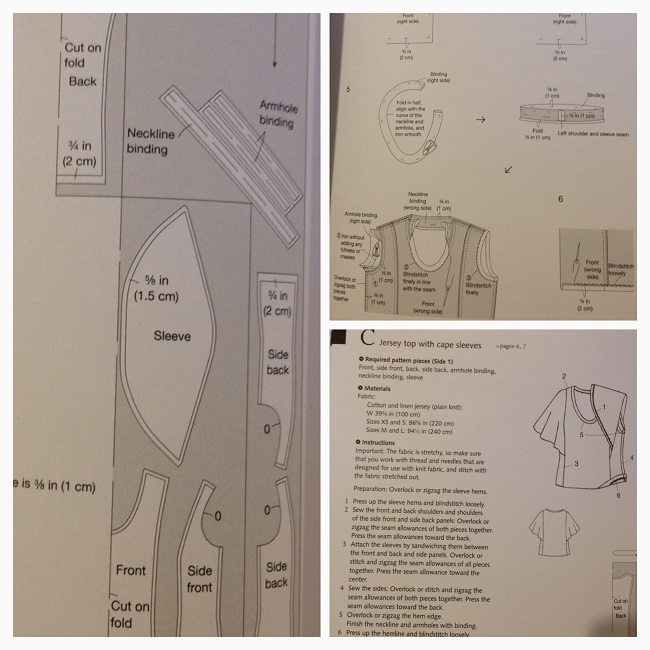
This is my first ever make from a non-translated Japanese sewing book – and I thought it best to pick something really simple to get a feel how I would go just using diagrams – no instructions! Bingo. Successful top. This little pullover top has four pattern pieces, front & back yoke, front and back body piece. I did get a bit confused – I blame tracing the pattern at 11pm – and added the wrong seam allowances to the neckline and sleeves. Fortunately I noticed this before I cut it out and all’s well that ends well!

Curved yoke, Flared pullover from Clean & Natural

I love the gentle curve of the yoke.

I chose not to cut ‘self’ bias binding for the neckline – the embroidery on this fabric is quite heavy and chunky to sew through. I did not see a Battle of Bias being won by me. I used purchased white bias binding instead. I didn’t like how I could see the bias fold when I turned the binding to the inside (picky much Lizzy??). So I doubled it over as I folded it to the inside and achieved a very narrow neckline hem. This fabric is very sheer, a beautiful embroidered cheesecloth (?) style fabric from the only indie fabric store (for dressmaking fabrics at least) in Port Macquarie. Due to the fabric’s sheer nature I also chose to keep the sleeve hems minimal as I felt the slightly wider recommended sleeve hems would have looked heavy and out of balance with the neck binding. I didn’t French seam anything as the fabric is quite lumpy. Just sewn and then the seams overlocked together, rather than pressing the seams open and flat. In these photographs I’m wearing it with a ‘nude’ camisole – and always will for obvious reasons (unless it’s thrown over the top of swimwear!). top1 
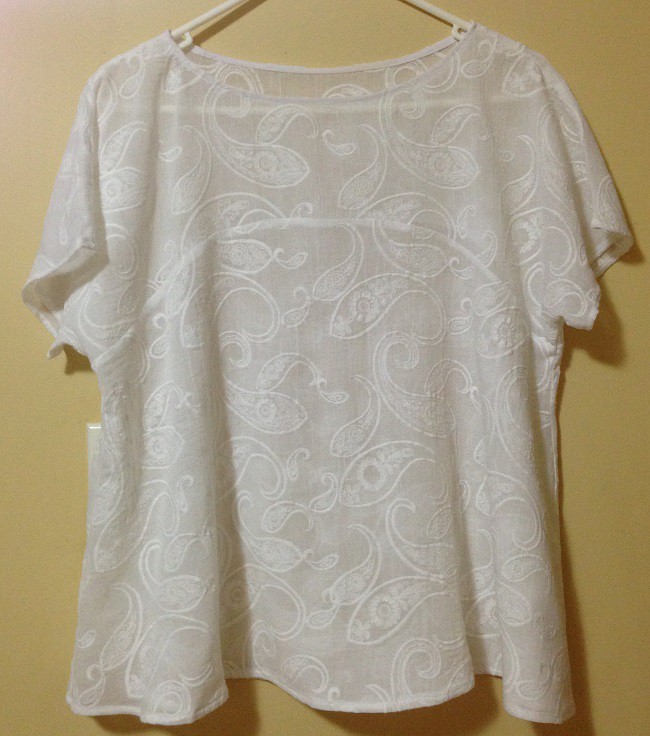
I must say, I do love this top. Yes it’s not sewing rocket science but it’s beautifully simple and easy to wear. It will get worn a lot as a result! I love the curved yoke and easy fit. It’s just ‘clean and natural’ in keeping with the book title. I do prefer simple tops with yokes, rather than the fabric just falling from the shoulder, I like the fit across the shoulders and upper chest, rather than just loose everywhere. Top 1 - Clean and Natural 10 The flared style of the lower section is just lovely. I love how the back falls below the curved yoke. Top 1 - Clean and Natural 2 Top 1 - Clean and Natural 1 Not much else to say about this basic top.

Clean & Natural - a Japanese Sewing Book (untranslated)

Clean & Natural – a Japanese Sewing Book (untranslated)

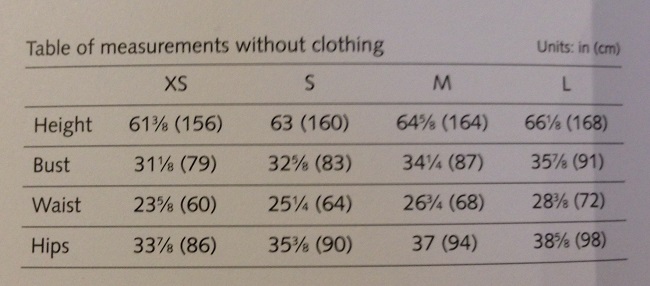
This book has patterns drafted for women 160cm in height, bust 79-91cm, waist 60-72cm & hip 86-90cm. Here are the makes from this book Clean & Natural. The designs are predominantly simple in nature and like Burda Style several makes are variations on a style – this top also has ‘cousins’ in a longer sleeved top, a dress and a long-sleeved long dress. makes3 
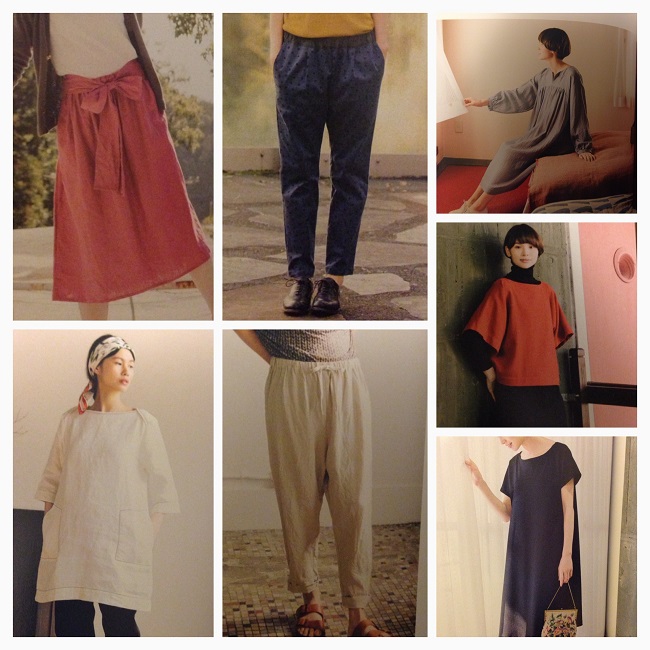
The orange top has my name on it – perhaps in an emerald wool crepe I’ve been hoarding! makes2
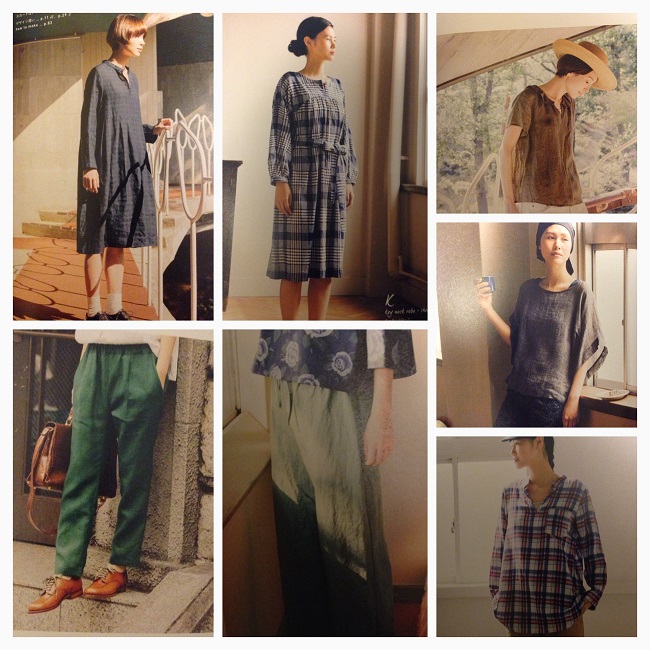
I do like that simple plaid shirt with a collar stand and placket. I can see me wearing that a lot! makes 1 Please pop over and visit Japanese Sewing Books – this is a great resource for these books. She has reviewed this book in full here. makes4 
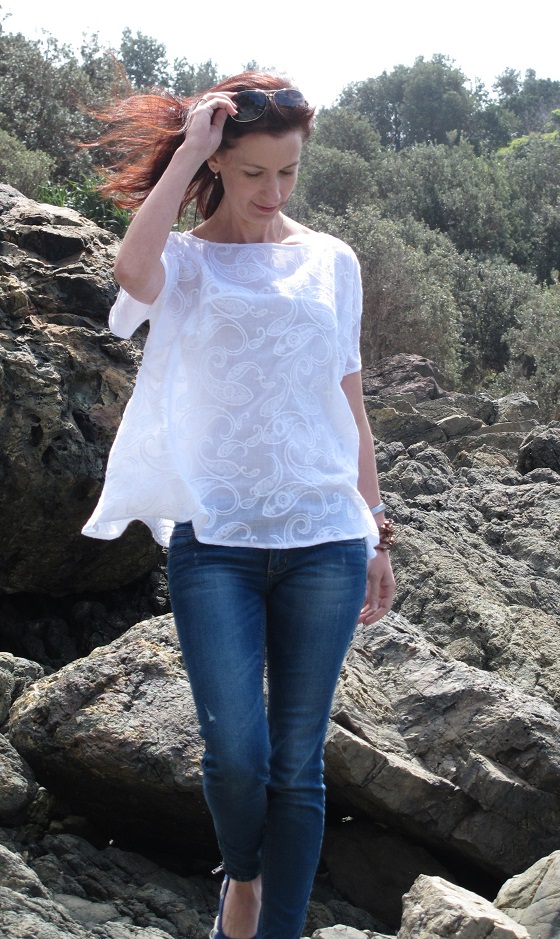
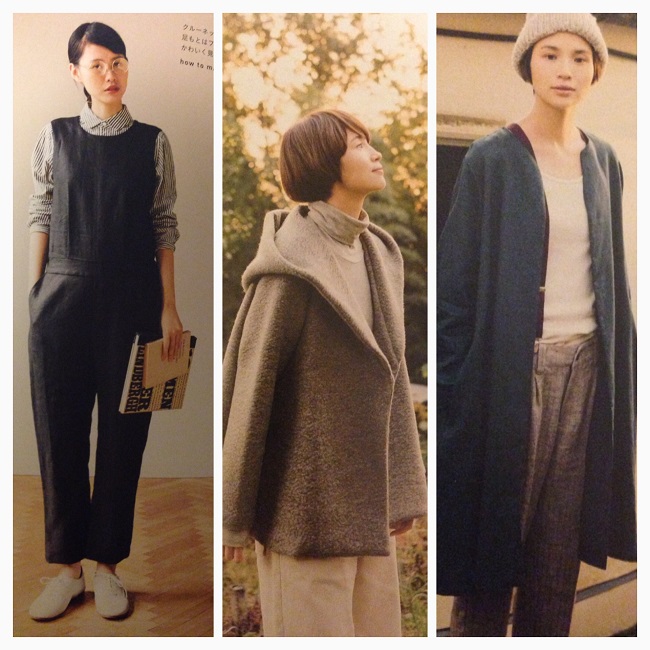
I confess I fell hard for this book when I spotted the hooded coat. I need that in my life! Whereas it was the onesie that sent Top Notch scuttling off to the bookstore when I was showing off my purchases at afternoon tea prior to Frocktails in September (I can confirm she is just as fabulous and stylish IRL, note: she would never scuttle just glide in some uber-fab heels).  Thank you to the lovely Kat of All the Whimsical Things who was not only my roomie for the weekend but also Ms Frocktails herself. She’s a beautiful soul (and is a true fabric enabler!). This was photographed on the same day as the Japanese t-shirt and the koala hunting trip – the kids asked to go to ‘the rocky beach’ at lunchtime so we took the opportunity to take these snaps while the kids searched for shells and pretty rocks on this little deserted part of paradise. Gotta love Port Macquarie. Pattern: Flared Pullover from Japanese sewing book ‘Clean & Natural’ purchased from Kinokuniya, Sydney Fabric: Embroidered cotton.

A Flutter Sleeve T-Shirt from Casual Sweet Clothes

AKA The Everyday Caped Crusader Tshirt!

This book was reviewed on a few blogs recently – and I wasn’t totally convinced. Then I went to Sydney for Frocktails, visited the most amazing bookshop… flipped through it and I had to have it. I could have bought all the Japanese sewing books but I do try to exercise some restraint… sometimes…

Totally unplanned picture - but seemed too perfect! A Superman Koala on our Town Green (which comes with a bonus waterfront!)

Totally unplanned picture – but seemed too perfect! A Superman Koala on our Town Green (which comes with bonus river frontage). All credit to Miss 9: Posing Supercoach

I’ve always been fascinated by Japanese arts & crafts – the design, quality, attention to detail and workmanship are exceptional. My first love was via patchwork and quilting. Sewing clothes has opened up a new world of Japanese indulgence for me.

Warning: loads of pictures in this post as I’ve decided to review the book (note: it’s my book, purchased with my own funds. I just found the adventure interesting and decided to share it with you).

Earlier this year I went on a Drape Drape binge with some rather unusual pieces (here, here, here, here and here) – the pattern pieces and construction fascinated me. I am keen to make some more.

Now I am equally fascinated by the stylistic simplicity of the ‘other sort’ of Japanese pattern books. Sweet Casual Clothes seems to fall into what I’m starting to consider the Japanese ‘everyday’ clothing aesthetic.

Casual Sweet Clothes

Casual Sweet Clothes

While I love a good complicated sewing project and my work wardrobe is quite structured, I love to wear very simple casual clothes with clean lines. Fortunately for me I fall into the Japanese size range, I’m a medium tall and Japanese size small in terms of body it seems.

I’ve decided to share images of the clothes that you can make from this book and show you the sizing chart (I get asked this frequently about Drape Drape books and it’s a very valid question if you are thinking about buying a Japanese sewing book). I do find buying patterns books online un-nerving as they can be an unknown quantity, you rarely see all of the makes. I did purchased Basic Black: 26 Edgy Essentials and was a little disappointed with it – mainly because all the makes are black and it is harder to see details which is frustrating for a line art junkie (the garments are shown in the instructions but not as well as I like. Which naturally means I am now determined to make some of these clothes and like them – I’m contrary like that.). So I’m hoping some of what I share might be helpful to you if you have hovered on the brink of indecision with this book.

The sizing chart (I love the ‘without clothing’ reference):-

Casual Sweet Clothes: Size Chart

Casual Sweet Clothes: Size Chart

And most of the projects (I’ve omitted a simple lace trimmed cami and a pair of shorts)

A casual jacket, tiered skirt, lace skirt and long-line jacket

A casual jacket, tiered skirt, lace skirt and long-line jacket

Love this braided edge denim jacket, a bolero with a flounced edge and a very sweet short, flared coat

Love this braided edge denim jacket, a bolero with a flounced edge and a sweet short, flared coat  (I want to make all these jackets!


A lace trimmed shirt, a very simple sacklike black dress (but I love that lace trimmed sleeve) and a plain white top with tied shoulders

A lace trimmed shirt, a very simple sacklike black dress (but I love that lace trimmed sleeve) and a plain white top with tied shoulders

Casual ribbon trimmed pants, a simple shift and an embellished wool vest

Casual ribbon trimmed pants, a simple shift and an embellished wool vest

A flutter sleeve shift, a simple colour-block shift and a jersey flutter sleeve top.

A flutter sleeve shift, a simple colour-block shift and a jersey flutter sleeve top.

In the interests for time, I’ve snapped these on my iPhone and used a photo composite app to create these images to give you a rough overview.

Instructions? They are quite Burda-like. They are brief but accompanied by diagrams. Beginners may find the brevity a little daunting – however when you begin you don’t know what you are missing so perhaps not! I tackled a Burda project early in my sewing days and managed just fine!

Casual Sweet Clothes: a snapshot of what you can expect instruction-wise

Casual Sweet Clothes: a snapshot of what you can expect instruction-wise

The Patterns? You need to add seam allowances – they recommend 1cm, however if you prefer a different seam allowance you can easily use your own. You can see on the pattern layout that it indicates when you should vary the allowance – generally for hems. (LOL I’ve just noticed that it doesn’t indicate any seam allowance on the armholes of this top… I added them but it doesn’t seem to matter on the finished make.

I do find these pattern sheets much easier to trace then Burda – they are not so cluttered and there are less sizes. In some cases the XS-S are combined and so on. I also use lightweight white plastic ‘party table cloth’ to trace my patterns which is very easy to see through. A tip I picked up from Handmade by Carolyn.

My Make

I chose to make up the jersey top in small. It reminded me of the Sewaholic Pendrell which I have made before and liked. This top has more aeroplane-worthy wings!

The stash spat out some ribbed white/lemon knit for this make. I have never, ever worn yellow before. Seriously. I am surprised that I quite like this soft shade on me (a lifetime of avoidance for no apparently reason it would seem).  The fabric was the devil itself. The rib texture made hemming it impossible. Yes, I used fusible hem tape and it is still a mess and all ‘fluted’. The shirt itself is loose and I can live with it.

To be honest I thought this might be too feminine and theatrical on me. I’ve never been a fan of fuss however I was surprised when I put it on. I really do like this top. I’m also pretty happy with the sun protection factor it offers!

Side view - without the flappiness

Side view – without the floppiness

The instructions to attach the neckline and armhole bindings seem unnecessarily fussy to me. I did attach the neckline in the manner instructed (attach one long edge and then fold the other raw edge to the inside, tucking over the seam allowance and slip stitching it in place on the inside – I’ll admit it does give a nice finish – fiddly though!). I choose to attach the armholes bindings in more of the Sewaholic Renfrew manner – fold the strips in half wrong side together and attach them to the right side of the armhole and then press the seam to the inside (does that make any sense??).

the insides

the insides – hard to photograph neatly as you need to keep the wings kept in and they rather dislike the coathanger!


Preparing for take off - side view in the coastal breeze

Preparing for take off – side view in the coastal breeze

I also decided to roll hem the ‘wings’ – which was an excellent decision after the hemming disaster of the lower hem! I decided that a hem would add weight and change the fall of the fabric – so I omitted the 1.5cm seam allowance indicated on the layout and just finished the edge with a rolled hem (if you are wondering how to do this, I blogged about it here… it’s very easy!)

side/back view

side/back view

Front view - the hem is hideous. I love this fabric but it was a b*&ch to sew.

Front view – the hem is hideous. I love this fabric but it was a b*&ch to sew – stretched out beyond belief. I had to use the twin needle on my Bernina to hem it as the coverstitch just gobbled it up!

VERDICT?

So all in all – if you like this simple feminine style and you are in the size range or awesome at resizing patterns, this book could hold some appeal for you and be a good investment. I do find Japanese patterns to be very generous – or perhaps not as body conscious as our usual style of fit. For the $20 – $30 it might cost you, you get quite a lot of patterns.

I’m surprised and happy with this make. I made it because I was curious about such a style on me – and discovered that while I might have walked past it in a store, I do like it on me. Yay for sewing and experimenting. I did try it on with my navy Hollyburn and my husband promptly told me I looked Amish. While the Hollyburn gave it a ‘waist’ it also dramatically shortened my frame visually. I think the volume of the top works better on me with skinny jeans and makes it look modern rather than blousy and old-fashioned.

Next up on the blog will be a top from a Japanese sewing book – which hasn’t been translated!

WHAT’S WITH THE KOALAS?

What’s with the koalas? It’s the Hello Koalas Sculpture Project. We currently have 50 of them scattered about the region, the majority of them located in Port Macquarie’s town centre. We took the kids on a koala spotting adventure on the weekend. They adored it. You can see all the koalas here. Yes, it is a pretty nice place I live in…

Loved this little guy... in fact they are all quite fabulous in their own way!

Loved this little guy… in fact they are all quite fabulous in their own way!


The Girls’ Road Trip & Little Truck Stop Tops…

I love my girls. Love them. They are beautiful and funny – but more importantly they are sweet-hearted human beings. I always imagined being a mother to boys – but life had other plans and I’m more than OK with that.

This post seemed timely as I’m actually solo with the girls at the moment as the husband is away in Malaysia fishing (no he didn’t fly with Malaysia Airlines) until mid next week.

My girls... Giselle and Zoe - the very best of friends

My girls… Giselle and Zoe – the very best of friends. Just a random shot one night when they were being funny and sweet to each other. I love the spontaneity and love in this shot.

I made them some tops for the girls earlier this year – then I lost my blog drive (now recovered – and I save everything to Google Drive now!). It’s on the long list of things I need to blog about… and I’m finally getting there… unfortunately it’s been a long hard road this year, in every sense – but I will get there.

It’s The Little Truck Stop Top by The Makers’ Journal from Stitch56 (and sent to me by Stitch 56). It’s such a simple little pattern – perfect for using up your scraps and sending the kids to the remanent bin to find fabric for their next one! More about the make later in the post.

It’s so cold this winter and I need to channel some virtual sunshine into my life – so here they are. And I’ll probably be making more this spring and summer for them.

girls5

The crazy kid on the left is Giselle – she is going to need a riot squad as a chaperone when she grows up. She is a beautiful, generous soul with a wicked sense of humour… She ‘brings me back’ with a hug and a kiss when ‘Mummy looks far away’. I’ve always described her as the child that God trapped a ray of sunshine inside and it’s so true. She was an adorable little tot, always giggling and smiling… and making me giggle and smile… she still does…

giselle at 3

She’s always been so joyous…

Giselle 2

this one kills me every time. So beautiful.

… and the one on the right is my ‘big girl’ Zoe Rose. She’s so sombre and serious at times. She saves her money – and buys shares as investment… she’s a beautiful dancer… she studies hard… she’s one of the most driven individuals I’ve ever met. What makes me most proud? She stands up for the kids that can’t stand up for themselves, even at her own personal expense. She’s got opinions about bullies, boat people, gay marriage and discrimination. She’s quietly extraordinary. The world needs more people with big hearts and open minds like my beautiful, brave Zoe.

zoe ballet

She’s amazingly poised & elegant for her age

Zoe ballet 2

I’m terrified of her growing up, she’s too gentle & soft to get her heart broken.


The LITTLE TRUCK STOP TOP by The Makers’ Journal

There is always water somewhere nearby!

There is always water somewhere nearby! People get married every weekend at this beautiful place and now padlocks are appearing on the wires with the couples’ names engraved on them.

Such a simple and quick little make this Little Truck Stop Top – these will pop up a lot in their summer wardrobes. They are loose through the body which makes them cool and easy to wear – and hence very popular with the girls. Zoe also loves to throw her top over her leotard between dance classes.

I opted not to attach the frill to the hem – my girls are not the frilly types. While Zoe may dance obsessively, she’s got a rock ‘n’ roll, boho personal style thing going on (she loves leopard print and wears a fedora in summer) and Giselle is a low-fuss gal. That said, I think the frill is gorgeous – but perhaps on girlier girls than mine 🙂

Once you attach one edge of the binding strips to the arm and neck you then leave the other edge raw. It creates a really cool little finish as the binding curls over a little. Making the tops look a little bit cool’. The hemline is just finished with the rolled stitch on my overlocker. They take no time to make and kids love them.

With Zoe’s top I rolled the binding over on the sleeve edges as an experiment to see what a clean edge would look like. I prefer the raw edge finish TBH.

Zoe is tall and very lean, so she wears her top with a singlet underneath (she’s also a layering junkie like her mother – must be in the DNA).

The pattern is beautifully presented. It is vacuum packed and printed on environmentally friendly recycled paper. It’s also got detailed instructions and comes complete with some fabric swatches so you know that types/weights of fabric will be suitable. You can see the packaging here on the Stitch 56 site.

girls4

We recently had a road trip together, just the three of us. We had such a lovely time… we did the much-wanted trip to Dreamworld… which despite all the anticipation wasn’t quite what they hoped… although we had lots of laughs which I needed…

Giselle Dreamworld

Yes, Giselle is always slightly crazy…

girls dreamworld

I couldn’t figure out if Giselle was trying to save Zoe… perhaps not…

and the things they loved the most on the road trip?

Staying on the top floor…

I confess I wasn't a huge fan of the 'water view', the river is brown #spoiltcoastal girl

I confess I wasn’t a huge fan of the ‘water view’, the river is brown! #spoiltcoastal girl

Walking along the river at night…

They loved our evening walks - there was lots of games and giggles.

They loved our evening walks before dinner – there was lots of games and giggles.

Visiting my grandfather’s house Glengallen (my grandfather was born in this house) near Warwick on the Darling Downs in Queensland…

I was always captivated by this house growing up - it was amazing to walk through the doors and see it partially restored.

I was always captivated by this house growing up – it was amazing to finally walk through the doors and see it partially restored. As a child I had only ever seen it derelict with the verandahs collapsing and windows smashed. I had always wondered about the house & the lives lived here – it’s just magnificent, I’m so glad we visited.

Horseriding for the first time…

I was shivering behind the canera - so cold! Thank goodness my cousin Megan is made of tougher stuff than me. #spoiltcoastalgirl

I was shivering behind the camera – so cold! Thank goodness my cousin Megan is made of tougher stuff than me. #spoiltcoastalgirl

Staying in a little tiny cottage – even though it was freezing cold…

Yes, let's all play spot the 'townie girl' car.

Yes, let’s all play ‘spot the ‘townie girl’ car’. I stayed in this cottage often as a child. It was referred to as Camp David. LOL. It’s been spruced up and there are even stairs into the cottage – I used to clamber up via a big rock – which was quite a feat… I was absolutely tiny as a child.

Feeding beautiful birds on a cold winter’s morning…

Rosellas at Queen Mary Falls

Rosellas at Queen Mary Falls

They are already talking about going back…

like the Little Truck Stop Top… the simple things in life are the best…

Thanks for reading 🙂

MAKE DETAILS
Pattern: Truck Top Tee, The Makers’ Journal from Stitch 56
Fabric: remnants from Spotlight & Lincraft!

I love this dorky picture - it's just happy.

I love this dorky picture – it’s just happy.

and beautiful morning view at the holiday cottage…

Such a beautiful cold clear morning... although they need some rain...

Such a beautiful cold clear morning… although they need some rain…


How the Battle of Silk Charmeuse was won – Mood Fabrics – Simplicity 1424

I’ve travelled the silk road with a length of divinely lovely amethyst silk charmeuse from Mood Fabrics NY – and returned with a rather wow-factor top to wear with jeans (as you do)…

For a remarkably simple looking top, this took me a loooonnnng time. However it was an interesting sewing journey and I’ve learnt a lot more about silk!

Simplicity 1424 in silk charmeuse

Simplicity 1424 in silk charmeuse

This is my second make for Mood Fabrics Sewing Network and my first ever with silk charmuese.

I’ve always been most curious about sewing with silk. You hear such nightmare stories. I have sewn with silk cotton blends and found them delightful so I had some degree of confidence that silk charmeuse could be conquered.

I had originally planned to sew a long, draped evening dress but I decided that I might appear to be drowning in a tidal wave of purple so I decided to sew a shorter dress and settled on Vogue 1344. It lists charmeuse as one of it recommended fabrics. I cut out the bodice pieces and spent eight hours sewing the lined bodice over two days… and I wasn’t happy with it. The pleats were not behaving and I felt the fabric was not right for the pattern. I could have solidered on but decided to take a different approach.

Then I did what I should have done in the first place – I patted the silk, ran it through my hands and draped it over my shoulder. Obviously what silk charmuese wants to do is drape… so I set about finding a relatively simple pattern which would let the fabric do the talking – too often we look for complex patterns – however the simple fact remains often the simplest shapes and designs showcase beautiful fabric the best.

Simplicity 1424 in silk charmeuse from Mood Fabrics NY

Simplicity 1424 in silk charmeuse from Mood Fabrics NY – I really should have given that side seam one more press with the iron!

I settled on Simplicity 1424 – described as a ‘top with back interest’ and recommends ‘silky types’. The back has a dramatic cowl back and the front has an upper layer which provides a double layer of fabric and creates a sweet doubled ruffled/fluted hem effect.

I only used 1.2m of silk to make this top. This pattern also has a cute little swing top that isn’t quite as revealing as this one – it uses even less fabric!

This time I did a few simple things which improved my sewing results enormously – and since this project is all about the fabric I’m going to share.

FLAT PATTERN PIECES

I used some ‘Crafting Trace & Toile’ – it was from my ‘stash’ and is sold alongside interfacings generally. I traced the pattern pieces onto the Trace & Toile as if I was cutting out fabric – and created full piece flat pattern pieces. This enabled me to more easily lay out the fabric as a single layer – no cutting on the fold. This technique meant the silk could move around a lot less.

Flat Pattern pieces for sewing with silk - Mood Fabrics

I created full pattern pieces to avoid cutting the silk on the fold.

NO PINS WHEN CUTTING

The ‘Trace and Toile’ is slightly textured and tends to grip the fabric a little. This also negated the need for pins – which I had found tricky with the Vogue 1344 pieces that I had cut… pinning the pattern pieces caused the fabric to shift and slide – very frustrating!

Glass tumblers as pattern weights

Heavy Glass tumblers make excellent pattern weights… I would not recommend draining them of whisky before one starts cutting silk. Just sayin’

I used some glass tumblers from the cupboard as my weights. This made the cutting process so much easier and more accurate. The glasses are also very heavy and smooth which was perfect for this purpose.

ROTARY CUTTING

I often tell people that a big cutting mat and a rotary cutter is an excellent investment – never more so when sewing with silk!

SEWING SIMPLICITY 1424 IN SILK CHARMEUSE- some tips

The Straps

For the straps I decided to block-fuse a piece of the silk with a very lightweight fusible interfacing. This made the straps a little more stable, lie flatter once ironed and were also also easier to turn. Rather than using the cut edge as a guide when sewing, I used the folded edge – doing this means that your straps will be the same width for the full length of the strap – which I think is more accurate than relying on the cut edge as a sewing guide.

Sewing narrow straps with Mood Fabrics

Using the folded edge of the strap as a sewing guide to achieve a consistent strap width.

I never use a loop turner, for narrow straps a bobbin pin is perfect. I cut a small slit about 1/4inch down from the end of the sewn tube. I then slide one side of the bobbin pin into the slit and the other into the tube itself. You then gently wiggle the end as begins to turn itself into the tube and thus the right way out. It does take a little patience to get the tube to start to turn but once it does it is quite simple to slide the bobbin pin along the inside of the tube – in the same way you thread elastic through a casing using a bodkin or a safety pin.

Turning narrow straps with a bobbin pin

Turning narrow straps with a bobbin pin

I left off the lingerie slides and made my straps a fixed length. I choose to do this as I think it would have make the straps ungainly and bulky. The silk charmeuse is silky soft and the lightweight interfacing means they lie beautifully flat on my shoulders.

Hems

The hems – I do have a rolled hem foot for my Bernina – however this silk charmuese simply did not want to obey and feed through the foot consistently. So I elected to do the three-step rolled hem manually. It does take a lot longer however there is a great degree of control which I think it great for this type of fabric.

I’ve sewn hems using this technique several times – however if you are new to this – check out the Craftsy Blog’s online tutorial for some help. This is better than the method Simplicity recommends for this particular fabric, essentially Craftsy has you stitch one extra row but the results are worth it.

Strap ‘Interest’ Variation

This pattern has fabric straps running horizontally across the front and back straps. I decided to leave off the front strap and replace the single back strap with very fine chains of different lengths so they fell in waves down my back – mimicking the flowing folds of the silk. I simply attached a metre/yard of fine chain to a jump ring on one of the lingerie circles and then across to another jump ring on the opposite shoulder’s lingerie circle – going back and forwards with the chain becoming increasingly longer.

So there you have it. A cute little cami with a little bit of wow at the back… in divine silk charmuese from Mood Fabrics NY. If you haven’t tried sewing with this type of fabric – you really should. It feels like water running across your skin.

Simplciity 1424 with Mood Fabrics Silk Charmeuse

A deceptively simple cami in Mood Fabrics silk with a little bit of WOW

Fabric: Amethyst Solid Silk Charmeuse from Mood Fabrics
Pattern: Simplicity 1424


JEANS IN JUNE & JULY! Update
Blog post coming very very soon – I’ve started a pair… made some blog buttons and half written a post. So sorry – life has been a runaway train at the moment.

Rum Tum Tugger Summer Concert Tee & the PATTERN PARCEL

While every sewing blogger seemed to be madly sewing Plantains (which is lovely!) I just couldn’t stop thinking about the Summer Concert Tee… and it made me feel like a right Rum Tum Tugger… what was wrong with me?? Plantain is French, chic, I downloaded and printed it… and still I wanted a Summer Concert tee.

I love all types of clothing – I am a true wardrobe eclectic… and in my spare time… I am a denim/khaki junkie & often a slouchy mess – I love edgy, I love grunge and I love casual. Remember, SewBusyLizzy does love to have her shoes off… Summer Concert Tee seemed so very me.

…and funnily enough days later it landed in my inbox courtesy of the brilliantly clever Perfect Pattern Parcel. Of course I immediately made two Summer Concert tees – in two evenings… because that is the SewBusyLizzy way… go hard or go home.

The classic red striped version…

Dixie DIY Summer Concert tee - the classic version

Dixie DIY Summer Concert tee – the classic version

Dixie DIY Summer Concert tee - the classic version

Dixie DIY Summer Concert tee – the classic version side/back view

and then there is the lace-back version – I made this from a piece of left-over Japanese rayon knit and some lace from a remanent bin… which I had considered binning but rather glad I didn’t.

Dixie DIY Summer Concert tee - the lace backed version

Dixie DIY Summer Concert tee – the lace backed version (yes, yes, you will see the lace soon)

Dixie DIY Summer Concert tee - the lace backed version

Dixie DIY Summer Concert tee – see there’s a little bit of lace…

Dixie DIY Summer Concert tee - the lace backed version

Dixie DIY Summer Concert tee – there it is!

and a naughtier/younger version of me might have worn it like this…

Dixie DIY Summer Concert tee - the lace backed version

Dixie DIY Summer Concert tee – the lace backed version – this one is for Sown Brooklyn and crew’s Sew Sexy Sewalong!

It’s a tee – easiest thing in the world to sew. I did cut my own neckbands without the pattern piece as it looked a little short. With the lace version, I simply roll-hemmed the edges of the sleeves and lower hem with my overlocker. I also decided to let the double layer sleeve hems hang separately as I liked the softness of them. I also used a doubled over strip of the Chantilly lace to bind the neckline. It’s super girly.

I’m actually smaller than the smallest measurements for this tee by 2 inches… so it’s very roomy – but I love it to pieces, it’s so very easy to wear and layer… there will be many more!

I’ve worn these ever since they came off the machine. LOVE.

Parcel 1 Collage

And in the first ever Pattern Parcel you get FIVE patterns…

Personally I’ve been dying to make the Lady Skater to slouch around in at home. And Ava has been ringing my bell but I want to make her grungy because she’s so very pretty and I like a bit of ‘nasty’ with my ‘nice’. I’ve made the Dandelion top (which is very different and a great project to make and wear) – and heck who doesn’t need a bag? My girls seem to think bags are required in double digits.

ABOUT PATTERN PARCEL

Now we all need MOAR patterns in our lives – am I right? Great news, Pattern Parcel is the perfect solution for you! So what is Pattern Parcel?

About Perfect Pattern Parcel:
Put together two entrepreneurial makers driven by their internal voices and one self-taught hacker with an “if you build it, they will come” mentality, and Perfect Pattern Parcel was born. We are passionate about supporting independent designers in their craft and fostering a community of makers to grow. Our mission is to offer high-quality pdf sewing patterns written by indie designers while supporting children’s education.
About Donors Choose:
Donors Choose is an organization that matches up the needs of teachers and their students for specific projects with willing donors. The funds raised from each Pattern Parcel sale will go to help K-12 students in minimizing educational inequality and encourage a community where children have the tools and experiences necessary for an excellent education.
About Parcel #1:
Pattern Parcel #1 includes sewing patterns for women that are modern classics, featuring both flattering silhouettes and garments that are comfortable to wear. From a new little black dress to weekend play wear, the patterns in Parcel #1 have got you covered.
Support Indie Designers
Independent designers create patterns that are innovative, imaginative and in line with current style trends. Their patterns encompass a broad range of sizes and fabulous “out of the envelope” fit because they’re thoroughly tested by real people. With detailed and well-explained instructions, these patterns often teach as you sew. Independent designers are approachable, providing support, suggestions, publishing additions to your favorite designs, and hosting interactive sewing events. When we are patrons of indie designers, we are supporting small, mostly women owned, businesses. We are developing the community around us. We are helping to making dream come true.
Now the really cracking thing about this deal is that by buying patterns you can choose to support a charity – yes, I know. This is brilliant. “I’m not buying patterns honey… it’s about charity… yes really it is… I just have such a big heart“.

Seriously who is not going to believe that? Five fab patterns – some serious rockstars of the sewing world. Buy it – it’s on sale for just TWO WEEKS! In fact at time of posting this, there was just 11 days and 3 hours left…

Perfect Pattern Parcel Buy Now

and wait for it…

  • a Rafflecopter giveaway to boot. Go forth and support charity… and perhaps add to your pattern stash along the way… just sayin’

What does this cost? The retail value of this parcel is $48. You decide what amount you want to contribute in order to truly support the Parcel’s designers for their work – read more here… It is a personal choice. As sewing bloggers and participants in the blogosphere, I know you support indie designers… so focus on that fact – the purpose is to support independent pattern designers and charity.

Also bloggers participating:- One Little Minute | SeamstressErin Designs | One Girl Circus | casa crafty | the quirky peach | Kadiddlehopper | Sew Caroline | Groovybabyandmama | Fishsticks Designs | the Brodrick blog | verypurpleperson |sew a straight line | Adventures in Dressmaking | true bias | Idle Fancy | La Pantigana | Crafterhours | Boy, Oh Boy, Oh Boy Crafts | Max California | YoSaMi | la inglesita | Diary of a Chainstitcher | four square walls | Lauren Dahl | Sewbon | mingo & grace | Dandelion Drift | VeryShannon | Sanae Ishida | buzzmills | Sew Jereli | Figgy’s | Froo & Boo | a happy stitch | Disaster in a Dress | Things for Boys | mama says sew | sew Amy sew | Made With Moxie | imagine gnats

RUM TUM TUGGER?

And if you don’t know what the Rum Tum Tugger reference is… it’s from Old Possum’s Book of Practical Cats by TS Eliot. My father read this to me as a child and I love every poem dearly… (I am also a huge fan of all of TS Eliot’s poetry…)

Here is an excerpt…

The Rum Tum Tugger is a curious beast:
His disobliging ways are a matter of habit.
If you offer him fish then he always wants a feast;
When there isn’t any fish then he won’t eat rabbit.
If you offer him cream then he sniffs and sneers,
For he only likes what he finds for himself;

So you’ll catch him in it right up to the ears,
If you put it away on the larder shelf.
The Rum Tum Tugger is artful and knowing,
The Rum Tum Tugger doesn’t care for a cuddle;
But he’ll leap on your lap in the middle of your sewing,
For there’s nothing he enjoys like a horrible muddle.
Yes the Rum Tum Tugger is a Curious Cat–
And there isn’t any need for me to spout it:
For he will do
As he do do
And there’s no doing anything about it!