Simplicity 1463 & WIPs…

Yes, I’m bored of my tshirts too – however I tweeted I was making this… there was interest… so here it is! Evening light was fading fast – we photographed this top, this top and these tops at the same time. I made them to wear with shorts, skirts and jeans so I just snapped them all at the same time, this is how I wear them – everyday casual wear.

Simplicity 1463, View A. Front View 
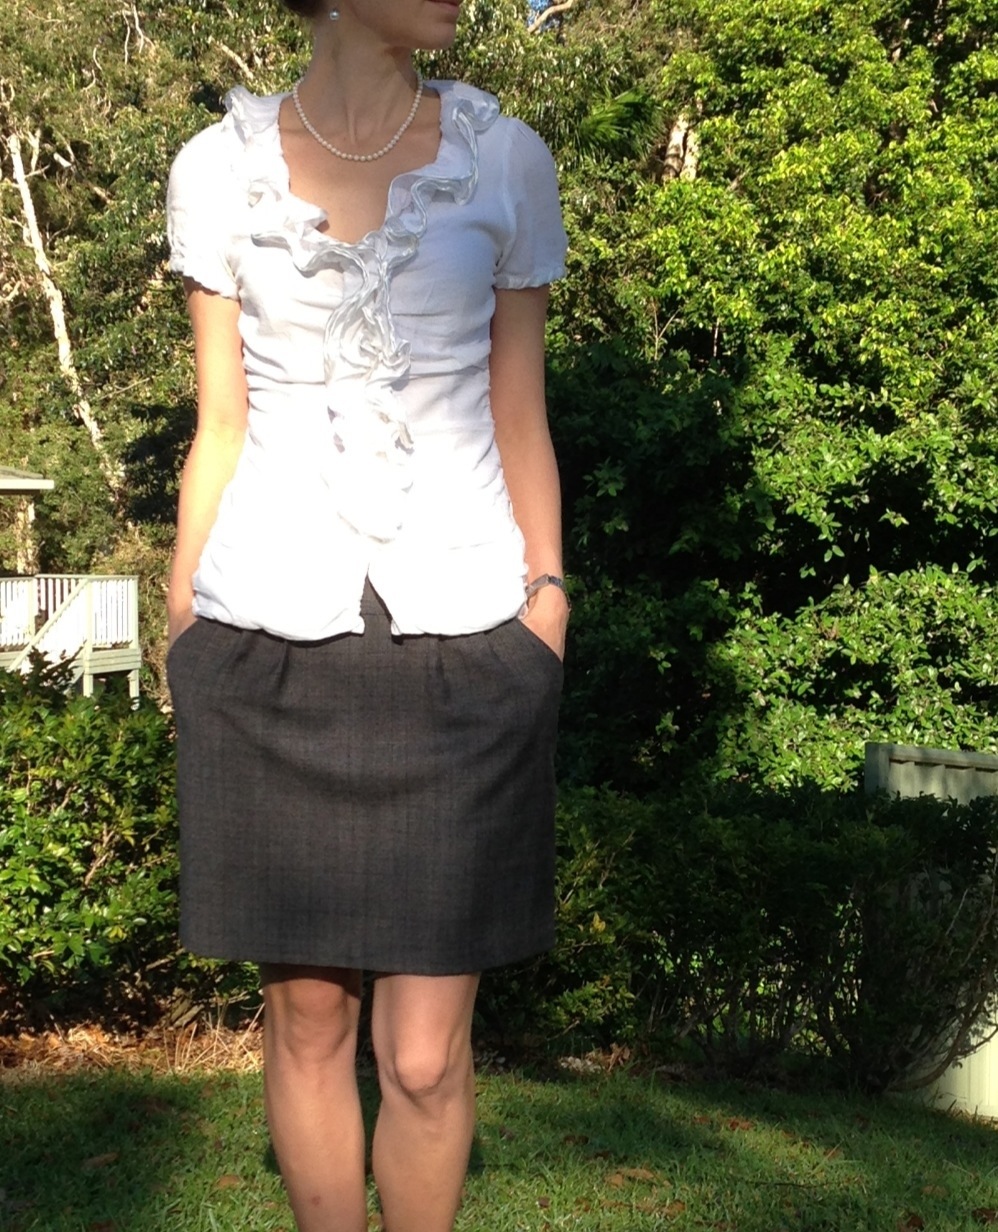
Simplicity 1463, View A. Front View. Bit fuzzy – sorry!

I’ve made Simplicity View A – the least fancy – and I like it. It’s comfortable & easy to wear. I know… it’s a complete mimic of the pattern cover. I wanted a neutral top & this was ‘in the stash’. I do want to try View B in a deep blue DKNY lyocell I have waiting.

Simplicity 1463 - Pattern cover Simplicity 1463 – Pattern cover

After the Simplicity 1589 top and the masses of ease, I decided to make the smallest size. While the fit of the top wasn’t too bad, I found the sleeves too snug. Fortunately my daughter Giselle loved it. It’s too big for her but she loves it anyway… she even wore it to Santa photos. That’s her wearing it on the right… I know lovely fabric (remanent bin find at Spotlight, rayon knit)

Giselle is on the right wearing Simplicity 1463 Giselle is on the right wearing Simplicity 1463.
Is that the smallest Santa in the history of Santas???

There’s not much to tell you…

SLEEVES

As mentioned above, I found the sleeves snug so be aware that if your fabric doesn’t have much stretch that may impact on ‘sleeve snugness’. The other thing that I have found just a little annoying is the sleeve sits in just around the nook of my elbow. So after I’ve been wearing it for several hours I get ‘wear creases’ in my elbow and they don’t drop out and it bothers me… I know that’s a bit OCD of me but the strangest things annoy me – perhaps that’s why I got a deportment badge at school?! I generally only dress sloppy when I drive long distances, my car isn’t very judgemental…

If you like stripe-matching…

Simplicity 1463, View A. Side view Simplicity 1463, View A. Side view

My fabric is quite lightweight but does not stretch much so I found fitting the sleeves to the top slightly fiddly as my sleeves were difficult to stretch to fit the top. I just pinned/eased the pieces and with patience I got them in neatly. If your fabric is lightweight it makes it slightly more fiddly as the sleeves are sewn as a doubled over tube so there are three raw edges to think about when attaching the sleeves to the top. You might perhaps like to overlock the raw edges of the sleeves together before attaching them to the top. The good news is: no sleeve hems!

NECKBAND & HEMS

The neckband is two pieces. I attached this with the overlocker & used my Bernina to stitch around the neckline to hold the binding seam in place. I like the scoop in the neck, it’s enough but not too much.

I finished my hem with my coverstitch machine. I have a Janome CoverPro 1000 & I’m glad I have done several knit projects in a row as I’m becoming more confident with multiple uses.

Simplicity 1463, View A. Back View Simplicity 1463, View A. Back view

It has a high-lo hem but it’s not exaggerated, it’s a gentle swoop rather than a massive leap from front hem to back hem. The front is also a generous length which I really like.

THOUGHTS?

Just mind the snug sleeves & due to the size of the top I would think it’s best sewn in a lighter weight knit but that could be just my preference. It’s rumored I’m into draped styles.

It’s loose fitting without drowning you and I think the length/hem shape is flattering.

Once you get used to sewing knits, tshirts are a fun project. I had not sewn many knits in my first couple of years of garment sewing. The Drape Drape books made me take a leap & challenge myself. I’m glad I did.

Fabric: a mystery knit from the Spotlight bargain table. $3 a metre.
Pattern: Simplicity 1463


IN THE WORKS…
I haven’t sewn in my sewing room since New Year. I’m back at work. Work is all consuming for a while & my brain feels like Swiss cheese at the end of the day. I suspect I’ll be a bit a preoccupied for a couple of months. I cancelled my 2.5 weeks holiday this January and therefore also the Tasmania holiday. That’s life, just means holidays later this year instead. So I’ll sew at night instead… I know, surprised?

Alabama Chanin: I’ve just hand sewn the funniest Alabama Chanin test tank with different seams, threads, stitches – so I could see what I like and what I needed to consider before leaping into hours and hours of hand work. It’s mistake ridden – which was the point of the exercise. I now know what works and doesn’t!
I’ve been fascinated by this for ages… and it was on my Wish List for Christmas and my sister-in-law gave it to me… so now I’m indulging myself with hand sewing, something I used to do a lot of. I’m loving it.

In the name of sewing... excuse the selfies, blue bra etc... I was excited In the name of sewing… excuse the selfies, blue bra etc… I was excited late at night when I finished HAND sewing this. The armhole error has nothing to do with the stitch used – it’s to do with how I attached the binding. I also figured out my neckline problem.

Edith: I have a new addition to my sewing room, she’s a sweet little lady and you will meet her soon!

My latest little friend... My latest little friend…

Ziggi: I have embarked on the epic Style Arc Ziggi Jacket. Wish me luck!

Style Arc Ziggi Jacket - 48 page PDF. No, it wasn't fun, Style Arc Ziggi Jacket – 48 page PDF. No, it wasn’t fun.


Simplicity 1589 – a polka dot peekaboo top!

I’ve been churning out tops recently. I had a lack of ‘summer separates’ so I decided to take action – amazing! Practical sewing by me!

To start off the sewing binge, I made Simplicity 1589 – a ‘learn to sew’ pattern.

Simplicity 1589, view A

Simplicity 1589, view A. Our Christmas weather has been rubbish – so much rain!

I had always been drawn to the peekaboo and lapped backs of this pattern – so when a pattern sale came along, I decided to buy it. I don’t particularly mind whether a pattern is advanced or easy – if it works, it works. I also love that this pattern is a fabric miser.

Simplicity 1589

Simplicity 1589

I made this with less than a metre of fabric – left over from my first Grainline Alder (Jillian of Sew Unravelled… you were so right about not making a belt for the Alder – the fabric was perfect for a top). It’s a woven rayon – I love rayon, it straddles the divide of man-made and natural fibres. It’s perfect for my climate.

View A, which I have made here, takes just 90cm of 150cm wide fabric (or 1 yard at 60 inches wide) so it’s an absolute stash buster. View B takes slightly more 1.3m of 150cm wide fabric (or 1 3/8 yard at 60 inches wide).

These are easy, easy tops to make. If you are looking for a nice woven top pattern with a difference – then this might be an option. I also suspect it is a great option for fabric busting all those smaller pieces from bigger projects.

The armholes and neckline are finished with bias binding. I confess I do struggle to get my bias binding as neat as I would like – but it’s a challenge I’ll continue to embrace.

Simplicity 1589 - front view

Simplicity 1589 – front view

There are no bust darts. I suspect some may find the fabric in this top falls like a waterfall… I wouldn’t know and I don’t speak for FBA department of the sewing community – but if you have knowledge/advice to share, please comment below for others. What I can say is that it works for me. The side panels and back also cover up most bra straps which is a nice feature.

Due to the lack of bust darts I personally think a fabric with some drape will work best – otherwise it may be a little tentlike.

I made a size 4 – this top has A LOT of ease. About 5 inches of ease at the bust – which I just think is too much, even for a loose fitting top. If I had made this according to the sizing chart, I would have made size 8 – which would have been two more inches of ease than this one on me. I like the fit of this. The armholes are comfortable and the back sits nicely.

Simplicity 1589 - back view

Simplicity 1589 – back view

If you get stuck with what size to make, check the finished bust measurements at the bottom of the envelope back – put a tape measure around you and figure out how much ease seems reasonable. I do this with almost every make. This top isn’t meant to be tight or close fitting but I don’t think you need to swim in fabric either.

I also think this would be a nice pattern for teenagers. It is loose but has cute details that I think would appeal to many young girls I know. My daughters are too slight for this pattern at the moment although I think many of their friends would love it.

I absolutely struggled with my stitching with this make… the tension was all over the place and I could not for the life of me figure out why. It was funny that it happened on this make as it was supposed to be ‘easy’! As it turned out, a drunk monkey (or a small daughter) had fiddled with my machine tension at some point – it didn’t occur to me to check the tension dial because I hadn’t touched it. I thought it was a bobbin case screw issue which has happened once before. Oh well. At least I know not to make the assumption that no one else touches my machines 🙂

Once I found the source of my stitching woes, I unpicked the topstitching at the armholes and neckline then restitched the topstitching. It was too late for the back neck and side panels… thankfully the tension issues only shows on the inside – and it’s not that bad (suck it up Princess Lizzy).

Simplicity 1589 - side view

Simplicity 1589 – side view

I briefly considered throwing this out or not blogging it for a bunch of reasons… but it’s escaped the charity bag and made it to the blog.

To hell with imperfection.

Pattern: Simplicity 1589
Fabric: Rayon from Spotlight. I picked some more up at the 40% sale the other day to make a little dress for my youngest daughter.
Skirt: Target – I found this in the kids sale section for $10. It’s a bit ‘out there’ but I love it – I have a weakness for anything denim, especially skirts. It looks fab dressed up with a white shirt and heels. Plus I think it would be fun to copy the spray paint concept on a future make.

How the Battle of Silk Charmeuse was won – Mood Fabrics – Simplicity 1424

I’ve travelled the silk road with a length of divinely lovely amethyst silk charmeuse from Mood Fabrics NY – and returned with a rather wow-factor top to wear with jeans (as you do)…

For a remarkably simple looking top, this took me a loooonnnng time. However it was an interesting sewing journey and I’ve learnt a lot more about silk!

Simplicity 1424 in silk charmeuse

Simplicity 1424 in silk charmeuse

This is my second make for Mood Fabrics Sewing Network and my first ever with silk charmuese.

I’ve always been most curious about sewing with silk. You hear such nightmare stories. I have sewn with silk cotton blends and found them delightful so I had some degree of confidence that silk charmeuse could be conquered.

I had originally planned to sew a long, draped evening dress but I decided that I might appear to be drowning in a tidal wave of purple so I decided to sew a shorter dress and settled on Vogue 1344. It lists charmeuse as one of it recommended fabrics. I cut out the bodice pieces and spent eight hours sewing the lined bodice over two days… and I wasn’t happy with it. The pleats were not behaving and I felt the fabric was not right for the pattern. I could have solidered on but decided to take a different approach.

Then I did what I should have done in the first place – I patted the silk, ran it through my hands and draped it over my shoulder. Obviously what silk charmuese wants to do is drape… so I set about finding a relatively simple pattern which would let the fabric do the talking – too often we look for complex patterns – however the simple fact remains often the simplest shapes and designs showcase beautiful fabric the best.

Simplicity 1424 in silk charmeuse from Mood Fabrics NY

Simplicity 1424 in silk charmeuse from Mood Fabrics NY – I really should have given that side seam one more press with the iron!

I settled on Simplicity 1424 – described as a ‘top with back interest’ and recommends ‘silky types’. The back has a dramatic cowl back and the front has an upper layer which provides a double layer of fabric and creates a sweet doubled ruffled/fluted hem effect.

I only used 1.2m of silk to make this top. This pattern also has a cute little swing top that isn’t quite as revealing as this one – it uses even less fabric!

This time I did a few simple things which improved my sewing results enormously – and since this project is all about the fabric I’m going to share.

FLAT PATTERN PIECES

I used some ‘Crafting Trace & Toile’ – it was from my ‘stash’ and is sold alongside interfacings generally. I traced the pattern pieces onto the Trace & Toile as if I was cutting out fabric – and created full piece flat pattern pieces. This enabled me to more easily lay out the fabric as a single layer – no cutting on the fold. This technique meant the silk could move around a lot less.

Flat Pattern pieces for sewing with silk - Mood Fabrics

I created full pattern pieces to avoid cutting the silk on the fold.

NO PINS WHEN CUTTING

The ‘Trace and Toile’ is slightly textured and tends to grip the fabric a little. This also negated the need for pins – which I had found tricky with the Vogue 1344 pieces that I had cut… pinning the pattern pieces caused the fabric to shift and slide – very frustrating!

Glass tumblers as pattern weights

Heavy Glass tumblers make excellent pattern weights… I would not recommend draining them of whisky before one starts cutting silk. Just sayin’

I used some glass tumblers from the cupboard as my weights. This made the cutting process so much easier and more accurate. The glasses are also very heavy and smooth which was perfect for this purpose.

ROTARY CUTTING

I often tell people that a big cutting mat and a rotary cutter is an excellent investment – never more so when sewing with silk!

SEWING SIMPLICITY 1424 IN SILK CHARMEUSE- some tips

The Straps

For the straps I decided to block-fuse a piece of the silk with a very lightweight fusible interfacing. This made the straps a little more stable, lie flatter once ironed and were also also easier to turn. Rather than using the cut edge as a guide when sewing, I used the folded edge – doing this means that your straps will be the same width for the full length of the strap – which I think is more accurate than relying on the cut edge as a sewing guide.

Sewing narrow straps with Mood Fabrics

Using the folded edge of the strap as a sewing guide to achieve a consistent strap width.

I never use a loop turner, for narrow straps a bobbin pin is perfect. I cut a small slit about 1/4inch down from the end of the sewn tube. I then slide one side of the bobbin pin into the slit and the other into the tube itself. You then gently wiggle the end as begins to turn itself into the tube and thus the right way out. It does take a little patience to get the tube to start to turn but once it does it is quite simple to slide the bobbin pin along the inside of the tube – in the same way you thread elastic through a casing using a bodkin or a safety pin.

Turning narrow straps with a bobbin pin

Turning narrow straps with a bobbin pin

I left off the lingerie slides and made my straps a fixed length. I choose to do this as I think it would have make the straps ungainly and bulky. The silk charmeuse is silky soft and the lightweight interfacing means they lie beautifully flat on my shoulders.

Hems

The hems – I do have a rolled hem foot for my Bernina – however this silk charmuese simply did not want to obey and feed through the foot consistently. So I elected to do the three-step rolled hem manually. It does take a lot longer however there is a great degree of control which I think it great for this type of fabric.

I’ve sewn hems using this technique several times – however if you are new to this – check out the Craftsy Blog’s online tutorial for some help. This is better than the method Simplicity recommends for this particular fabric, essentially Craftsy has you stitch one extra row but the results are worth it.

Strap ‘Interest’ Variation

This pattern has fabric straps running horizontally across the front and back straps. I decided to leave off the front strap and replace the single back strap with very fine chains of different lengths so they fell in waves down my back – mimicking the flowing folds of the silk. I simply attached a metre/yard of fine chain to a jump ring on one of the lingerie circles and then across to another jump ring on the opposite shoulder’s lingerie circle – going back and forwards with the chain becoming increasingly longer.

So there you have it. A cute little cami with a little bit of wow at the back… in divine silk charmuese from Mood Fabrics NY. If you haven’t tried sewing with this type of fabric – you really should. It feels like water running across your skin.

Simplciity 1424 with Mood Fabrics Silk Charmeuse

A deceptively simple cami in Mood Fabrics silk with a little bit of WOW

Fabric: Amethyst Solid Silk Charmeuse from Mood Fabrics
Pattern: Simplicity 1424


JEANS IN JUNE & JULY! Update
Blog post coming very very soon – I’ve started a pair… made some blog buttons and half written a post. So sorry – life has been a runaway train at the moment.

Hot Mess Birthday Dress

Last year I cheated on a birthday dress project because my mother-in-law gave me a beautiful vintage 1950s lace dress

This year I got SewBusy with less than a week to spare. That is the SewByTheSeatOfYourPantsSewBusy way.

Naturally I opted to pick a dress with at least 15 bodice pieces… because that is the ObstinateSewBusy way.

Naturally I opted to match a fabric with the pattern which was an IN YOUR FACE SewBusy option.

At the Melbourne Frocktails fabric trip in September, we spied a bolt of black/white gingham sitting on the counter at Alannah Hill. Several of us loved it, I think it was MyMessings, Petticoat & Peplums, Busy Lizzie and Bimble & Pimble (I’m getting old – forgive me if you are not in the list…). I suggested we do a Gingham Face-off and see what happened. We decided it could be paired with anything: piping, contrast fabric and whatever took our fancy – just use 2 metres of the fabric (I’ve used much less I think I have enough for a sleeveless shirt!).

I originally planned a shirtdress (my first thought), then I thought a Grainline Archer, then a strapless dress… then I was seized with a severe bout of IndecisiveSewBusy.

Then in one moment, I decided it had to become this…

Simplicity 2250

Simplicity 2250 – Cynthia Rowley design

Oh course! Let’s pair regular gingham checks with an irregular darted, pleated, seamed bodice with a crazy pleated, gathered skirt – hell yeah. And make those perfectionist stitchers’ eyeballs boil looking at all those mis-matched gingham checks… that’s the SewBusy way.

And I give you The Hot Mess Birthday Dress…

Too short!
Hot Mess is also v.short!

Today is (or was) my birthday. I totally understand if you don’t approve (of the dress – not the birthday). However I love it.

This dress has had mixed reviews… personally, I adored sewing it. I think it’s a little too short – but I love the pattern and would definitely make it again.

Hot Mess Birthday Dress - the back view

Hot Mess Birthday Dress – the back view

In typical SewBusy way, I loathed this pattern on sight. It was only when I pictured it with this fabric I went YES!, punched the air and purchased it.

Personally, and I totally get if some of you are rubbing your eyes at my crimes against pattern matching right now, I love how this pattern teamed with directional prints or a plain fabric. I think the whole point of all those crazy darts, pleats, tucks, gathers and more, is that you ‘see’ the hot mess of the bodice and skirt. It’s madness and I love it.

The craziness going on inside the bodice!

The craziness going on inside the bodice!

The bodice has tucks, darts and pleats. The bodice is underlined and lined. The bodice – without the contrast band, back bands ties and straps is a mere 15 pieces. The skirt is pleated, gathered and flat in places. It’s all kinds of crazy. It’s a blast to sew.

Things I did differently…

I attached the lining to the zip in the same way that the Sewaholic Cambie bodice is lined. I think the way this bodice is finished is messy *sniff*. The Sewaholic way of finishing conceals all the seams – soooo much nicer.

I boned the bodice with Rigalene – it’s easy enough, you just sew the boning to the wrong side of the bodice lining seams (minus the seam allowances). It provides a nice structure to the dress – I recommend this!

I changed the ties to have a straighter shape, the petal/balloon shape of the pattern ties just scared me.

I did do a tiny bit of pattern matching down the centre back bodice seam – don’t know why I bothered as the ties cover it… I marked the seamline on the pattern piece – I find this the easiest way to match checks.

Matching checks technique

The line under CB (centre back) is the 5/8 inch seam allowance – I use this line to match the checks

Freaking me out…

The length of the skirt… I added 1.5 inches to the contrast band. I wished I added 2 inches to the main skirt pieces, it’s just sooo short! If I make this again, it’s going to be loooonger.

The Hot Mess Birthday Dress

Final thoughts…This dress has had some shaky reviews and some good ones. It is not a walk in the park but it’s not that difficult either. Really. There are a billion and one steps (I never exaggerate) however if you mark all your notches, dots and more, it’s not that complicated. Really. Just go slow.

Check the finished measurements and choose your size from there. I like about 1 inch of ease in a fitted bodice so I made size 6. If I went by my body measurements, my size would have allowed 2.5 inches of ease in the bodice… way too much for this style of fitted bodice/dress in my humble opinion.

Pattern: Simplicity 2250
Fabric: from Alannah Hill, $10 a metre with black rayon fabric contrasts.

Confessions of a birthday blogger… I have more pictures of the interior of the dress… but it’s my birthday and I wanna have a drink, it’s late… *shuffles off stage left with a glass on Nant in hand…*

On the beach before Birthday dinner

On the beach before Birthday dinner

RETURN OF MOJO & 15 POUND AUSSIE

Firstly thank you so very much for all your lovely comments on my last post. It was surprisingly cathartic to write and I really appreciate your comments. I never expected to win, I suspect my reaction/thoughts are simply the outcome of working in a highly regulated environment where opinion, personality & relationships cease to exist. Everything is done by ‘due process’… and I sew to escape it. So rather than looking for reasons, explanations, criteria – I’m just going to except there isn’t always going to be those things in my sewing world and that’s what I need.

£15 AUSSIE RETURNS: Abakhan Fabrics
I finished my £15 Aussie project for Abakhan Fabricsbefore I left for London. This month I chose a lovely grey wool suiting and I must say I was rather taken with it!

I used Simplicity 2451 – a skirt much beloved by bloggers. I added a lining and hand stitched the zipper in.

For £15 this is a brilliant work skirt. I loved wearing it. There will be more – no time for detail pictures, I had to fly to London! I should not have put my hands in the pocket for this picture, it looks like it pulls and it doesn’t.

20130414-193423.jpg

And I’ve been busy sewing and knitting other things…

a detail shot of my just-finished Vine Bolero (Ravelry)

20130414-195235.jpg

And a Japanese rayon knit Sewaholic Renfrew

20130414-195429.jpg

and I’ve managed to squeeze a skirt out of this.

20130414-195716.jpg

Must go. I’ve got to pack a bag for Paris…

PS: Abakhan sent me a ‘few’ things for the meet-up…

20130414-201835.jpg