A double take… Morris Blazer Grainline Studio

Morris was one of those patterns which just seemed to be a guaranteed hit before it was even released. Everyone was talking about it. Instagram and Twitter went a bit barmy on its release. It seems everyone is now madly printing and sewing it. I anticipate our blog feeds will be brimful with blazers! These blazers (yes I made two) are huge queue jumpers. I’ve been working on a vintage muslin and have four other projects in the blog queue. I just wanted to make Morris… so I did!

Morris Blazers

Morris Blazers

The Morris Blazer is the latest release from Grainline Studios. I will admit before I even write anything about Morris that I am a huge Grainline fan. I haven’t made all her patterns but I have made the Maritime Shorts (x 3), Moss Mini (x1), Archer (x1), Hemlock (x1) and Alder (x 3). The Morris Blazer is described by Jen as “The Morris Blazer is the perfect mix of casual and cool. It will quickly become the go-to garment to complete any outfit. With a mixture of drape and structure, bracelet length sleeves, and gentle shawl collar, it looks great dressed up or down. It works up well in fabrics with stretch, making it comfortable on top of everything else!” It’s rated as an advanced beginner and I would agree with that. I made two of these in two days (OK, one evening and one day). Probably the trickiest thing is putting in the shawl collar but it’s not that difficult. Techniques include:  sewing a straight seam, setting sleeves, sewing a shawl collar, facings, and topstitching. I made my first Morris in one of the suggested fabrics: a medium weight ponti style fabric. I have no real idea exactly what is it – it’s been maturing in my stash for about three years. I found it on the Spotlight bargain table for the princely sum of $5 a metre. Anyway, shut up Lizzy and show us some pictures… OK.

Morris Blazer by Grainline Studios

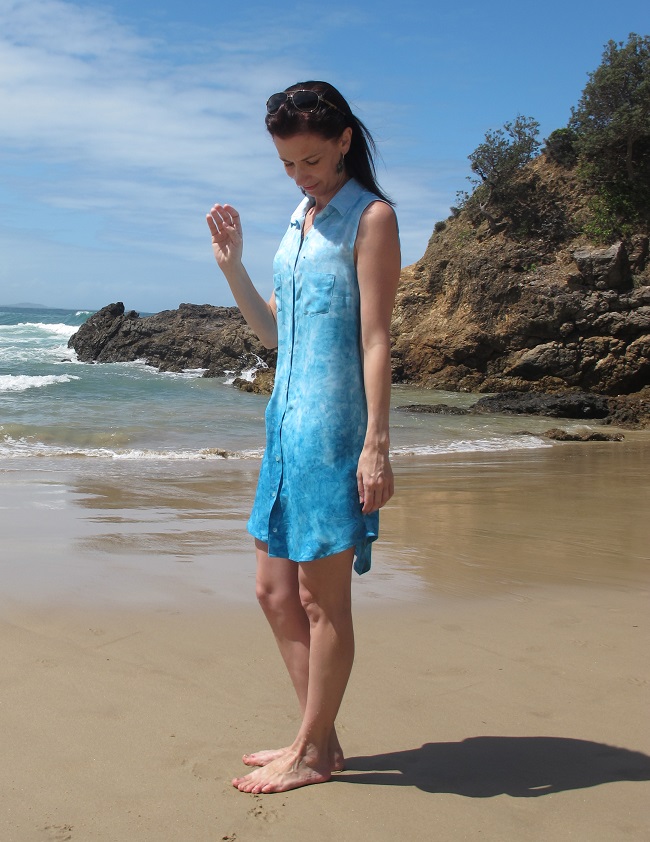
Morris Blazer: Excuse the ‘resting bitch face’. Had zero sleep the night before due to 12-year-old molars! Complete bummer as she never teethed badly as a baby!

Morris Blazer, pattern by Grainline Studios

Side view – sorry that dratted cloud in the background suddenly slid across the sun and we were done for the day. Boo!

The edges of the jacket at the lower front don’t seem to sit quite as smoothly as I would like. The jacket has a front facing, which rolls over to become the shawl collar. I think the texture of the medium weight knit tends to catch against each other or perhaps the body of the interfaced knit is not playing nice with the non-interfaced jacket front – if that makes sense. I’ve been wondering two things… if I lightly interfaced just the front section (where the front facing is) of the front pattern piece if this might alleviate this issue. I wouldn’t interface the entire front of the jacket – just the front portion. The knit properties are very comfortable and I would want to retain that quality. Would the front then have the same structure as the front facing piece and be less likely to collapse against the facing thus creating a smoother jacket front?? I have no idea – but I’m interested to find out. While it’s made from a stretch cotton, my Papercut Patterns Bellatrix blazer has the front facing and front pieces lined… just food for thought. Jen has made a hefty number of these blazers so I’m sure she will have some strong opinions about that! I’m all ears! The only step I got a little confused was Step 15. Most likely because I was tired. Earlier in the process you join the two facing pieces at the back neck. You then fold over the inner edge of the front facing pieces by 1/2in to the wrong side. You join the back and front hem facings and turn their upper edge under by 1/2in. Then you join the facing pieces to the front facing pieces.

Step 15 - Grainline Morris Blazer

Step 15 – Grainline Morris Blazer

This is where I go confused – Step 15. If you are purely a diagram person then you might not get confused – however it wasn’t clear to me that I had to fold the folded inner edge of the front facing back out before I attached the hem facing pieces to the front facing piece. You need to unfold the front facing edge before joining the pieces. Yes, the diagram does say ‘foldline’ but I managed to get confused anyway. I read the words and cross check the diagrams and they didn’t quite click for me. I’m not sure if this is any clearer but I think it better matches the diagram and desired outcome. Step 15: With the right sides together and raw edges aligned, line up the bottom edge of the front hem facing with the bottom edge of the front facing. Stitch the two together starting at the hem edge and stopping at the point where the 1/2″ front hem seam allowance is folded under. Press seam open.” Fortunately it’s about 3 inches of unpicking to rectify. Not a big drama. Maybe it should also say “Unfold the front facing edge. Then with  rights sides together… etc With my curiosity sated about this new much-anticipated pattern, I got thinking and wanted to make another straight away! A LINEN MORRIS

Grainline Studio Morris Blazer - front view

Morris Blazer – front view

Then I just couldn’t get a Morris linen idea out of my head… so I made it despite the fabric not being a stretch. It’s a rayon linen blend with a tiny bit of give. I really should have perhaps sized up or altered the pattern… or been sensible and chosen a jacket pattern designed for non-stretch wovens. Since I’m not altering guru (at all!), I decided to make it, rather than seconding guessing what would happen and trying to counteract it. I’m one of those idiots who learn best by making mistakes and analysing them. This is why I have a fabric stash – to enable excessive amounts of sewing, my imagination and sometimes my idiocy. I decided to underline the back and front pieces with very light white cotton voile. I was concerned about the soft drape of the linen. I choose a very light fusible interfacing for the front/back/sleeve facings and front facing pieces. Interestingly the jacket front doesn’t seem to have the same tension issue around the lower hemline. Whether it this is because the front and facings have the same body due to the interfacing and underlining – or whether it’s just because it’s a woven rather a knit? I’m looking forward to seeing all the other makes.

Morris Blazer - in linen

Morris Blazer in linen – back/side view. Should have rolled that collar over more, should have pulled my top down, should have worn a belt… Oh for a blog stylist. LOL

Overall the jacket sits very nicely and went together without any hiccups. As it is a casual jacket, without shoulder pads interfacing around the upper jacket shoulders etc it does fold slightly as it sits – but I wasn’t after a structured blazer so I don’t mind those features. In fact I’ve always wanted a linen jacket, I love the soft creases they get in the elbows and the gentle worn look they have. I find it very distracting to talk to people wearing linen jackets, or men in great dress shirts (I have a fascination with shirtmaking at the moment), as I have an urge to turn over their button plackets and feel the quality of the fabric. Sorry, I digress.

Morris Blazer

I’m a fiddler. Is it just me – it doesn’t how much you press – you always miss a tiny bit?

While it’s a neat fit, it is comfortable and will definitely be worn. I rather like it. It’s important to note, I don’t have broad shoulders and I couldn’t swing a golf club in this. Fortunately my golfing is limited to living within walking distance of two golf clubs and playing hydro golf with the kids… which I’m not bad at and don’t wear linen jackets to at any rate. All credit to Busy Lizzie who suggested the navy trim when I was pondering the lapel – whether to make it contrast or piped or who knows! A very indecisive morning! It’s just a navy bias binding, sewing to one side and hand stitched down. Thoughts about Morris

  • A fast  and easy jacket pattern – some sewing experience is needed or wait for the sewalong.
  • The instructions are excellent (except for possibly Step 15, although it could just be me! I read this Morris  blog post by Saturday Night Stitch and wondered if it was the same step that tripped me up.
  • Fabric choice is important.
  • The sleeves are short. I like this feature as I tend to roll up my sleeves – or shove them up my arms in the most untidy fashion.

Note: I would not recommend making this jacket in linen or a non-woven. It’s not designed for it and I respect for Jen’s knowledge and pattern drafting skills (I just like experimenting). The linen jacket works for me – but perhaps not for everyone.

Pattern: Grainline Studios, Morris Blazer. PDF purchased.
Fabric: First version: medium weight ponti style knit and a  linen rayon blend from Lincraft (purchased at a 50% off sale). All purchased by me.
Size made: 0 (my measurements: 32 bust and 25 waist)
Construction: Sewing machine and seams neatened on the serger/overlocker.

Also see: Crafting a Rainbow | Saturday Night Stitch

WordPress editing mode is impossibly slow tonight – I can’t write any more as it takes several minutes for a line to appear. No more words possible.

Grainline Alder in vintage rayon

aka #teambumruffle

I wasn’t going to blog this for a while… but back to work tomorrow… so it’s a final holiday hurrah. Sorry for spamming you in the last week! I’ve mentioned before I’m an obsessive stitcher… and my last Alder is proof!

Grainline Alder view B - back view

Grainline Alder view B – back view

So that pattern I wasn’t particularly entranced by when it was released? Yeah well… I’ve made three of them since November.

Here we go with the view I liked the least… and now find it has grown on me… View B – the one with the gathered sides and back.

Then it came up as a joke on Instagram that this version was #teambumruffle (recently blogged by Funkbunny and also made by The Stitcher and Gatherer – not blogged yet) which made me laugh… and then I wondered if I needed to re-think this one as there seemed to be quite a fan club out there.

Grainline Alder View B - side view

Grainline Alder View B – side view. The armholes are slightly large but I prefer that in a summer dress, especially on our hot and humid days.

I wasn’t sold when I first put it on… and I confess it has grown on me. It’s been very, very hot lately and this is the perfect summer holiday dress. I don’t like wearing shapeless sacks as they swamp me, but the details of a collar and buttons provide some definition to this make and I do like that. I think the ‘girliness’ of this suits the pretty vintage fabric that I have been hoarding for a year or so now.

Attaching the skirt: It’s worth the three lines of gathering stitches recommended by Jen – the skirt gathers up nicely and it easier to attach to the bodice/shirt fronts.
I would also recommend referring to the online Alder sewalong when attaching the gathered skirt, it’s a little trickier than your standard gathered skirt shirtdress.
I did shorten this by 1 inch as I had read the back is rather long and I’m 5 foot 4… However the front is somewhat shorter than I anticipated so I would probably adjust the dip in the back and leave the front length next time. Then again… how many Alders do I need?
If you want more construction details, check out my Polka Dot or Blue Alders.

Grainline Alder View B, front view - a bit too short, ok for summer casual though I guess.

Grainline Alder View B, front view – a bit too short, ok for summer casual though I guess.

Since I have nothing else startling to add (other than my first impressions of this as a pattern release – and even when I first put it on – were wrong), I wanted to share The Thong Tree with you. Yes, yes. I know. In other countries ‘thong’ refers to a rather brief item of underwear. Here in Australia, it’s footwear – or as you might call it – a flip-flop…

This is a 700m walk up the beach, perched on the sand dunes with a stunning view – which Banjo rather enjoyed.

The Alder, the whippet and the Thong Tree

The Alder, the whippet and the Thong Tree

Lighthouse Beach Thong Tree

Lighthouse Beach Thong Tree

This local festive oddity only appears at Christmas time and is a ‘gift’ from a local artist. You can read about it here. We took Banjo for a walk on the beach as we had a spare hour or two the other day. Unfortunately the wind was howling and the #bumruffle was in full flight – or the dress plastered against my body… the perils of beachside living! Hence the photos in the ‘bush’ behind my house – the only place safe from the wind.

A windy day on a classic sandy Australian beach

A windy day on a classic sandy Australian beach

It’s odd, these days I don’t like going to the beach and not taking Banjo with me. That limits the beaches we can visit… but I don’t really mind.

Pattern: Grainline Alder, View B
Fabric: Vintage rayon from the charity/op shop. Cost = $3

OK I’m done with Alders for now… I promise! Are you on the fence about this pattern or a fan of Alder? It’s taken me three versions to get off the fence and acknowledge that I am a fully-fledged member of the fan club.

Grainline Alders x 3

Grainline Alders x 3

Stripe play: Grainline Hemlock and more Drape Drape

This all started with the intended purchase of 1.4 metres of striped cotton jersey from The Fabric Store, Brisbane. Then they offered me the rest of the roll for half price. So I left with 3 metres instead – what’s a girl to do?

I wanted a classic long-sleeved t-shirt. Big & slouchy. I tossed up between the Tessuti Mandy Boat Tee & the Grainline Hemlock (both free). I chose the Hemlock.

Grainline Hemlock. Neck binding has been cut on the bias.

Grainline Hemlock. Neck binding has been cut on the bias.

Why? The finished bust measurements of the Grainline Hemlock is 44.5 inches and the Tessuti Mandy Boat tee is 58 inches. Even though I wanted a big t-shirt, 12.5 inches of ease felt like enough – 26 inches with the Mandy Tee seemed a bit excessive with this jersey.

What can I say – this is an easy t-shirt to make. This is a one size pattern and on me it’s very loose. Some days that’s exactly what I want to wear. I’m a huge fan of loose tops paired with fitted skirts and jeans so this fits into the my casual wardrobe nicely.

Grainline Hemlock

Grainline Hemlock. Back view. I keep rolling up the sleeves as they are long and loose. To be honest, I push up all my sleeves!

I decided to cut the neck binding on the bias just for fun. I know, crazy times.

All seams sewn with my overlocker. Hems completed on my coverstitch. I only used my Bernina for the extra line of stitching around the neckline to hold the neck binding seam in place.

Grainline Hemlock

Grainline Hemlock. Stripe matching not too shabby. Sleeves down.

I’d recommend this pattern if you are after a generic t-shirt. It’s easy to put together and there is an online tutorial if you need it. Perhaps it might be a nice introduction to sewing with knits if they have been daunting.

For my second t-shirt I decided to make a draped garment where the stripes were anything but regular. I also didn’t want two shirts more or less exactly the same – the obviously choice was my favourite draped t-shirt pattern from Drape Drape 2.

Drape Drape 2, Number 4. The pattern piece has been flipped over to run the stripes downwards on the front.

Drape Drape 2, Number 4. The pattern piece has been flipped over the run the stripes downwards on the front.

Drape Drape 2, Number 4

Drape Drape 2, Number 4. More stripe (not) matching

I had been a little disappointed that the stripes on the front of the drunk candy cane t-shirt had been so horizontal/normal on the front, whereas the back was more visually interesting with the stripes running down and into the drape.

Red stripe and blue stripe Drape Drape 2 No.4 shirts.

Red stripe and blue stripe Drape Drape 2 No.4 shirts.

So I flipped the pattern piece over, placing the drape on the other side & making the stripes on the front more of a feature. I also cut the neckline slightly higher so it wasn’t in danger of being indecent.

Drape Drape 2, Number 4. Back View

Drape Drape 2, Number 4. Back View

What’s the point of all this? Nothing much, it was just fun. Sometimes I just sew to explore ideas… and fortunately I end up with a wearable garment. Bonus.

Grainline Hemlock and Drape Drape2, No.4

Grainline Hemlock and Drape Drape2, No.4

More sewing… I’ve got another Grainline Alder (View B – #teambumruffle version – see Funkbunny if that hashtag makes no sense) and a Simplicity 1463, View A to share here soon! I’m back to work on Monday so my sporadic sewing and blogging will resume shortly!

Blogging, writing, thinking…
I like writing as much as I like sewing – but I enjoy writing about more things than sewing (shock, horror). The writing, re-writing and editing process helps me think about things more objectively and explore ideas. Sometimes I feel the urge to write about life. Or put down stories, scenes and ideas that run through my head. However that’s not going to happen here, it will be somewhere else on a private blog just for me – when the urge strikes or time permits. Selfish writing 🙂

GRAINLINE ALDER and a WHIPPET…

More obsessive sewing.

I did mentioned I had made another Grainline Alder and here it is. I’ve worn my first Alder so much that a second one seemed sensible. If it works for you – sew it I say! I’ve worn by McCalls 6696 just once, it’s lovely but I feel at home in my Alders.

I’ve sewn View A again, this time in a border print (or more like dip-dyed, marbled) rayon woven fabric.

Another Alder, more beach and whippet photos... a typical Lizzy weekend.

Another Alder, more beach and whippet photos… a typical Lizzy weekend. I love this beach, it’s not too busy. Lots of space of a whippet to run,

The sewing

As the graduation in colour ran from selvedge to selvedge, I cut the Alder on the crossgrain. I also didn’t have quite enough so I shaved about 1 inch off the side seams. It was frugal cutting at it’s very best and I had the tiniest pile of scraps you can imagine when I finished… and I was very conscious not to make a mistake as there was nothing left to cut another piece – not even a pocket piece!

Grainline Alder, view A. Side view

Grainline Alder, view A. Side view

Pockets: I moved the pockets up about 1/2 inch. I think they could move up more next time.

Hem: I hemmed it. I wasn’t pleased with my finish. So I hemmed it again. Then I took some photos and thought it was slightly too long. So I cut off the hem, slightly increased the curve at the side and re-hemmed it.

Grainline Alder, view A - wide view. The hem is even - it's just windy (as usual) and I like to leave the bottom button undone as the dress moves better as you walk.

Grainline Alder, view A – wide view. The hem is even – it’s just windy (as usual) and I like to leave the bottom button undone as the dress moves better as you walk.

Buttons: I got some lovely buttons that were a perfect match. I made the buttonholes… started sewing on my buttons… decided the buttons were slightly too large. Fortunately I had not cut the buttonholes! I found more buttons, unpicked the buttonholes and re-did the buttonholes. I want to unpick the buttonhole on the collar (which I haven’t cut fortunately) as it is slightly too low.

Grainline Alder, view A. Back view

Grainline Alder, view A. Back view

The Fabric: this is a marbled, graduated rayon fabric from The Fabric Shop in Robina. It’s just a hop, skip & a jump off the freeway on the way to Brisbane. It’s got parking out the front, a refreshing change from Brisbane which can be a parking nightmare, especially around The Fabric Store in Fortitude Valley!

Despite vowing not to add to my fabric ‘library’ on this trip, I succumbed to some blue fabrics – which seemed to be in plentiful supply in this shop! There were lovely piques, sateens, embroidered cottons, Japanese fabrics and a range of fabrics that Maria (the owner) imports from Madrid. I loved the white cotton broderies – which I’m still wondering why I didn’t buy as they would make gorgeous summer tops… then I look at the size of my fabric ‘library’ and remember why that’s a good thing!

This fabric was the end of the bolt (I think it was about 1.5m) and Maria slipped it into my bag when I bought the two fabrics below… clearly I have a thing for blues – thank you Maria. The Fabric Shop does have similar fabrics to this one – I just got the last sliver of this one – sorry!

A cotton pique and an imported embroider cotton eyelet

A cotton pique and an imported embroider cotton eyelet

Pattern: Grainline Alder, view A. Purchased by me.
Fabric: An ‘end of the bolt’ piece, woven rayon from The Fabric Shop.

I’m on a Grainline binge at the moment. I’ve also just made the Hemlock tee (the free Grainline pattern) with some striped cotton knit from The Fabric Store, Brisbane.

WATER-LOVING WHIPPET

The following photos are for those who love to see Banjo on the blog.

There are quite a few whippets in Port Macquarie now. None of them seem to love the water quite like Banjo does. He will spend more time swimming than running if the family are in the water and he attracts a lot of attention as whippets are not famed for their love of swimming… although no one has told Banjo that…

Yes, my whippet even enjoys body surfing!

Yes, my whippet even enjoys body surfing!

I love this shot, he's such a happy handsome hound

I love this shot, he’s such a happy handsome hound.

Banjo - my favourite water rat.

Banjo – my favourite water rat.

Top 5 Hits – 2014 (or perhaps 4)

Before we even start this Top 5 blogging journey, I’d just like to say that I might not always blog ‘five’ things. It’s not that I can’t count, it’s just that I’d rather pick one thing, four things or maybe eight things or more… it’s just what feels right.

I enjoy these posts – for me. So skip over it or read on if you like. I find it interesting to sit back and think about the year just gone. Whether it’s sewing or life in general, it’s good to think about what worked, what didn’t and ‘where to next’.

TOP 5 HITS

Today I’m blogging my Top 5 Hits. The makes I’ve worn the most and feel most ‘like me’. It’s easy to get caught up in a trend but more and more I simply sew the things that appeal to me and my sense of style (or perhaps lack thereof!).

Drape Drape

My mother-in-law gave me Drape Drape book last Christmas – and I immediately ordered Drape Drape 2 & 3. These books really changed my sewing approach and ricocheted me off into a completely different style zone – where I’ve never felt more comfortable. They finally provided me with some options that were really what I wanted to create and wear. Some of the makes were perhaps a little crazy but I’ve found these patterns fascinating. Drape Drape posts are here…

As recently blogged, the draped singlet dress from Drape Drape 2 has been the runaway winner in this year’s sewing. This little make is simply a misshapen singlet/tank dress. It’s incredibly easy to make and takes just 1.1m of fabric. When I’ve worn them people want to know ‘who the designer is’ – that gives me particular delight with my red/white/blue one which cost me just $6 in fabric.  

No 2. from Drape Drape 2. Without the drapes in view, it is a very simple singlet dress.

Excuse the stupid pose. blowing a gale and the camera went flat. No 2. from Drape Drape 2. Without the drapes in view, it is a very simple singlet dress. This is perhaps my favourite. I love the lyocell DKNY fabric and the vibrant colours.

No 2. from Drape Drape 2. Side view - with the drapes.

Side view – with the drapes.

Vogue 8780 – the Ugly Duckling

Despite the incredibly uninspiring pattern artwork or even more ‘blah’ Vogue photography, this cardigan is one of my most loved & versatile pieces. It’s made from a very fine merino knit from The Fabric Store in Sydney – plucked from the remanent bin for just $19.

It’s lovely with dresses & jeans. I wear it at work as much as I wear it casually. It’s got lovely drape at the front, a flared hem and it’s fitted across the back. I will make a size smaller next time (this is a small) as the sleeves are quite roomy – but I don’t mind, I love wearing it as it is. To me, this is the perfect cardigan (or whatever you call this!).

All I can say is, you need this in your pattern stash, buy it before it becomes OOP.

Vogue 8780

Sorry can’t see much of the ‘make’ but I love all the natural tones in this shot.

Vogue 8780 - so versatile

Vogue 8780 – so versatile. That’s in the work lift… it has rather a lot of mirrors. Helpful for selfies! I didn’t make the pink dress, it’s an old Metallicus which I had bagged for the op shop – then I thought would lovely it would look with this cardigan. So glad I saved it!

Vogue 1250 & Maria Denmark Day-Night Dress

I’ve made five of these dresses, my most beloved is the Sew Dolly Clackett dress which I’ve worn to work many times. It’s a versatile, comfortable, fun & flattering dress. I’ve been surprised by how much people admire this given the somewhat ‘unusual’ print – it’s not for the faint-hearted! I love the quirkiness and the fact it’s a different colour palette to what I would usually wear.

I love this picture - not because it's a great one of me - but that 'window' in the print looks like a peephole into my soul... or belly button LOL

I love this picture – not because it’s a great one of me – but that ‘window’ in the print looks like a peephole into my soul… or belly button LOL

Grainline Alder Shirtdress

A very recent sewing hit. I’ve worn this a lot!. It’s easy to wear & I’m quite proud of my collar, placket & overall finish. I think I’m also emotionally attached to it as it was sewn on a happy, stress-free day – something I relished after some long, tough months.

I’ve got another Alder to share in the next few days!

Alder, view A - back view. I sense this will be worn A LOT this summer.

Alder, view A – back view. I sense this will be worn A LOT this summer.

CONCLUSION

There you have it. One indie (Grainline). One Vogue. One Vogue & indie (Maria Denmark) hybrid. One Japanese pattern book.

I love slightly fitted, draped clothes. I adore casual wear and love nothing more than an outfit that I can wear barefoot or with heels. It suits my lifestyle. I work fulltime (so corporate office wear five days a week) and when I’m not at work I like to relax – mentally and physically. We really do go to a quiet beach almost every weekend with the dog and spend plenty of time outside the house.

I’ve loved plenty of other things I’ve made, including my By Hand London Hollys or the dress Holly hack which were fun to make & joyous to wear (and I love that bodice). However for my everyday wear, these four makes/patterns are the ones I reach for the most often – clothes that feel most like ‘me’.

I often sew simply to experiment and challenge myself. I’ve always said I’m not always a practical blogger. I make things that are buzzing around in my head or make me happy (or I try to). My sewing room has many resident squirrels to distract me and one drunk monkey who wrecks havoc on my hems, buttonholes and topstitching when I’m too tired to fight him off.  However on my favourite sewing days, I’m making something I have envisaged and desperately want to wear – and it comes off the sewing machine like magic. Those are the great days.

Top 5 of 2014

Top 5 of 2014