Inari Dress, Named Patterns

or My Gigantic T-shirt Dress 🙂

I had no inclination to make this dress. At all. Then I did. I’m not sure what triggered my change of heart, perhaps sunnier days or the Inari dresses and tops popping up here, there and everywhere… so I jumped online at Stitch 56 during a sale.

Inari Dress, Named Patterns, Sew Busy Lizzy

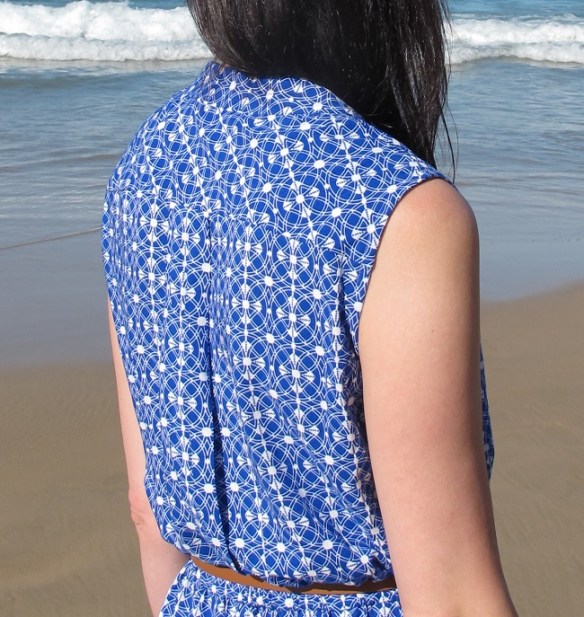
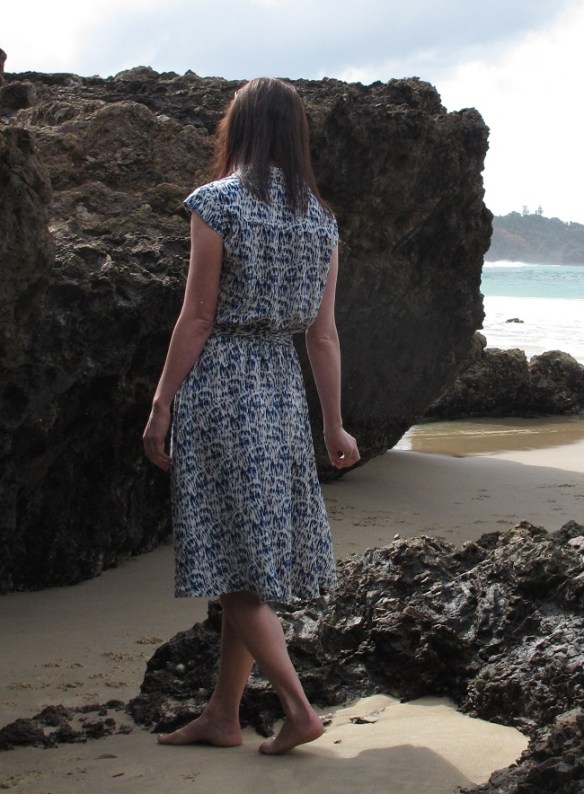
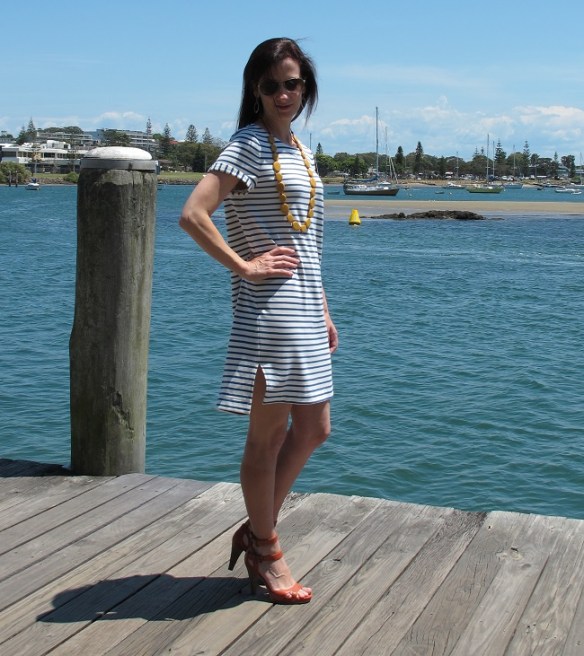
Inari Dress. Like everyone that has made this – I love how the seam brings the back of the dress around toward the thigh.

THE PATTERN

I purchased the paper pattern, it is also available as a PDF. If I have a choice between a paper pattern or a PDF, I will usually choose the paper pattern, unless the PDF comes with an A0 copy-shop file – then I have to think twice about it. Named paper patterns are expensive, however they are printed on bond paper and the instructions presented in a booklet – all packaged up in the neat envelope.

Here’s the trick with Named Patterns. The paper patterns come with no seam allowances… and the PDFs do (read about Named paper and PDF patterns here). I’d rather trace a pattern and add seam allowances than put together a bazillion A4s – even a handful of A4 is too many for me. I just added the allowances with a ruler as I traced – I know, I could add them by eye as I cut… but I’m a bit precise about some things (and hopelessly imprecise about others). The Inari is a simple pattern so adding the seam allowances wasn’t onerous… I am horrified at the thought of doing that for the Isla Trench Coat which is loitering in my sewing queue.

Inari Dress, Named Patterns, Sew Busy Lizzy

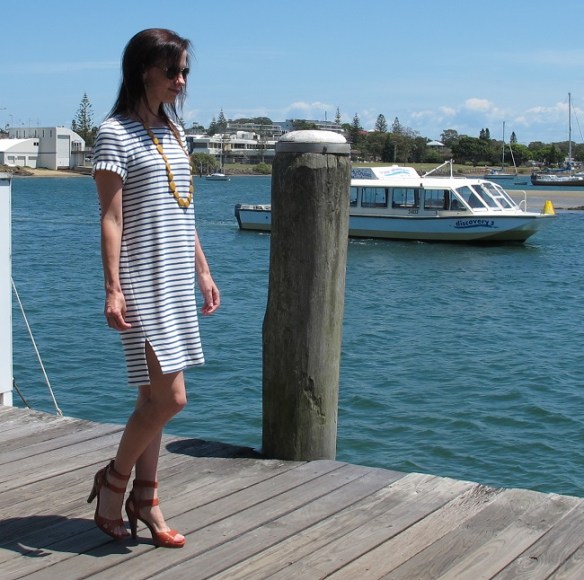
love that sloping side seam and split hem.

The pattern has a dress or a top option and two neckline finishes. The dress has a forward sloping side seam, meaning the back panel is slightly wider than the front, the hem is also split with the back being slightly longer than the front. I do love the small thoughtful details that seem to be core to the Named Pattern’s aesthetic.

The instructions are presented in a neat little booklet. I did find having the finished garment measurements and the pattern measurements on different pages rather odd – I like to compare these for each area of the body (for ease) before I choose a size. I also found myself jumping about the booklet to find things such as recommended seam allowances. I suspect there are elements to the Named Patterns which are put together in chunks for speed in layout and also translation purposes – some elements in a pattern are fairly standard (body measurements and general instructions) whereas other elements are individual to the pattern (finished measurements). Perhaps the Named instruction booklet layout reflects this. I’m not sure – it’s just a theory. 

I was momentarily bamboozled by some of the markings on the pattern sheet – ie the bust and hip line are marked on the pattern – at first I thought they might be shorten/lengthen lines. Perhaps there is a key somewhere that I missed but I had ‘lost’ this pattern in my sewing room so when I finally dug it up I was desperate to sew and didn’t spend too long puzzling through everything! A few Instagram comments later I was on the right track, the Named team are very prompt and helpful! Thank you!

I think all sewing patterns and instructions have their quirks – it’s just getting used to knowing where to look for things. Provided the actual garment goes together well, I enjoy seeing how different companies approach their patterns and instructions.

THE DRESS

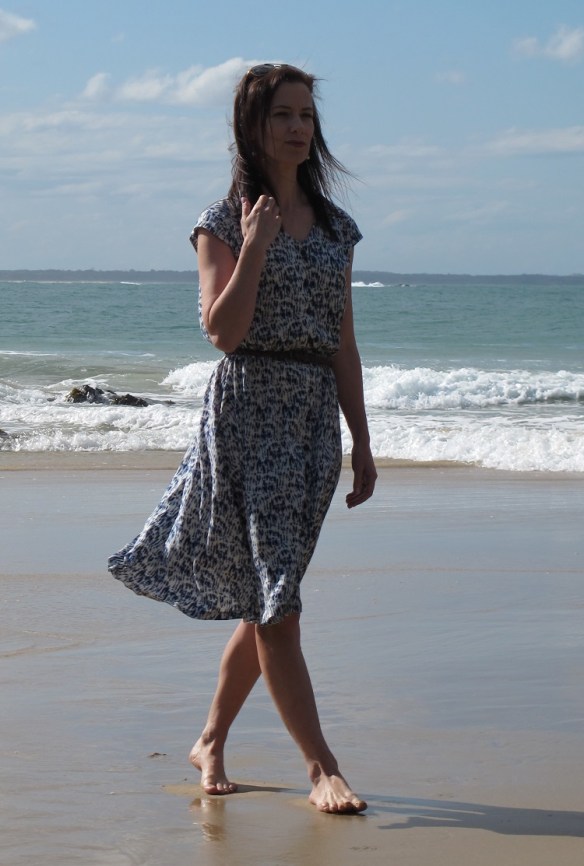
I decided to make this in a white/denim striped ponte. This ponte composition is 64% rayon, 32% nylon and 4% spandex. It has a lovely drape and sheen that I’ve not often seen in ponte.

Inari Dress

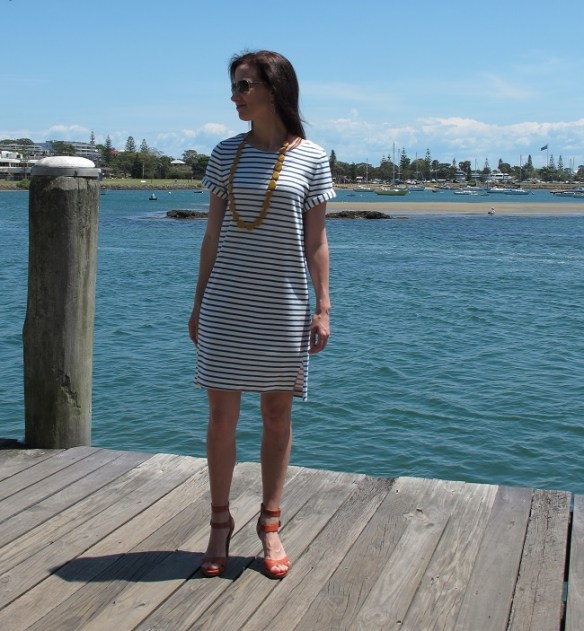
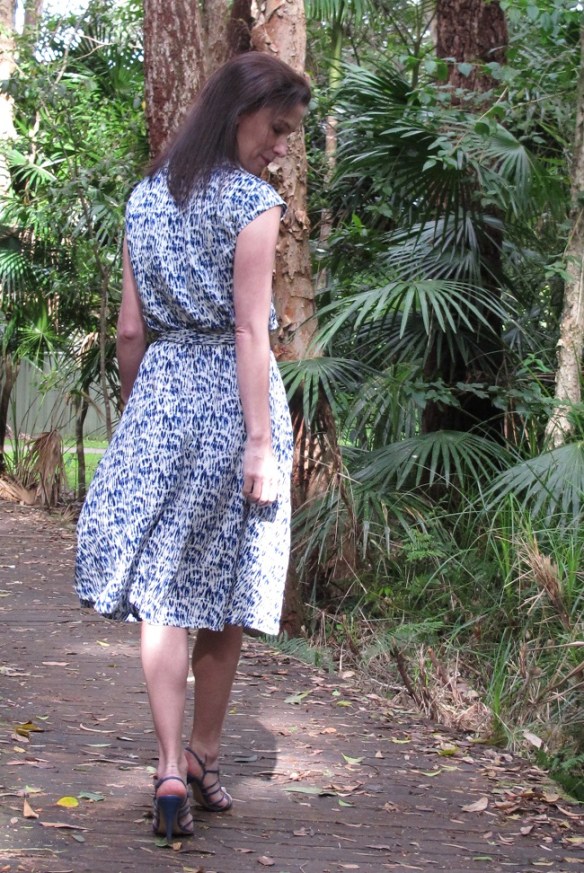
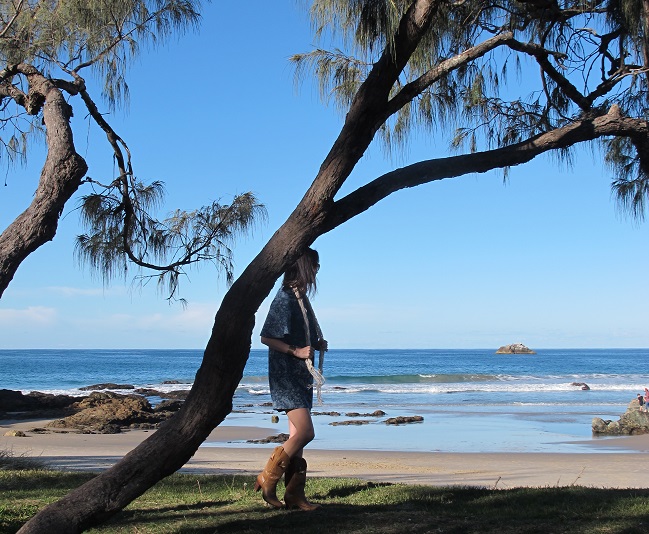
Inari Dress – ponte is perhaps not ideal for this and wind doesn’t help! I confess I do love wearing a gigantic t-shirt regardless. 

Everything went together perfectly. The instructions are clear and the diagrams adequate.

Even though I used a stretch fabric, I opted to use the facing rather than a neckband piece as I love the finish on my She Wears The Pants (SWTP) Top and felt that the addition of stripes running in another direction around the neck would break up the clean lines of the stripes. I was after a very simple, classic shift. I understitched the facing to prevent it rolling out and added a line of stitching about 20mm in from the neckline as I liked that finish on the SWTP top.

Choosing stripes turned a simple sewing project into a much fiddlier project (I unpicked one sleeve three times, yes I basted, used a walking foot, unpicked and adjusted but it just didn’t want to play nice). It’s acceptable but not perfect.

I overlocked all the edges first. This usually concerns me (stretching and distorting the edges) but I decided to give it a go as directed by the instructions – and my seam allowances were only 1cm which are a pain to feed neatly through the overlocker after sewing. I pinned and basted the seams, then stitched them with lightening-bolt stitch on my Bernina. Due to the loose fit around the hemline, I chose to use a standard straight stitch to hem the dress. I liked the stripes running the other way on the sleeve bands and hand stitched the sleeve cuffs at four places to keep them securely in place.

Inari Dress, Named Patterns, Sew Busy Lizzy

I went BARMY sewing the sleeves… and then I got to a point of begrudging acceptance. I still haven’t overlocked both pieces together in case I have a bout of ‘yes I can fix it’. I suspect not as the fabric is starting to show signs of wear from being unpicked THREE TIMES.

Named Patterns drafted for someone about 5 foot 6 or more (172cm), I am 5 foot 4 (165cm) – so I shortened it by about 40mm (1.5 inches) around the hip line.

I don’t think it’s the most flattering dress I’ve made but I love it nevertheless. It’s a sack, a drapey sack and hangs like one… but I love it anyway.  Obviously choosing stripes wasn’t a master stroke for figure flattery – however I love the classic nature of stripes and how easy they are to pair with a range of jackets, shoes and accessories for a different look. The ponte rayon has quite a bit of drape – I’d be interested to make this in a woven and see how it looks.

Would I make this again – yes. I’ve got the same fabric in red stripe for my ‘Christmas dress’.

Inari Dress, Named Patterns, Sew Busy Lizzy

I do have hips under all that fabric – here’s proof. Blowing a gale – hem flapping everywhere!

Pop over to Instagram to see how I wore it to work on casual Friday recently…this combination gives it more shape – with a vintage denim jacket, resin jewellery and a pair of leather high-heel sandals. I guess the obvious choice with this dress is to do the red/white/blue combo – maybe another day!

Pattern: Named Patterns, Inari Dress/top
Fabric: approximately 1.3m ponte (slightly less?) from Spotlight (purchased at a 40% sale for about $14)
Shoes: Nine West (purchased at a cancer fundraiser ladies night for $5 – massive score!)
Necklace: Polka Luka.

Also see: Funkbunny | The Long & Winding Bobbin | Dresses & Me | Cut, Cut, Sew | Sew Amy Sew | Miss Castelinhos| Sewing and Cocktails | Closet Case Files | Offsquare | Fiona Makes | Up Sew Late (plus a tutorial for a hem facing)
and the one that sold me? BEE MADE – I want this dress!

//platform.instagram.com/en_US/embeds.js

The Happy Days maxi(mum) summer shirtdress, McCalls 7242

I confess, I may be slightly infatuated with this pattern. I was happy when I made it. I feel happy when I wear it.

McCalls 7242 sewn by Sew Busy Lizzy

Front view. The buttons finish mid thigh.

Meet McCalls 7242. I immediately fell in love with this pattern. It has a gracious swooshiness (technical term). I pictured it in a vivid blue fabric.

The Inspiration

When I was in Melbourne for Frocktails, Busy Lizzie gave me a page from a magazine of a ‘celebrity’ wearing a striped maxi shirt dress (very much like this one), telling me ‘I can see you in this’. She knows me well! I confess I’ve been a little obsessed since. When I spotted this McCalls pattern it seemed like a good place to start a maxi shirtdress kick. Next up I’m looking for something with a buttonband – I may simply convert an existing ‘stash’ pattern.

Aussie road block: it’s a Laura Ashley design and McCalls only ship Laura Ashley patterns to USA and Canada! I know, I know, virtual mailboxes, other websites such as sewingpatterns.com (which didn’t have it at the time, I’m an impatient person!), eBay… however we have an international network of enablers… I’m most grateful to Suzanne of Beau baby for helping me out! Thank you!

The Pattern – McCalls 7242

This pattern is described as: Loose-fitting dresses have collar, blouson bodice, back pleated into self-lined yoke, elasticised waist, side pockets, and narrow hem. A: Pockets and side slits. B: Ruffle. C: Bias armhole facings. B and D: Elasticised lower edge of sleeves.

I was immediately drawn to the sleeveless maxi dress – View C.

Likes

This is a lovely design, elegant in its simplicity.

The skirt is gently flared. I like the lack of volume combined with the length of the skirt. I’m 5 foot 4 and I feel slender and tall(ish) in this style.

Back view: McCalls 7242

Back view: McCalls 7242. A rather wet hem… see photo below! The perils of beachside living.

The neckline is simple V-neck with a mandarin/band collar. As far as collars go – this is nowhere near as fiddly as a collar and band to attach.

I like the centre back pleat and how the back is gently gathered at the waist with elastic. I’m not always a fan of elastic at the waist… in fact I never seem to have any in my stash. However it is very comfortable for eating/wearing and I’d always wear a belt with this to break up the expanse of fabric and define my waist.

McCalls 7242 sewn by Sew Busy Lizzy

I cut the back yoke on the bias. The back features a pleat and the waist is gathered in with elastic.

The finish is generally neat. I opted to French seam the side seams of the bodice & skirt. The yoke is self-lined, finished burrito style (I cut the outer yoke on the bias – barely noticeable but I know). The armholes are finished with self bias binding.

The fit across the upper bust reminds me of the Grainline Alder (which I made here, here and here!). The back is fuller than the Alder with a centre back pleat and the fullness being gathered in gently at the waist with elastic. Note: There are no bodice darts for shaping.

The only overlocking is along the inner edge of front facings.

I managed to have a slight ‘idiot’ moment sewing on the facings in a completely stupid fashion late in the afternoon of the first day – I knew I should stop… but I didn’t… the blessing is I didn’t go past ‘the point of no return’ and some unpicking and patience figured up my mistake. Lisa of Notes from a Mad Housewife sent me the instructions via Instagram (mine were beside my machine, locked away in the sewing room for the night… I’m sure I’m not the only person who can’t go to sleep until I figure out a mistake!). Funnily enough she was just finishing up her long-sleeved shorter version of the same dress – perhaps more inspirational for those of you heading into fall!

McCalls 7242 sewn by Sew Busy Lizzy

Of course I managed to ‘wreck the dress’ during photos, getting caught by the slightly bigger wave wash than anticipated! You will notice some of these photos have a slightly drenched hemline!

Dislikes

Honestly I can’t find much critical to say about this pattern. It went together easily and I like its silhouette, ‘vibe’ (that’s a thing right?) and design elements.

The elastic finishes shy of the centre on each side. I find it does want to pull the centre front apart a little at the waistline. I think my elastic needs to be looser – I confess I didn’t measure the elastic using the pattern guide (I never do). I may use a button or snap to hold it neatly closed (see this post by the Vintage Ink Fairy)… although I will probably always wear a belt with this to define my waist and break up the expanse of fabric.

The front opening doesn’t have a button placket. It is finished with long, long, long front facings. The maxi length of the skirt combined with the buttons stopping above the knee means that the facing wants to flap out a little as I walk. I might try some invisible hem stitches to catch it to the inside of the dress skirt.

McCalls 7242, you can just see the front facings here. That sort of thing bugs me - minor but I notice it

McCalls 7242, you can just see the front facings poking out here. That sort of thing bugs me – minor but I notice it

Conclusion

I love it – perhaps one of my favourite creations of 2015.

Thank you

To the girls who came from Sydney, Brisbane, Gold Coast, Parkes and Frederickton to sew in Port Macquarie last weekend. I was exhausted after two days of non-stop sewing (and talking!). Included in this lovely bunch was Kat of House of Lane (crikey she can sew fast!), Maria of How Good Is That?, Michelle of My Sparkling Machine, Colette of Colette’s Sewing and Stuff, Loanne from the Gold Coast, Lee-anne from Parkes, Bianca from Brisbane, Kylie from Frederickton and Jenny from Lincraft.

We had breakfast and dinner together (I’m not sure you can count picking up takeaway and stuffing it down our throats mid-sewing as ‘lunch’) and spent two days talking and sewing non-stop. It was lots of fun and something I haven’t done before. Sewing can be such a solitary process, it was interesting to sew with company… it was also interesting to see how focussed we all are! I loved that people bought their families and partners along with them – and we all had dinner together. It was noisy and fun. We were joined at dinner by June, who happened to spot us on Instagram and was holidaying in Port with her daughter.

I managed to start and finish this dress over those two days (thank you for rescuing me from a ‘derp’ moment Maria LOL). I even managed to scare away a hoard of rampaging squirrels and stayed focused until I reached the finish line. Thank you to Bianca who provided the final bit of white thread as I ran out about 20cm from the end of the hem! Argh! Typical.

There were quite a few who couldn’t make it – life happens! I think there may be another in 2016… maybe with a workshop or two, we might need a bigger room… hopefully the weather is as perfectly fabulous as it was last week.

Sorry not many photos of the actual weekend’s activities… I get distracted and just enjoy the moment sometimes… camera/iPhone free. Nothing to apologise for!

Pattern: McCalls 7242, size 6-8
Fabric: Woven rayon from Spotlight, Port Macquarie. I used approximately 3 metres (plenty of leftovers). I purchased it on special for $9.95 a metre.

A girl and her dog

A girl and her dog. I do love a maxi that can be a little saucy when required.

It was a warm spring weekend – we spotted a pod of whales breaching and flipping their tails about. Like spotting koalas ‘in the wild’, it’s hard to tire of the magic moments that nature provides free of charge.

Whales frolicking in the summer heat

Whales frolicking off the beach in the afternoon heat

This post first appeared on http://www.sewbusylizzy.com

A little too ladylike… Sewaholic Nicola

I haven’t sewn a Sewaholic pattern for quite a long time… and like every Sewaholic pattern  I’ve encountered so far in my online sewing life (Gabriola, Cambie, Lonsdale, Renfrew, Pendrell, Tofino, Alma, Hollyburn), the drafting and instructions for this Nicola were excellent.

Sewaholic Nicola

Sewaholic Nicola – excuse sulky pout… it was FREEZING… and WINDY… I wore it with a plaited belt and a self-fabric belt… I think I like the self-fabric belt best.

That said, this dress isn’t quite right on me – rather like my issues with the very popular Hollyburn skirt. I know my style… so I’m not quite sure why I was so tempted to sew this dress. I think curiousity got the better of me and I felt like making a ‘pretty dress’. I know, shoulda stuck to grunge!

The neckline of the Harwood seems a bit severe to me, however the Nicola appeals to me as a feminine, pretty shirtdress.

The Nicola reminds me of the Colette Patterns Hawthorn, albeit a softer style over all with its yoke and gathers, and flaring gathered a-line skirt.

Sewaholic Nicola with heels - back view

Sewaholic Nicola with heels – back view

Construction comments

This is a neatly finished dress, seems to be a Sewaholic trademark!

The yoke is finished ‘burrito style’ and the instructions are perhaps the best written instructions I’ve seen for this technique. Tasia certainly nails her instructions every time, they are concise but ample enough to achieve a well-finished garment.

I French-seamed the bodice side seams and skirt seams. The only visible overlocking is on the raw edge of the facing pieces.

Sewaholic Nicola - side view

Sewaholic Nicola – side view

The front yoke gathers do seem to be a little puffy. When I referred back to the Sewaholic site it appears to be there in the sample dresses for the long-sleeved version – this is easier to see in a solid fabric than my printed version or the printed sample. It seems to puff slightly above the bust.

It’s a lovely feminine shirtdress. I don’t hate it, in fact I think it would be gorgeous on plenty of women, it’s just not quite my thing.

This is a great pattern for anyone who has been put off collars. While it’s not a traditional collar-band finish, it is a very easy collar to sew.

Some friends have commented I should shorten the dress… I think it would throw the proportions of the dress out and look a little odd… a sweet dress needs a sweet length I can’t imagine it shorter. It’s not really a ‘sexy’ short dress to me… what do you think?

Conclusion

Not for me… but another great pattern from Sewaholic that I think deserves a little more attention.

Sewaholic Nicola - back view

Sewaholic Nicola – back view

While I might not be sold on this dress on me… sewing with Sewaholic again is tempting me to make another Gabriola and it is such a lovely pattern…. and I do love a maxi skirt…

Side note

I do love the new Sewaholic Vancouver collection. I have no interest in ‘activewear’ (well not right now) – however I like the Cape and I especially love the Seymour jacket… if it had been provided as a PDF A0 file I probably would have ordered it & had it printed immediately. However printing 36 inch files is painful or impossible where I live – and I actually prefer an A0 PDF to a tissue paper pattern… so I’m in holding pattern (pun intended)… I might yet succumb…

Final thoughts…

I’ve wondered why there seemed to be so few Nicola and Harwood dresses out there – after the huge popularity of the Cambie and the Lonsdale a few years ago.

Perhaps it’s the sheer volume of independent pattern companies out there and we are now seeing the same volume of dresses but more diversity.

It’s a mystery as to why some patterns take off like a rocket (hello By Hand London Anna dress) and others seem to simmer slowly or simply fade away. Without a doubt there are dresses and t-shirts aplenty to choose from these days and I suspect it dilutes the impact of a new pattern release… there are so many ‘new kids’ on the block, it must be harder to make a splash.

What do you think?

… not an exciting blog post so I leave you with a Banjo photo bomb and some beach shots…

I couldn't resist including this rather classic Banjo photo bomb!

I couldn’t resist including this rather classic Banjo photo bomb! For the record there was nothing exciting in the tiny cave. Alas.


A cold and windy day but the surfers didn't seem to notice! Nobby's Beach, Port Macquarie

A cold and windy day but the surfers didn’t seem to notice! Nobby’s Beach, Port Macquarie


A sea eagle...

A sea eagle…

Pattern: Sewaholic Nicola (purchased from Sew Squirrel), size 2.
Fabric: Woven printed rayon from Spotlight, Australia ($9.95 a metre on special)
Buttons: Lincraft ($0.29 each, great button range at Lincraft compared to Spotlight!)

A Casual Flutter (Tunic) & Papercut Pattern Giveaway Winner

or One Good Flutter Deserves Another…

I’ve worn my rayon Flutter Tunic several times and was even stopped this week by a lady who asked “where did you get that amazing dress?” I was wearing it with my beloved black Avani boots as blogged – plus opaque black tights, a white scarf and long red wool coat.

And one good Flutter deserves another… yes? So I decided to try a more casual look…

Flutter Tunic, Papercut Patterns. Front view.

Yes those are crazy OTT vintage cowboy boots… they inspire deep hatred or love. I don’t mind either way – they are fun to wear and make me smile. Although the lower front boot cut makes my legs look longer (or tunic shorter!) than my styling of the first Flutter dress!

Yes, it’s short but you only live once, my new boots (in transit) which I planned to wear with this, finish closer to my knee – which means less legs and the tunic doesn’t look quite as… frisky… I’ll wear this with tights in winter – it was such a beautiful winter afternoon I couldn’t be bothered. All the headlands and beaches were packed with people, walking and watching for the migrating whales. We saw a whale breach near the lighthouse – I still get excited by that stuff!

This Casual Flutter was inspired by Kirsty of Top Notch – she blogged her gorgeous frocktails Silk Flutter last week and mentioned she’d like a denim one. So when this paisley denim fabric threw itself out of the stash on Saturday afternoon shrieking it needed to be a Flutter, I made it – in less than three hours. I’m not the only one who has a chatterbox fabric stash am I?

I’d like to make another in plain denim with feature stitching and pockets. Pretty sure that might happen soon.

Flutter Tunic, Papercut Patterns. Side view.

Flutter Tunic, Papercut Patterns. Side view. My more sensible (flat!) Flore Duo Boots.

Flutter Tunic, Papercut Patterns. Back view.

Flutter Tunic, Papercut Patterns. Back view. While the tunic is loose, I don’t think it’s shapeless.

I used readymade bias binding for the neckline as I felt the denim would have been bulky. It worked beautifully.

Flutter Tunic, Papercut Patterns. Neckline binding

Flutter Tunic, Papercut Patterns. Neckline binding

I overlocked/serged all the pieces before I sewed the seams. I don’t usually do this for fear of warping or stretching the edges – however denim is quite stable to work with. I find the 1cm seam allowance is a bit fiddly to feed through my overlocker after sewing the seams so I decided the neaten the edges before I began.

PAPERCUT PATTERNS GIVEAWAY WINNER
Wow, there were a lot of entrants – over 120! Thank you so much for your interest and comments. I put everyone’s name in a spreadsheet to provide each name with a number. Then I used random.org to generate a number… and the winner is…

PIPS! of The Girl in a Teacup!

Flutter Tunic, Papercut Patterns. Front view.

Ahhhhh, those flutter sleeves… I love them! Flutter Tunic, Papercut Patterns.

Pattern: Flutter Tunic, Papercut Patterns
Fabric: Paisley printed denim, Spotlight
Boots: Flore Duo Boots & vintage American boots (obviously I suffered a severe bout of boot indecisiveness today)
Scarf: Cotton lace of forgotten origin. It is a paisley pattern though. Pure coincidence!

Note: Papercut Patterns provided this pattern for preview purposes. All opinions my own – I’ve made it twice just because I enjoy making and wearing it so much. No affiliate links in this post.

Oxley Beach, Port Macquarie.

Oxley Beach, Port Macquarie.

This post first appeared on http://www.sewbusylizzy.com

Flutter Tunic, Papercut Patterns

I didn’t expect to knock out another Papercut Patterns project so quickly… but when the inspiration strikes, one must sew along with it… meet my new Flutter Tunic (with a little bit of grrrrr)

Papercut Patterns, Flutter tunic, front view

Flutter Tunic, front view

This is a garment shape that people either love and shy away from. One of the responses I have had to this is “grrrrrrr” which is apparently manspeak for “sexy“. Not quite the response I anticipated to a loose & simple dress.

I planned to make the Flutter blouse – then I spotted this blue/blue/white splatter print rayon ottoman suiting in my stash… and it just seemed the obvious choice for the tunic. I love this fabric, it’s got a bit of weight to it yet has a nice drape.

Papercut Patterns Flutter tunic, side view

Flutter tunic, side view

I added 1.5 inches to the length as it seemed a little saucy… and then cut it off when I finished the tunic – perhaps I’m a hussy at heart after all 🙂 The added length transformed the  ‘flutter’ into a ‘feedsack’. On my frame and height, the loose silhouette needs to be balanced by a shorter length. I turned the hem up by 1.25 inches. I’m an un-statuesque 5 foot 4 if that helps with your future Flutter tunic length decisions.

THE PATTERN

The tunic has French darts to provide some shape to the boxy body. The shoulders are dropped, the sleeves are flared and the back hem dips slightly.

Flutter tunic - Papercut Patterns package

Flutter tunic – Papercut Patterns package (in the background is a hoarded silk I’m thinking about turning into a Summer Flutter Tunic…

My fabric is rather ‘busy’ so here is the line art so you can see the detail.

Flutter tunic - Papercut Patterns: line art, measurements and fabric requirements

Flutter tunic – Papercut Patterns: line art, measurements and fabric requirements

This is an easy sew… the most work is the bias binding on the neckline, which in this fabric was not at all fiddly and was easy to achieve a nice neat finish. I didn’t have quite enough fabric to cut the strip on the bias… so I cut it on the ‘semi bias’ ie at an angle but not quite 45 degrees… it seemed to work, probably helped along by the agreeable nature of the fabric.

Back neck detail

Back neck detail, finished with self-fabric bias binding. Sorry, pattern matching impossibility with this one!

THOUGHTS

  • This is an easy garment to make. There are a couple of darts, you set the sleeves in flat (then sew up the side seams all in one go) and the hem only has a slight curve to it. The neckline is finished with a bias strip. You could do this in a contrast fabric or trim as per the pattern envelope.
  • I didn’t expect to love this quite as much as I do. It’s one of the strangely fabulous garments to wear. I stitched it up with a sickening ‘sack dress anxiety’ sensation and got a big surprise when I put it on! I’m wearing it out to a work dinner tonight.
  • I like the wide neckline with the v-back.

    This wide deep neckline is growing on me...

    This wide deep neckline is growing on me…

  • Yes it is short… however as it is straight there is no ‘oops’ that can happen with the Saiph circle skirt tunic in a sea breeze (which happened once… in front of a bunch of bikies… seriously).
  • I can imagine wearing this with leggings, a long scarf and a light, loose wool jacket on colder days. I think it would make a gorgeous summer dress as well in a different fabric.
  • I suspect some people will be tempted to add shape to this silhouette with some darts or a belt… however I love it as is. I think the loose shape works in a shorter length. The legs get enough attention without drawing more attention to the rest of my figure. This is definitely ‘all about the legs’ garment for me.

DETAILS
Pattern: Papercut Patterns, Flutter Tunic/Top. I made the tunic in XXS, choosing my size based on bust measurement, no grading for my XS hips. I left the length as drafted, I am 5 foot 4.
Fabric: 1.5m Rayon Ottoman Suiting from Spotlight, Australia. About $15 per metre, I think I scooped this up during a 30% or 40% off sale.
Necklace: Jellystones
Boots: Avani, Duo Boots

Also see: Beautyfull Handmade Tunic & Blouse | High tea & Hydrangeas Tunic & Blouse | Jolies Bobines Blouse

GIVEAWAY
(now closed – thank you for your interest!)
Katie from Papercut Patterns has generously offered to send one of my readers a Papercut Pattern of their choice – anywhere in the world – thanks Katie!

Just let me know the comments below if you would like to be included in the giveaway draw! (giveaway is now closed. Closed on Sunday 6 July, 6pm – Australian Eastern Standard Time). My Sway Dress and Flutter Tunic are from the recently released Chameleon range. The full Papercut Patterns range is available here.

Note: Papercut Patterns provided this pattern for preview purposes. All opinions my own. No affiliate links in this post.

Papercut Patterns, Flutter tunic, side view

These photos were taken in Port Macquarie, at the end of the ‘eat street’ in the CBD.

This post first appeared on http://www.sewbusylizzy.com