Papercut Patterns, Guise Pants aka Does Lizzy Wear The Pants?

It’s been awhile.

I was in a sewing ‘funk’, didn’t know what to sew or where to start. So I asked Instagram how to drag myself out of it. Amid the many suggestions was a very funny comment from Jen of The Stitcher and Gatherer to make some pants. As she pointed out, I make a lot of skirts, dress, tops and jackets… and I needed to challenge myself.

So I did.

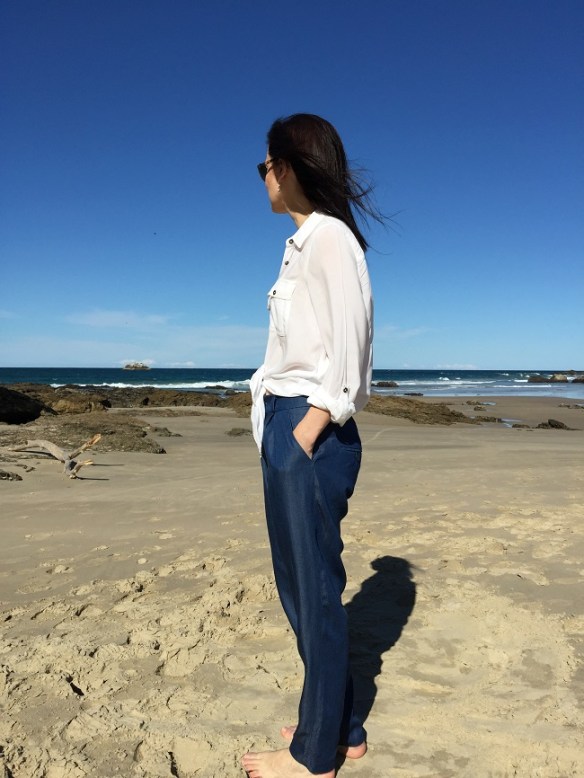
Hello Guise Pants from Papercut Patterns.

Papercut Patterns Guise Pants - front view

Papercut Patterns Guise Pants – front view

Now I will be 100% honest, I had plenty of reservations about this pattern – and I even told Katie of Papercut Patterns that 🙂

  1. I generally prefer skinny jeans or wide-legged flat-front trousers – it’s all or nothing with me; and
  2. elastic back waist. I live in a holiday/retirement destination and elastic waists of any description remind me of sensible shoes and comfortable pants worn by a significant proportion of my community…l’m not ready to go there yet!; and
  3. I wasn’t sold on the pattern photography – not my colours and styling. That said, I like to look beyond that and see if I can ‘make it my own’ – that’s part of what inspires me to sew.

However I love a challenge.
Katie had sent me the pattern (along with the Flutter and Sway) when I had enquired about the Papercut Pleated Pants – that’s another blog post in the not too-distant future.
Plus I had traced the Guise out weeks ago, I fell in love with the new tencel denim at Spotlight and the rest is history!

SEWING THE GUISE PANTS

Size: There are a few versions of these pants floating about the internet (see end of post for links) and a couple mentioned that they had sized down or would next time around. My hip measurement fell just below the XS size so I decided to make the XXS. I admit, making pants that are too small terrifies me as there is nothing more ego deflating than too-tight pants. I could have made a toile/muslin… however having made a few Papercut Patterns I decided to trust my instincts and just leapt in.

Fit: I don’t know!
I don’t often wear pants of this loose-fitting, pleated and casual style. In fact, one of the reasons I made the belt as I really don’t own belts for trousers.
They feel OK and are certainly very comfortable.
They do seem very generously sized. Even sizing down, they are a little droopy about my waist and hips. However I think the soft drape suits them with this fabric choice.
I love how the legs are taper around my calves and ankles. I cut about 1 inch off the length (I’m 5 foot 4). I’m going to try these with the hems rolled up a little. I like how Jolies Bobines styled hers.
There is quite a lot of ‘room’ in the crotch however they seem to sit nicely over the junk trunk and hang well at the front.
If you are a pleated pant fit guru – please share your thoughts!

Papercut Patterns Guise Pants without a belt

Papercut Patterns Guise Pants without a belt

Construction: The pattern went together without a hitch. One of the easiest makes yet. You can read quite a detailed post about it at Gingermakes – and she notes an error in the instructions and some other quirks with Papercut Patterns – it’s well worth a read if you are making these.
I found the instructions really straight-forward and comprehensive. I have sewn welt pockets and fly fronts before – however I found these instructions really helpful and clear. There wasn’t any ‘support’ from Google search.
I did overlock all the edges of each piece before I sewed. I don’t always do this as I think overlocking can distort the fabric edges. However as this fabric was stable, I overlocked the edges – as I find Papercut Patterns 1cm seam allowances rather small when feeding them through the overlocker (not overlocking both together). They just never turn out as neat as I would like.

Pockets: Four pockets! Two front and two back welt pockets. I had some floral silk fabric that I decided to use for pocketing. I found this on a remanent table at my local independent fabric shop in Port Macquarie. All five metres of it for $5. I’ve been hoarding it for lining purposes.

Papercut Patterns Guise Pants, sewn by Sew Busy Lizzy

Back pocket detail

Papercut Patterns Guise Pants side pockets, front pleats and self-fabric belt

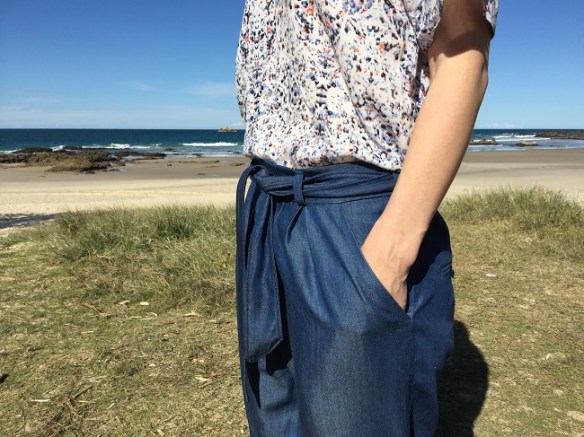
Papercut Patterns Guise Pants side pockets, front pleats and self-fabric belt. Sorry my belt is twisted – no mirrors at the beach. I pulled these on in the car!

Welts: My back welts are not quite perfect – but they are OK. I love these little details. I thought the welt fusing piece (inside the trousers) could be just a little bit narrower so it isn’t visible above the pocket on the inside. That’s just a visual detail if you like picture perfect garment guts.

Papercut Patterns Guise Pants - welt pockets

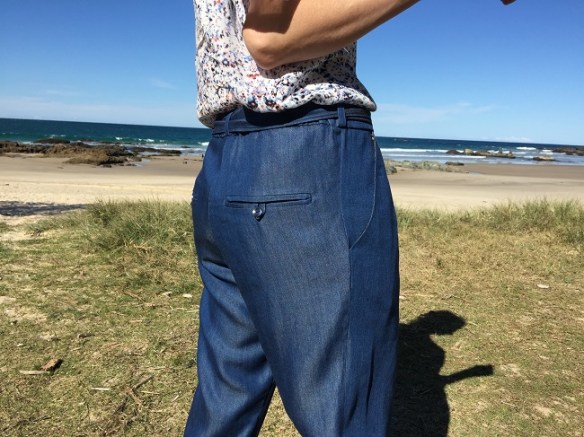
Papercut Patterns Guise Pants – welt pockets. I’m mid stride here.

Fly front: I found the pieces and instructions fabulous, this is one of my best fly fronts yet.

Waist: The pattern has you neaten the inner waist band edge and stitch it down. I decided to finish my edge with bias binding for ‘neatness sake’. Gingermakes widened her pattern piece and folded the raw edge under – do whatever rocks your world I say.
I machined the bias on the right side and then took the pants to work and handstitched the bias edge under to the wrong side. Why so pedantic? Mainly because I do like neat finishes… and then I could get sewing on the rest of the pants as soon as I got home! I love to maximise every minute of my day.
The elastic back waist may be a deterrent for some. It was for me at first. However the back doesn’t make the fabric fall in an unflattering way over the ‘junk trunk’ – or mine at least.

Papercut Patterns Guise Pants - I've included this so you can see how the elastic back looks. It is not 'that' gathered

Papercut Patterns Guise Pants – I’ve included this so you can see how the elastic back looks. It is not ‘that’ gathered

Belt and belt loops: I laid out my pieces with the intention of having a skerrick of fabric left running down the selvedge to make a self-fabric tie belt. It’s a little wider than the belt loops but I wanted the belt to look like that – I know, not everyone’s style but it was the look that was in my head. I would have loved it slightly longer and flared at the ends… but no fabric left!
I opted for the fabric belt as well as sometimes a different coloured belt seems to chop me in half and visually shorten me.
If I make these again, I would make the belt loops slightly longer, they seemed ‘just the right’ size. I would rather cut them slightly longer and them trim them back. That’s just how I construct things. I like a bit more room for fiddling.

Fabric: Tencel denim from Spotlight, Australia. This is LOVELY stuff. Beautiful to work with and I will be curious to see how it wears. (Note: after 6 hours of wear I was pleasantly surprised at how this fabric didn’t crease excessively).
I opted for tencel denim as I decided that anything with too much body would potentially make the pleats a little too ‘sticky-outie’ and result in unwanted lower tummy/crotch ‘poofiness’. I’m really happy with this fabric and pattern match.
I think these would be great in a light wool crepe for casual office pants aka secret pyjamas.

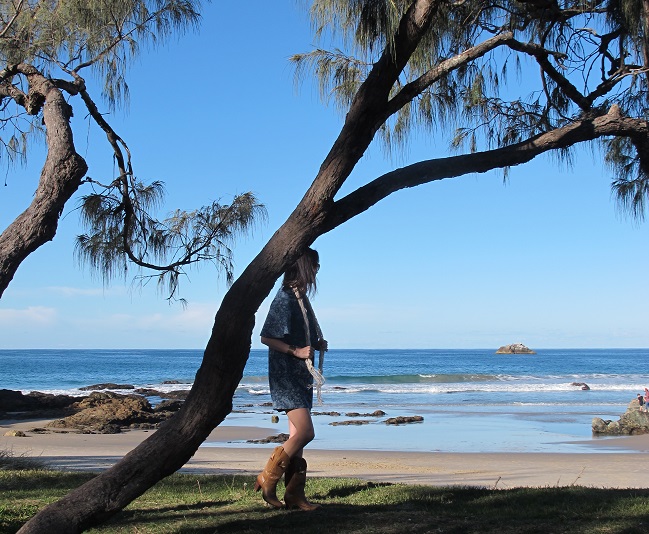
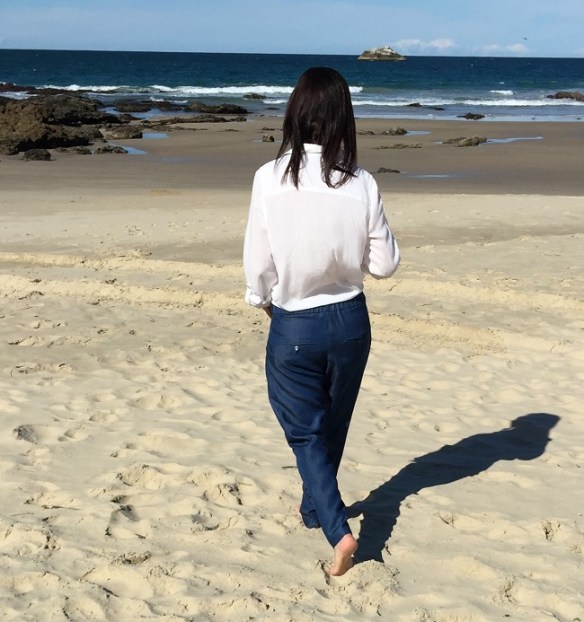
…and how I’m most likely to wear my pants… beltless & casual… that’s how I roll (or prefer to).

guise pants_me1

Beltless – they really need a belt to hold them up… but the seagulls don’t seem to mind so much.

Also See: Gingermakes | Jolies Bobines | Craft Sanctuary | The Monthly Stitch

Thanks Jen for the suggestion – I’m back to ‘normal’.

sewing again and back at the beach

sewing again and back at the beach

Pattern: Papercut Patterns Guise Pants
Note: Papercut Patterns provided this pattern for preview purposes. All opinions my own. No affiliate links in this post.
Shirts: RTW – Just Jeans, Australia
Shoes: Zensu (lovely red patent leather… never-been-worn from the op shop for the princely sum of $5)
Earrings: Pandora
Location: Oxley Beach, Port Macquarie

This post first appeared on http://www.sewbusylizzy.com

//platform.instagram.com/en_US/embeds.js

A Casual Flutter (Tunic) & Papercut Pattern Giveaway Winner

or One Good Flutter Deserves Another…

I’ve worn my rayon Flutter Tunic several times and was even stopped this week by a lady who asked “where did you get that amazing dress?” I was wearing it with my beloved black Avani boots as blogged – plus opaque black tights, a white scarf and long red wool coat.

And one good Flutter deserves another… yes? So I decided to try a more casual look…

Flutter Tunic, Papercut Patterns. Front view.

Yes those are crazy OTT vintage cowboy boots… they inspire deep hatred or love. I don’t mind either way – they are fun to wear and make me smile. Although the lower front boot cut makes my legs look longer (or tunic shorter!) than my styling of the first Flutter dress!

Yes, it’s short but you only live once, my new boots (in transit) which I planned to wear with this, finish closer to my knee – which means less legs and the tunic doesn’t look quite as… frisky… I’ll wear this with tights in winter – it was such a beautiful winter afternoon I couldn’t be bothered. All the headlands and beaches were packed with people, walking and watching for the migrating whales. We saw a whale breach near the lighthouse – I still get excited by that stuff!

This Casual Flutter was inspired by Kirsty of Top Notch – she blogged her gorgeous frocktails Silk Flutter last week and mentioned she’d like a denim one. So when this paisley denim fabric threw itself out of the stash on Saturday afternoon shrieking it needed to be a Flutter, I made it – in less than three hours. I’m not the only one who has a chatterbox fabric stash am I?

I’d like to make another in plain denim with feature stitching and pockets. Pretty sure that might happen soon.

Flutter Tunic, Papercut Patterns. Side view.

Flutter Tunic, Papercut Patterns. Side view. My more sensible (flat!) Flore Duo Boots.

Flutter Tunic, Papercut Patterns. Back view.

Flutter Tunic, Papercut Patterns. Back view. While the tunic is loose, I don’t think it’s shapeless.

I used readymade bias binding for the neckline as I felt the denim would have been bulky. It worked beautifully.

Flutter Tunic, Papercut Patterns. Neckline binding

Flutter Tunic, Papercut Patterns. Neckline binding

I overlocked/serged all the pieces before I sewed the seams. I don’t usually do this for fear of warping or stretching the edges – however denim is quite stable to work with. I find the 1cm seam allowance is a bit fiddly to feed through my overlocker after sewing the seams so I decided the neaten the edges before I began.

PAPERCUT PATTERNS GIVEAWAY WINNER
Wow, there were a lot of entrants – over 120! Thank you so much for your interest and comments. I put everyone’s name in a spreadsheet to provide each name with a number. Then I used random.org to generate a number… and the winner is…

PIPS! of The Girl in a Teacup!

Flutter Tunic, Papercut Patterns. Front view.

Ahhhhh, those flutter sleeves… I love them! Flutter Tunic, Papercut Patterns.

Pattern: Flutter Tunic, Papercut Patterns
Fabric: Paisley printed denim, Spotlight
Boots: Flore Duo Boots & vintage American boots (obviously I suffered a severe bout of boot indecisiveness today)
Scarf: Cotton lace of forgotten origin. It is a paisley pattern though. Pure coincidence!

Note: Papercut Patterns provided this pattern for preview purposes. All opinions my own – I’ve made it twice just because I enjoy making and wearing it so much. No affiliate links in this post.

Oxley Beach, Port Macquarie.

Oxley Beach, Port Macquarie.

This post first appeared on http://www.sewbusylizzy.com

Flutter Tunic, Papercut Patterns

I didn’t expect to knock out another Papercut Patterns project so quickly… but when the inspiration strikes, one must sew along with it… meet my new Flutter Tunic (with a little bit of grrrrr)

Papercut Patterns, Flutter tunic, front view

Flutter Tunic, front view

This is a garment shape that people either love and shy away from. One of the responses I have had to this is “grrrrrrr” which is apparently manspeak for “sexy“. Not quite the response I anticipated to a loose & simple dress.

I planned to make the Flutter blouse – then I spotted this blue/blue/white splatter print rayon ottoman suiting in my stash… and it just seemed the obvious choice for the tunic. I love this fabric, it’s got a bit of weight to it yet has a nice drape.

Papercut Patterns Flutter tunic, side view

Flutter tunic, side view

I added 1.5 inches to the length as it seemed a little saucy… and then cut it off when I finished the tunic – perhaps I’m a hussy at heart after all 🙂 The added length transformed the  ‘flutter’ into a ‘feedsack’. On my frame and height, the loose silhouette needs to be balanced by a shorter length. I turned the hem up by 1.25 inches. I’m an un-statuesque 5 foot 4 if that helps with your future Flutter tunic length decisions.

THE PATTERN

The tunic has French darts to provide some shape to the boxy body. The shoulders are dropped, the sleeves are flared and the back hem dips slightly.

Flutter tunic - Papercut Patterns package

Flutter tunic – Papercut Patterns package (in the background is a hoarded silk I’m thinking about turning into a Summer Flutter Tunic…

My fabric is rather ‘busy’ so here is the line art so you can see the detail.

Flutter tunic - Papercut Patterns: line art, measurements and fabric requirements

Flutter tunic – Papercut Patterns: line art, measurements and fabric requirements

This is an easy sew… the most work is the bias binding on the neckline, which in this fabric was not at all fiddly and was easy to achieve a nice neat finish. I didn’t have quite enough fabric to cut the strip on the bias… so I cut it on the ‘semi bias’ ie at an angle but not quite 45 degrees… it seemed to work, probably helped along by the agreeable nature of the fabric.

Back neck detail

Back neck detail, finished with self-fabric bias binding. Sorry, pattern matching impossibility with this one!

THOUGHTS

  • This is an easy garment to make. There are a couple of darts, you set the sleeves in flat (then sew up the side seams all in one go) and the hem only has a slight curve to it. The neckline is finished with a bias strip. You could do this in a contrast fabric or trim as per the pattern envelope.
  • I didn’t expect to love this quite as much as I do. It’s one of the strangely fabulous garments to wear. I stitched it up with a sickening ‘sack dress anxiety’ sensation and got a big surprise when I put it on! I’m wearing it out to a work dinner tonight.
  • I like the wide neckline with the v-back.

    This wide deep neckline is growing on me...

    This wide deep neckline is growing on me…

  • Yes it is short… however as it is straight there is no ‘oops’ that can happen with the Saiph circle skirt tunic in a sea breeze (which happened once… in front of a bunch of bikies… seriously).
  • I can imagine wearing this with leggings, a long scarf and a light, loose wool jacket on colder days. I think it would make a gorgeous summer dress as well in a different fabric.
  • I suspect some people will be tempted to add shape to this silhouette with some darts or a belt… however I love it as is. I think the loose shape works in a shorter length. The legs get enough attention without drawing more attention to the rest of my figure. This is definitely ‘all about the legs’ garment for me.

DETAILS
Pattern: Papercut Patterns, Flutter Tunic/Top. I made the tunic in XXS, choosing my size based on bust measurement, no grading for my XS hips. I left the length as drafted, I am 5 foot 4.
Fabric: 1.5m Rayon Ottoman Suiting from Spotlight, Australia. About $15 per metre, I think I scooped this up during a 30% or 40% off sale.
Necklace: Jellystones
Boots: Avani, Duo Boots

Also see: Beautyfull Handmade Tunic & Blouse | High tea & Hydrangeas Tunic & Blouse | Jolies Bobines Blouse

GIVEAWAY
(now closed – thank you for your interest!)
Katie from Papercut Patterns has generously offered to send one of my readers a Papercut Pattern of their choice – anywhere in the world – thanks Katie!

Just let me know the comments below if you would like to be included in the giveaway draw! (giveaway is now closed. Closed on Sunday 6 July, 6pm – Australian Eastern Standard Time). My Sway Dress and Flutter Tunic are from the recently released Chameleon range. The full Papercut Patterns range is available here.

Note: Papercut Patterns provided this pattern for preview purposes. All opinions my own. No affiliate links in this post.

Papercut Patterns, Flutter tunic, side view

These photos were taken in Port Macquarie, at the end of the ‘eat street’ in the CBD.

This post first appeared on http://www.sewbusylizzy.com

Sway Dress, a simple LBD – Papercut Patterns

Recently I sent Katie at Papercut Patterns an email because I was searching (unsuccessfully) for a copy of the Pleated Pants pattern and noticed that it was sold out online.

Katie let me know that it was indeed out of print (*sobs* she who hesitates is patternless). Then she told me she had a new trouser pattern coming out and would I be interested in trying it… well… yes!

Sway Dress by Papercut Patterns

Sway Dress

I know this is not even nearly a pair of trousers… Katie sent me a few patterns and I was swayed by the Sway Dress immediately. I know. I get distracted easily. #squirrel

Why? It’s a very simple dress and often I’m drawn to patterns with details or unusual shapes (hello Drape Drape). However it is something that I could see myself wearing in a solid or a floral. Dressed up and dressed down. While I wear a lot of fitted sheath dresses to work, so I tend to prefer softer, loosely fitted styles when I’m not at work. I guess I just feel more relaxed in them.

Swingin' in the Sway

Swingin’ in the Sway

While I had planned to make this is a floral, when I stumbled across this strange micro-pleated woven fabric in Spotlight it just seemed perfect… and on a bargain table!

I chose not to create a self-fabric belt – mainly because of the pleats in the fabric. I felt having the pleats run one way down my body and then another way across my waist would have been distracting. So I’ve used a black satin ribbon instead. This fabric does not fray at all so I let the dress hang for 24 hours and then re-cut the hem so it was straight (it did drop all over the place). Yes you read that right – no hem on this LBD.

I don’t like these photos. I’m just so tired at the moment. Everything feels a little blah and I had horrid hair after a morning at the beach – seaspray is not my hair’s friend. That’s life though – and we are here for the dress not me LOL. If I don’t blog now – who knows when I’ll do some more photos!

Sway Dress - back

Sway Dress – back neckline. Not a great picture but this is just to show the shape of the back neck (you can wear the dress either way)

FACINGS…

I used black tricot for the facings, interfaced with a light tricot interfacing. Yes I said facings… and like my Top with Epaulettes I think this is a superior way to finish this particular dress rather than bias binding.

As the dress is sleeveless, the facing is attached using one of those Houdini methods… you know those type of sewing steps when if you haven’t done it before, you read the instructions, google, re-read the instructions… take a deep breath and then sew. If you have sewn a button-up shirt using the yoke burrito method (as seen here on the Grainline blog)… then I think you will master this technique easily. While the yoke is different, you do rolled the dress over to one side and then wrap the shoulder around the dress – I know, sounds weird but works perfectly. While I could demonstrate this on my blog, there are plenty of bloggers who have already done so – so check out Poppykettle for starters. My lovely friend Marjorie in Brisbane also emailed me a tutorial as well – so this was easy – just needed a little sewing faith.

BELT LOOPS…

Rather than making self-fabric belt loops I created thread loops. I had not made these before… however thread loops are SERIOUSLY the simplest thing to create. I cut six lengths of Gutermann thread (just my normal thread) I tied a knot at one end. Then I set my machine to a zig-zag stitch with the width at 3 and length at 1. I held the threads behind and in front of my machine foot with a light tension and away I went. Yes, it’s that easy.

sewing thread loops

my first self-made thread loops

I found this tutorial on Coletterie very helpful.

THOUGHTS…

It’s such a simple dress, four pattern pieces. Sometimes that’s just what I love to wear the most – very simple clothes that fit (loosely) and flatter – that’s enough more days than not. This is one of those dresses where you can let the fabric sing. Now I want one in a floral (of course). You can bet there will be exactly that in my summer wardrobe this year.

An amazingly quick and gratifying make. I love the neckline and you can wear it either way. I love the V-neck, it’s not too deep or too wide.

This dress has a front and back centre seam. I did think about eliminating them – however with this fabric you can’t see the seams so I chose to leave them.

I love Papercut Patterns. I’ve actually got quite a collection, I just haven’t had a chance to sew them all, except the Saiph Tunic and the Bellatrix Blazer.

The patterns come in a sturdy cardboard package, the pattern photo can be removed from the package… where you will discover all the measurements and fabric requirements. These really do look and feel like excellent value for money – the sort of pattern you keep and display on your shelf. Check them out here.

The patterns are easy to trace and the instructions are thorough without being too wordy. You can cut up the pattern and cerate a booklet from the instruction section of the sheet – however I can’t bear to cut these lovely patterns up.

STILL TO COME…

The Guise Pants (traced). I was initially a little hesitant about these – the back waist is elastic however I’ve seen some great reviews (Gingermakes and Jolies Bobines – and I am going to try them. In basic black. I’ve also cut out the Flutter Tunic .

GIVEAWAY TO COME…

Katie has offered a Papercut pattern as a giveaway – I’m a little tired this week so let’s do it with my next Papercut make! Watch this space.

Pattern: Sway Dress by Papercut Patterns, I made XXS cut to the longer hemline.
Fabric: Mystery woven from Spotlight (bargain table)
Shoes: Urban Soul (I do love these crazy shows but they have a history so I’m not overly fond of them… #itscomplicated – chosen by Miss 10 for these photos). I really need a pair of classic black patent heels… I got distracted last shoe shopping trip… it happens #squirrel

Note: Papercut Patterns provided this pattern for preview purposes. All opinions my own. No affiliate links in this post.

This post first appeared on http://www.sewbusylizzy.com

Drop Waist: Take 2, Papercut Saiph inspired Burda 7056

So while the jury is out on SBL vs the drop-waist look. I decided to try another ‘Saiph inspired’ make. Yes, another drop waist and a circle skirt.

I wanted to try out another drop-waisted look, this time with a more fitted bodice.

So I turned to my bulging pattern & fabric stash to see what might be a contender.

Burda 7056

Burda 7056

I chose Burda 7056, described as “No-frill dresses for the confident woman, being the focus. All slightly flared, fitted at the back waist, shoulders left exposed“. I liked the more fitted but slightly a-line shape, with fitting provided by bust darts and back fish-eye darts. I added this pattern to the stash quite some time ago, I love the maxi version, and I also love the combination of high neckline and cut-away shoulders. There are not too many blogged versions out there – except for the lovely new-to-me blog bernie and i who has made it several times!

The fabric is a cotton sateen from a Spotlight bargain table for a princely $3 a metre. I adore the vivid blue & white. The large regular pattern is fun but not easy to sew with as you will see later!

Here’s what happened…

Burda 7056 with Saiph-inspired drop-waist and skirt modification.

Burda 7056 with Saiph-inspired drop-waist and skirt modification. It was blowing a gale on this day we had to find a headland out of the wind (almost impossible to get out of the wind anywhere some days – so the dress looks slightly distorted in this picture and my bra strap has popped out – that’s life. And yes, it’s TOO SHORT! My waist is at the ‘ellipses’ travelling horizontally around the dress.

I cut the dress pattern off at about ‘Saiph’ bodice length. I sewed the bodice together, attaching the facings, which are great and don’t flip out at all due to the style of the dress, and put in the zip. The zip is a long centre back invisible zip.

To draft the circle skirt piece, I measured the finished bodice circumference. I then simply googled ‘circle calculator circumference, find radius’. Low and behold a little box popped up and I was away. This provided the radius & I used my daughter’s school compass to draft the dropped waistline of the circle skirt piece.

I simply pulled out the Saiph skirt pattern piece and used that as my guide for the outer hemline. I know, string, fishing line, makeshift compass, la la la – the pattern piece was there and a circle is a circle is a circle.

Burda 7056 with Saiph-inspired drop-waist and skirt modification.

Burda 7056 with Saiph-inspired drop-waist and skirt modification. Not sure if it’s looking ‘hippy’ possibly yes. or if the cut-away shoulders help balance it out.

Now clearly it’s a little short. Actually no. It’s a lot too short! Despite the ‘frisky’ length I’m pleased with the make. It was an interesting process… and that’s why I sew, to experiment and have fun. I could have not blogged it due to it’s length – but it’s part of my current obsession with shifts, shapes and more – I’ll just run the risk of you thinking me a ‘tart’. At some point I’ll reach the caboose of this sewing journey so forgive any hints of SBL caboose in the meantime. It’s part of the success/disaster of sewing.

Burda 7056 with Saiph-inspired drop-waist and skirt modification.

Burda 7056 with Saiph-inspired drop-waist and skirt modification.

Apart from the length, I’m not in love with the only front bodice shaping being the bust darts. Probably because this is a slightly heavier cotton sateen, I don’t like how the dress lies between my bust and the skirt – which you can also see in the white feather hem version on the pattern envelope. I don’t want this to be super fitted all through the length of my body but I think some waist shaping at the front of the bodice around the waist would be nice. That said, I think it’s great as is if it made up as just a shift dress, in fact I think it’s rather a terrific pattern for a shift.

Burda 7056 with Saiph-inspired drop-waist and skirt modification.

Burda 7056 with Saiph-inspired drop-waist and skirt modification.

If you are wondering about pattern placement… with a pattern this big it was always going to be challenging… and probably why this fabric sat in my stash so long. I love the vivid blue of this fabric but those ‘flowers’ and ‘leaves’ were challenging. I actually attached the skirt, removed it and reattached it… and I think you will agree the second try was much better!

Pattern placement = hilarious.

Pattern placement = hilarious.

so pleased to have provided a moment of mirth for you…

Like the Saiph, ELH rather likes this dress . He said “I think you should wear that dress… a lot”.

I’m now planning SBL & the Drop Waist No.3… why not… I’m having fun!

Oh and I forgot to mention last post… we have a new addition to the family… meet Midge…

Midge - the new bubba. Yes that's a Chihuahua.

Midge – the new bubba. Yes that’s a Chihuahua. Yes he is the same colour and has the same markings as Banjo – he’s twice as feisty though!

I’m betting you have now forgotten I made a dress. LOL. This post came so fast after the last post because I was pinned to the lounge by the sleeping puppy (he’s a genuine lap dog this one) so typed it up on my iPhone and read Japanese sewing books!

And here is a beach…

Photos taken at the northern headland of this gorgeous beach - Shelly. One of my favourite places and views in Port Macquarie.

Photos taken at the northern headland of this gorgeous beach – Shelly. One of my favourite places and views in Port Macquarie. Many of our beaches are ‘in town’ yet you don’t see a house – I love that.

Pattern: Burda 7056 with Papercut Saiph inspired modifications.
Fabric: Cotton Sateen from Spotlight (about $5 worth of fabric here!)