It’s a wrap (dress)… Butterick 6054

I’m rather amazed I haven’t made a wrap dress until now as I love them.

Butterick 6054

I think I’m rather ashamed I’ve never sewn one of my favourite styles before!

Maybe it was my early fear of knits… my inability to source quality knits locally… anyway – whatever the reason, I’ve made one now. Funnily enough it is very similar to the pattern envelope! I had planned to make McCalls 6884 however I chose this instead as the McCalls is a ‘mock’ wrap dress and I like ‘real’ wrap dresses (I still want to make 6884 of course).

CUTTING OUT

I find some knits challenging to cut out. This knit is a very soft cotton jersey from The Fabric Store, Sydney. While it’s not ‘slippery’, it does have lovely drape and wants to flop about. I started to set up on the floor (which is tiled so it’s an endurance) then suddently realised that my bed was a much more agreeable height. So I laid my cardboard mat on the bed and found the process much less exhausting – my knees thanked me. Clearly this style of cutting is not for using a rotary cutter, I used my shears.

I also thread marked all the notches, pleats and so on. I find some knits slide around if I’m trying to drag chalk over them – or any marker for that matter. Using a needle and thread is a little more time consuming but the accuracy makes it worthwhile.

PLEATS

Those lovely skirt and bodice pleats are a little challenging to sew through. The pleating is simple enough to do… however you end up with 11 layers of fabric just on the skirt piece. The bodice has two pleats and when you join the skirt to the bodice, there is another pleat across the waist line seam… to top it off you also need to attach the tie to the gigantic wad of fabric. It was quite a challenge to feed through my machine.

Butterick 6054

Please excuse my ancient cutting board, complete with toddler scribbles.
Focus on the pattern… that is a LOT of pleating for a knit…

As the front pleated skirt curves up towards the waist, the side of the top front hemline is curved upwards. I find that the squared-off corner of the other side (under the pleated wrap front) wants to perform ‘peek-a-boo’ – which I find annoying as it looks messy… to me… I’ve often said I’m stupidly fussy about minor visual details.

If I made this again I might curve the corner of the inside wrap skirt piece. I think this would minimise the visual distraction the squared off corner creates. My cure for this one? I tuck a tiny bit of the fabric on the inside into the side of my knickers to bring the edge up a tiny bit…. shhhhh don’t tell anyone. The fabric is so busy, and the pleats so distracting you would never know… except I’ve told you. Ooops.

Butterick 6054

The wrap does blow open a little and the wrong side can show… so it’s a classic wrap dress in that regard! The wrap is quite generous so I had no concern I would have a ‘whoops’ moment

TIES

I found these far too long. I’ve left them, however the tie on the side that goes under the front wrap and through the side opening is huge! I wrapped it around my waist twice (going under the front and through the side opening each time as I find all those ties wrapping around the front and over the pleats to be rather visually messy) and tied it as the side with the pleats.

I’m personally not a fan of ties that meet at the centre back. If you are sitting in a chair, having a lumpy knot between your spine and the chair is not comfortable. I also think it looks better at the side than dangling down over the junk trunk. Just personal preference.

SIDE OPENING FOR TIE

I Double stitched the seam around the opening for strength. I then used thin strips of lightweight hem tape to fuse the loose edges down rather than hand stitching them. Not because I’m lazy (I hand stitched the wrap facing down and to the waistline) but because I thought it would be neater and stronger and I’m happy with the finish. Sorry no photos… as you can’t see the fusing and the seam is now completely concealed and sealed away from prying eyes by the fusing tape.

NECKLINE

I found this neckline stayed in place all day and did not gape at all.

Butterick 6054

No neckline gaping whatsoever… happy days!

I didn’t actually cut the precise length of the band or bother to mark the notches and so on. Instead I simply pinned the band along the neckline, stretching it ever so slightly as I pinned, rather like attaching a neckband to a t-shirt. Just pulling it up ever so slightly to ensure there was a little tension to pull the neckline back against my skin. It appears to have worked a treat.

I used my coverstitch machine to stitch the band down after I attached it.

I also used some tape in the shoulder seams to stabilise them due to the weight of the fabric. Knit is strange stuff… it can be so heavy!

HEM

I always find hemming knits rather daunting. It is either smooth sailing or a turbulent trek of horror and frustration… sometimes involving hyperventilating. While the instructions have you turning up the hem and steaming out the curve etc. I found that this hem turned up very easily without any excess fabric to bother me. I simply turned it up, steamed it into place and then hand basted it into place. I often find encountering pins in the machine hemming process rather messy and sometimes results in a break in the rhythm of the stitching. I like to sew a consistent speed when hemming, no pauses and this seems to work – especially with my coverstitch machine, she’s a little… well… moody at times.

Butterick 6054

hmmmm, I’m undecided I think this makes the caboose look hmmmm, curvy….

FABRIC

It feels divine, soft and cuddly. The staff did say they had feedback that the black bled into the white when it was washed. And it did. Badly so. I washed it twice and hung it so it wasn’t touching as it dried. Only time will tell if it’s a repeat offender! I think I might search for some dye ‘fix’ solution – that must exist!

Likes

  • It’s a wrap dress. It’s a classic just not because it looks great on many body types, it feels like PJs!
  • Lovely neckline.
  • Pleats at the waistline that somehow manage to highlight curves and conceal bumps at the same time.

Dislikes

  • Not sure about kimono styles on me. I feel my shoulders look droopy. I think I prefer sleeveless or 3/4 sleeves – or a style which highlights my shoulders rather than covering them.
  • The huge volume of fabric at the waist… soooo many pleats.
  • The very, very long ties.
Butterick 6054

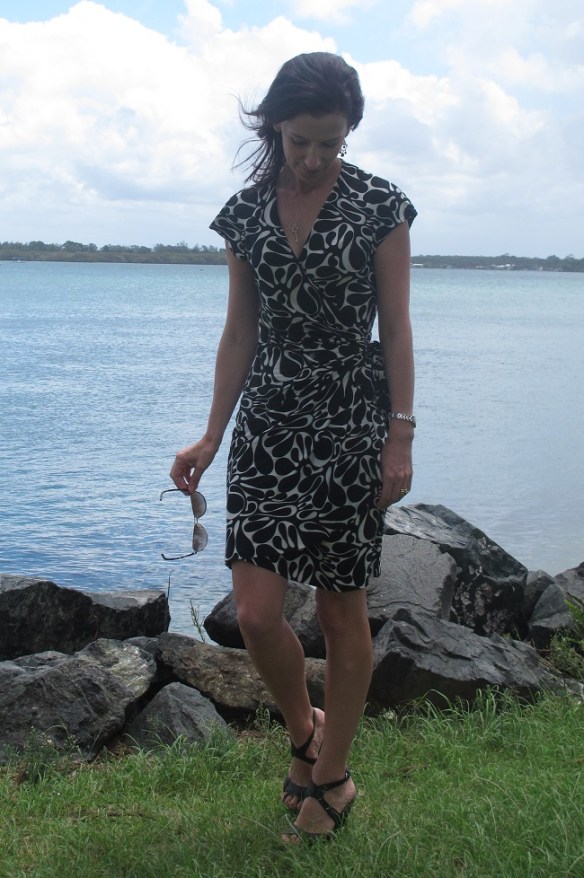
My choice of fabric unfortunately hides many of the details of this pattern, such as the lovely side skirt and bodice pleating. It was starting to rain – hence the little blurry spot on the camera lens right on my tummy/hip!

I don’t like this style on me quite as much as my cowl-neck dress, however it is perfect casual workdress – I don’t have to look super-corporate every day so it’s a great choice for those days at the desk when you just want to be comfortable.

While it’s not my favourite make, I wore it to work this week and got lots of compliments… and it felt like PJs #winning

Pattern: Butterick 6054. Size 6.
Fabric: Cotton Jersey from The Fabric Store, Sydney
Shoes: Sempre di by Biviel. I have had these forever… and they are slowly dying *sobs*. I actually wore my new red Miz Mooz shoes to work with this dress – however I like the monochrome look. I know – stupidly fussy again. (no affiliate links – I just buy stuff I like)

ON THE RADAR…

Sewing: I’ve sewn a Japanese pattern book skirt this weekend. It’s not fabulous but I suspect it will get worn a lot as it is comfortable! Blog post and photos soon. This is part of the Japan Sewalong (more info on how to participate here).
Life: December/January was overwhelming. Work & family stuff have been challenging to say the least. I don’t have much on the 2015 Fun & Frivolity Schedule… no holidays on the radar. However I will be hanging out with my sewing-soul-sister Busy Lizzie in Brissy at the end of March for High Tea. I have a zillion things to do in Brisbane as my Sydney trips are limited at the moment… including shoes and of course The Fabric Store, Fortitude Valley.
I’ll be down in Melbourne in August for Frocktails. Hope to see you then!

Focus Lizzy… Focus!

I tend to talk and write a lot. What can I say I talk, I type and words just come out!

So I’m attempting to rattle on less tonight, it’s getting late and I need to sleep 🙂 otherwise I end up SewCrankyLizzy.

PATTERN REVIEW RTW

Voting is now open on the Pattern Review website for the RTW competition. I’m quite sure that there are a few entries there that are going to smash my humble little gingham shirtdress but I’ve decided that if by some miracle I do win the $200 Mood voucher, I’m going to buy something (in addition to my dream Anise fabric) to giveaway on my blog. I figure you all want something from Mood Fabrics just as much as me – so part of being happy is about sharing it around 🙂 You are all so generous and kind to me, I would like to give a little back in the form of Mood fabulousness if possible. I guess that would be interpreted as an enticement but it’s not intended that way. A lot of what I have achieved has been inspired by your kind words and encouragement, you are all as much a part of my sewing as me. Maybe I should have wait til after the competition. Ah, I prefer to be upfront and just say things like they are. It’s just something I want to do & it’s not an afterthought Read more about this project here.

My Shabby Apple RTW dress

My Shabby Apple RTW inspired dress – I love it with my dark red belt, patent red slingbacks. I have worn this A LOT. Making it a sewing win regardless of Pattern Review competition outcome.

VINTAGE DRESS

I’ve also made up a vintage pattern – see if you can pick which one…. Thank you SuzyBeeSews! The bodice of this is very much like the Peony but it fits without alteration. I made this from an old doona cover from a charity shop – I as nervous about the fit but it fitted perfectly. The skirt is a little too gathered for the dress, I just used all the leftover fabric once I cut out the fabric. I didn’t have enough doona cover for the flared skirt in the original. I love this bodice. I want to make the dress again – sleeveless version.

Vintage McCalls

Vintage McCalls. That’s one of my beloved pieces of furniture, a early 1900s settee, from my childhood bedroom.

DISTRACTED

I’ve been distracted by Sewalongs. I can’t help myself. I have almost finished my New Look 6000 for Scruffy Badger’s Polka Dot NL 6000 sewalong. It’s more splodge-a-dot but I like it. I love this pattern. I confess I had been put off it because the envelope was so thick LOL. The neckline on this is not playing nice, it looks smashing but the facing does not want to stay put – damn you drapey fabric… although the pleats look lovely… I want to make it in a ponti fabric for work. Love this pattern.

New Look 6000

New Look 6000

Despite having the perfect pattern for the Sew for Victory Sewalong…

Sew for Victory

Sew for Victory. An original 1044 pattern.

YEAR OF THE JACKET RESUMES

I’ve decided that my London trip is too close and I would like to attempt to make a jacket to take. Hmmmm, I know ambitious….

Burda 03/2013 jacket

Burda 03/2013 jacket. A pretty wool blend.

I also got this raspberry stretch lace and would love this little cardigan from the latest Burda magazine. Don’t you think it would look fabulous with a black Charlotte skirt and a skinny belt…

Burda 03/2013 lacy cardigan

Burda 03/2013 lacy cardigan

Focus Lizzie. Focus!

Oh and my Tessuti competition fabric arrived…

Tessuti package

Tessuti package – how awesome is that packaging!!

APRONS Ruffle Kerfuffle and Strawberry Fields Forever. Butterick 5474

We were in Sydney this weekend (husband riding the Sydney to Gong Charity Bike Ride for MS). We spent the day in Sydney CBD and my husband suggested we take the apron blog photos in a very scenic and recognisable Sydney location – why not!

Before the apron photos (yes, yes be patient) I did start out with good intentions of doing the Did You Make That? Apronalong properly.

I purchased Butterick 4087, I cut out the pattern pieces, I intended to follow each Apronalong post as diligently as I had followed Sunni’s 1880 Sewalong earlier this year… then I purchased another apron pattern! *sigh* I’m hopeless.

My main reason for deviating from my good intentions? Waist-aprons are not sufficient protection for my work clothes. The bib apron of Butterick 4087 fairly terrified me with its gigantic ruffles. Yes, yes I could have designed my own… then I fell in love… with Butterick 5474.

Butterick 5474 - aprons!

Butterick 5474 – aprons!

Yes, I totally agree, the lobster print is to die for! A high fashion apron!! Does it make you think of this!

I could find any lobster prints alas despite my seaside location… fortunately I fell in love with a cherry quilting cotton… and the Ruffle Kerfuffle was born…

I loved the back background of this print and played it up with a red polka dot and black.white striped contrast fabrics.

THE PATTERN
Ruffle Kerfuffle Apron

Butterick B5474, view C: The Ruffle Kerfuffle

Butterick B5474, view C: The Ruffle Kerfuffle. Oh yeah, and that’s the Sydney Opera House in the background… concentrate on the apron people!

Excellent instructions – no complaints!

I did made a few changes of course…

  1. I found when I attached the skirt ruffle that the ruffle raw edge looked rather messy. Yes, it was at the back of the apron skirt but it annoyed me. So I cut a strip from my contrast black/white stripe fabric and stitched that over the raw edges. It’s not perfect but it is much nicer than a ruffle’s raw edge.

    Butterick 5474, view C: Ruffle Kerfuffle, covering the skirt ruffle raw edges.

    Butterick 5474, view C: Ruffle Kerfuffle, covering the skirt ruffle raw edges.

  2. I bias cut the black/white stripe contrast fabric for one of the pockets – simply because I like the geometric contrast against the black/white strip ruffle on the second pocket. Purely cosmetic! I also added a row of machine embroidery across the top of the red contrast pocket.
  3. I discovered post-construction that the pockets tended to gape a little, I think due to the skirt gathers. To cure this I created tiny inverted pleats in the centre of each pocket. I then topped each pleat with a contrasting button… because there is no such thing as too much trim!

    B5474, view C. Ruffle Kerfuffle pockets

    B5474, view C. Ruffle Kerfuffle pockets. Added some tiny inverted pleats to counteract gape and topped them with a button.

  4. I also attached the pockets in such a way that they are two separate pockets, if you attach them the way the instructions state you end up with the top pocket flowing through into the lower pocket. Weird.
  5. I interfaced the waistband. I think this helps the apron sit better and crease less around the waist. I guess it doesn’t matter for an apron but I felt happier about the end result.

If you need to practice gathering or love a good ruffle, then this is the apron pattern for you. Personally I like the crossover bodice, it walks a fine line between apron and dress (minus the obvious fact it doesn’t have a back of course – could be great hospital wear). It’s retro and super cute.

I fully expected to love the Ruffle Kerfuffle the most, however I am a bad stitcher and I think I have a favourite…

THE PATTERN
Strawberry Fields Forever

Butterick B5474, view E: Strawberry Fields Forever

Butterick B5474, view E: Strawberry Fields Forever. Oh and that? In the background? That’s The Coathanger – also known as Sydney Harbour Bridge.

Again – great pattern. Good instructions.

Check out that Peter Pan collar. I know… I’m still going squee too!

I couldn’t resist the strawberry fabric. I adore blue and the strawberries just seemed so wholesome! Paired with the red gingham I almost smell my raspberry buttermilk muffins cooking…

B5474, view E. The Strawberry Fields Forever piped collar and machine embroidered button placket

B5474, view E. The Strawberry Fields Forever piped collar and machine embroidered button placket

I piped the collar – it’s my latest trimming obsession and I love how it subtly sets off the collar. This pattern would also look fabulous with a contrast collar I think…. hmmm another apron is bubbling away in my brain already!

The buttons are purely decorative so there are no buttonholes to fret over. I thought it looked a little bare so I ran a row of machine embroidery flowers behind the button placement. It secures the apron bib beautifully and looks totally cute! Squee!!

The underskirt has a stack of gorgeous side pleats and the overskirt/apron has four inverted pleats. Very easy and very effective, I rather like the pleats in comparison to the gathers.

B5474, view E. Strawberry Fields Forever pleated underskirt

B5474, view E. Strawberry Fields Forever pleated underskirt

I had some cotton lace trim in the stash so I chuck this onto the apron waistline.

The one shortcoming of this pattern with no alterations is the lack of a pocket – I need somewhere to put my phone or pincushion and scissors when running about the house! I love the apron how it is, so I might sneak one on the apron’s underskirt so I don’t change the existing appearance.

Strawberry Fields Forever is also the family favourite – fortunately this is not an episode of Australia’s Got Talent so they are both staying!

Doesn't everyone wear aprons when sightseeing?

Doesn’t everyone wear aprons when sightseeing? LOL.B5474, view E. A little crumpled from being stuffed in my shoulder bag all day!

VERDICT

I never expected to like making aprons!! I’m in love! Mind you, I am still amused that the Big 4 dedicate an entire section to Aprons in their catalogues. Why???

The Ruffle Kerfuffle was the easiest, other than an epic amount of gathering it was very easy to put together. It’s OTT but in a cute way.

Strawberry Fields Forever was a little trickier because of the collar but probably quicker to put together. Less pieces to cut as well.

What I love about these aprons is how they feel like an outfit in themselves. They are definitely a conversation piece… which might be a good distraction if I ever have a kitchen cooking disaster for guests…

Now… who else needs an apron??? I want to make more!!!

Thank you Karen for the inspiration to make something completely different! Check out the Apronalong Festival going on over on the Did You Make That? blog.

Vogue 1247… again

Oh and I didn’t spend the entire day looking like a complete fruitcake. I wore my Vogue 1247 outfit – and was stopped in The Fabric Store by a customer wanting to know if I had made the top and where did I get the gorgeous fabric? (errrr, Lincraft!). I did super indulge myself at The Fabric Store – it is divine…

Vogue 1247 on apron day

What I really wore all day… Vogue 1247 top and skirt…

The second highlight was the Japanese tourist taking also pictures of me posing at Circular Quay in my aprons – how funny is that!

Location: Circular Quay – a gorgeous part of Sydney, you hop off the city train and BOOM you are smack bang in the middle of the Sydney Harbour Bridge and Sydney Opera House, waterside in the city – oh and there is the beautiful Museum of Contemporary Art as well – perhaps that’s another photo shoot… Gorgeous! It would have been nice to have some more sunshine but you can’t have it all 🙂

GERTIE’S LITTLEST WIGGLE (Butterick 5814)

Butterick 5814 - my little wiggle

Butterick 5814 – my little wiggle (and a tad smug)

AKA the Ladybird dress – thanks Bimble & Pimble! That’s all I think about when I see this! Totes!

So Butterick 5814 is finished – well nearly, I confess I still need to slip-stitch the hem up but I figured I could get away with it in the photos!

Butterick 5814 - my little wiggle

Butterick 5814 – my little wiggle accessorised with a smirk. Yes, I love those shoes too…

I had to do some modifications post bodice construction. I thought it was going to fit and then once I sewed it all up and put in the zip it was just a little tooooo revealing in the bosom department. It was kinda sliding across, very low-cut and revealing – I am not your classic wiggle figure. More of a slight shimmy. I’m sure if I was a full-figured lass, or more of a wiggle, it would not have been an issue.

Butterick 5814 - bodice interior

Butterick 5814 – bodice interior. Whoops camera strap. That’s my post construction ‘hack tack’ on the righthand side.

I made a 6 in the bodice and I still had to heaved the surplice bits over a good inch on either side, tapering out to zero at the waist. This pulled the bodice sides (which cross over) across more tightly and I feel more confident in it with this rather dodgy bodification. Hey, it works and from the outside you can’t really tell. Even when I am really drunk I don’t take my clothes off in public 😉 so the interior is not such an issue LOL.

Butterick 5814 - bodice exterior

Butterick 5814 – bodice exterior

It’s not the best way to modify the dress, post construction (listen… can you hear Gertie screaming “make a muslin first you silly woman” yes yes Gertie but I am a base jumper in the sewing world – take a leap of faith and see what happens) however you can’t tell from the outside and I think it did less damage that a truckload of picking.

I would try making this again, modifying the little bodice piece that the tucked side attaches to and pulling a substantial piece of the bodice that crosses under into the side seam on an angle. I would make it in black – it would be a smokin’ LBD.

Butterick 5814 - my little wiggle

Butterick 5814 – my little wiggle. This is how I look after a few drinks…

If you are a curvy girl I think this could really work on you.

It was fun to make. I found it came together beautifully and the interior of the bodice looked amazing (until my hack post-construction tack). I got a bit stuck on the boning as I had never tackled that stuff before. I ended up taking the boning completely out of its cover, edge stitching it down and then re-inserting the boning. Worked perfectly.

Butterick 5814 - back - whoops bra strap

Butterick 5814 – back – whoops bra strap. Sorry should have straightened myself up for that photo.

I was really disappointed with how the zip was inserted. It looks OK on the outside but the inside is not very neat. I felt after the immaculate bodice construction the zip insertion was a little ‘blah’ and I would do it my own way next time. I kept re-reading the instructions thinking “that can’t be it” but ended up using them anyway (in a leap of faith) but was not pleased with the result. Compared to the Cambie finish, it’s just not as tidy, But then the Cambie is perfect :-).

I made a 6 up top and an 8 for the skirt, I think I could have made a 6 all the way through.

Butterick 5814 - skirt puff!

Butterick 5814 – skirt puff!

The sleeves are tight and come right under your armpits.

Butterick vintage 2739 - there is one of those flounce things!

Butterick vintage 2739 – there is one of those flounce things!

Not good for a hot sweaty day. The flappy thing is necessary, without it you will end up with a fabulous but bouffy bunch of pleats curving across your stomach, excellent if you like the bloated or pregnant look, so the flappy bits are essential. I started out thinking they were odd but I really like them now! Then I saw this vintage pattern on eBay today. Vintage waist flappy things!

It’s also a tricky dress to wear a bra with. You might be able to go without with all the boning but I need one to give me some shape. Possibly sewing one into the dress might work…

I love how the skirt is underlined, I have never underlined anything before so it was a great learning experience. Now I better understand why you might underling something, how underlining can change the shape of a garment, how the tack the pieces together and tack the darts etc before actually sewing. It’s time consuming but worth the extra work.

My photos aren’t great, it was just too windy to do beach photos today sorry – and I would look a little freaky on the beach in this.

I had planned to wear is to ‘high tea’ event but chickened out. I’m a bit sorry I did as this would look fabulous with a black hat! My Twitter friends helped out and we ended up picking the beloved Cambie. I got busy in the morning and made two Lisette bows (great idea from Sewmelove and HouseofPinheiro via Twitter this week) and trimmed my hat and handbag to match (thank goodness for keeping scraps). I was nominated for ‘best dressed lady’ along with two of my friends. Three of us were nominated in the top ten from a field of 150 ladies. No I didn’t win but I bet no-one else had made their own dress 😉 A short black lace dress won the day.

High Tea Sewaholic Cambie

High Tea Sewaholic Cambie

High Tea Sewaholic Cambie - accessories

High Tea Sewaholic Cambie – accessories

More blogs posts to come this week – blogger awards, Tasmania trip finds and more…

And if you are wondering about the gorgeous plant in the background of the Gertie dress pictures it’s called a Bottlebrush – yes not only do us Aussie have creatures with built-in pockets (marsupials!) we also have kitchen utensils in the garden. LOL.

Talk soon!

Pattern: Butterick 5814 purchased from Sew Squirrel
Fabric: shell: taffeta from Spotlight’s bargain table $10 a metre. Lining: black bemsilk

WIGGLIN’ along

Just a quick note to let you know that I’m wigglin’ along quite nicely… so far… fingers crossed…

Gertie's Butterick 5814 - pattern and fabric

Gertie’s Butterick 5814 – pattern and fabric

This dress has not only lining and boning – the skirt is underlined. I’m learning lots of new things as I go along (like making sure I read the instructions before stitching – seems like a simple concept but I’m sure you struggle as much as me with that!!). So far I think Gertie’s done a great job with the instructions and everything is fitting together beautifully.

I’m only 18 steps into the 54 steps of instructions. Here’s the bodice front…

Butterick 5814: the bodice

Butterick 5814: the bodice. Progress shot, this is just the bodice front….

I was a bit stumped on the bodice boning but figured it out. I was thinking that some shots of attaching the boning might be helpful to some people?? Or does everyone know how to do that? This was a ‘newbie’ skill for me but once I got the hang of it, I was slammin’ down that bonin’ in no time ma’am. There are two pieces of boning in the front and four in the back of the bodice so I got a bit of practice and it ended up v.neat.

Tonight I attached the bodice sides to the bodice front… and started to underline the skirt pieces…

Butterick 5814: WIP

Butterick 5814: WIP. Bodice with the side attached. I have hopped ahead a few steps and started underlining the skirt pieces. Need to trim the boning back as well…

Next I need to slip stitch in bodice lining side seams in place.

IN OTHER SEWBUSYLIZZY NEWS…

Today I reached 100 blog followers – thank you 🙂 I’ve done several little happy dances tonight (the dog was only slightly amused at my antics).

My family is away but ELH, being the ever-lovin’ husband that he is, thought I might make it to 100 followers while they were away… so when I sent a message to him to let him know I had achieved the 100th follower goal (which was another Busy Lizzie (with an ‘ie’ and she lives in Brissy – and even funnier, she set up her blog just a couple of weeks after I set up mine in April – how is that for freaky – so you better go and check her out too!)… he immediately sent me back a message…

He instructed me to go and look in the fridge on the bottom shelf at the back and I found this…

Moet - celebrating 100 blog followers!

Moet – celebrating 100 blog followers!

Gotta love a man like that 🙂 xxooxx

So I better pack my bags as I am off to Tasmania for the weekend to see the lovely ELH and my gorgeous little poppets tomorrow afternoon. There will be no more wigglin’ this weekend however my daughter has been making a Halloween outfit in Tasmania and apparently I am not allowed to sit down and watch the ‘really good movie’ that I sent down for the girls to watch (Extremely Loud and Incredibly Close) until I attach the sleeves for them.

But I might find some time to read a bit of this.. it arrived today – thank you gorgeous Kat of All the Whimsical Things.

Gertie's New Book for Better Sewing

Gertie’s New Book for Better Sewing – I’m so intrigued by Gertie and her achievements – and interested to try some of her patterns and see what might work on this non-Wiggle, I do adore ‘girly’ clothes.

Kat tweeted she had accidentally ordered two… so I offered to purchase her ‘oops’ book, she even popped a reel of thread in the envelope. Thanks Kat! This book seems to be everywhere!! I had to get the post office to search for it – they claimed it had been delivered…. yeah right! Some postal worker must have been out the back ogling the gorgeous dresses, layout and fabrics!! LOL

Sewing – it’s the most wonderful little hobby niche filled with the most amazing people.

Talk soon xx