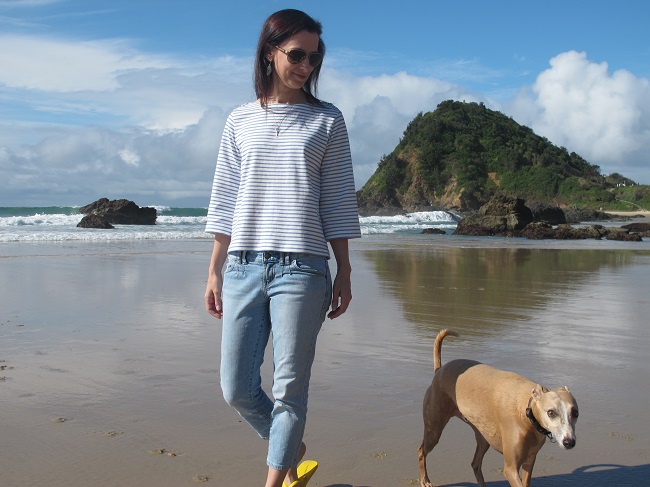
I’m not a country girl… it really gets up Willy’s nose…

Gathered Blouse from She Wears the Pants
Given my current fascination with Japanese pattern books, when
Tuttle Publishing contacted me about reviewing a couple of their titles, it was an irresistible offer. I received
She Wears the Pants (released this month) and
Sewing For Your Girls (I will review this soon – I have a backlog of projects!).

THE BOOK
The garments: This book does have a range of garments – from mini dresses to tshirts, shirts and jackets, pants and culottes. Yes, I was incredibly tempted to make that draped mini dress but I’ve got three draped dresses – my wardrobe needs other types of garments! I really like the range and style of these garments.

Some of the garments from She Wears the Pants
This book had been around for some time before being translated. Several of the garments have been made Top Notch (
velour top,
draped cardigan,
draped dress,
square top) & Handmade by Carolyn (
tapered trousers,
square top); and Meggipeg (
Gathered Blouse).
Not all of the garments pictured are patterns in the book, ie the tank with the short/culottes pictured above or the pants with the mustard top pictured below.
There is one knitted garment in this book – a belt stole. There are some tippets – one of these is pictured below.

She Wears the Pants – back cover
There is an excellent review of this book and more images on
Japanese Sewing Books.
Photography: I might be precious but I did find some of the photography a little bewildering. The images are very dark and this is exacerbated by the matt stock they are printed on. Some of the garment details are very hard to see in the photographs. It seems to me that these images are more about projecting a mood, intended as ‘fashion’ or ‘inspiration’. The construction section of the book has line drawings that provide the design details. I love line drawings.
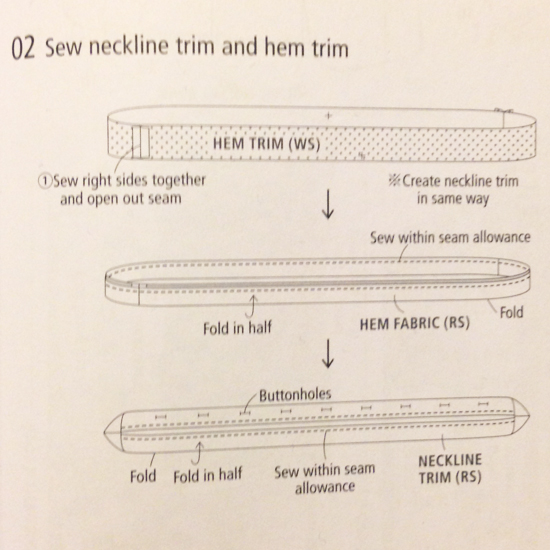
She Wears the Pants – example diagram
: The instructions are brief. There are some general instructions. In some cases, such as sewing on a collar, it is outlined once in a projects and then other projects simply refer back to those earlier instructions. Having some knowledge of garment construction is helpful. Like many Japanese pattern books, diagrams form a large part of the instructions. I don’t mind this – I find it interesting to puzzle through a project and think about how the project has been constructed and the other approaches I could take.
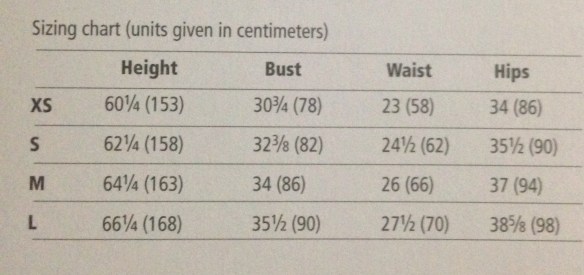
Sizing: Japanese sizing is small. I fit into the Small category & Medium height. While Japanese sizing puts some off I would say that they often allow A LOT of ease, in some cases much more than you might expect. Csews wrote about it in this February blog post. My second make from this book swims on me. It’s meant to but it could fit most sizes.
Title: I find the translation of this title odd. To me, ‘she wears the pants’ means something completely different to ‘she’s got mannish style’. To me ‘she wears the pants’ means that in a relationship the ‘she’ wearing the pants is in control, the dominant partner/personality or the boss of the relationship. To me, having ‘mannish style’ simply means a girl dressing in a ‘tomboy/masculine’ style. Handmade by Carolyn mentioned the translation of titles on her blog recently, in particular talking about this new title and her preference for the Japanese title. I don’t mind either way but I do interpret the new title as meaning something completely different to the original title. That said, it doesn’t impact on the contents of the book!

She Wears the Pants – pattern sheet
There are two double-sided pattern sheets. They are printed in a single colour and while the print is quite clear, the sheets are quite ‘busy’ and it took me quite a while to find one piece! Each sheet does have a list of the patterns on it, and the pattern pieces you are looking for – which is very helpful. Most of the pieces are listed around the edge of the pattern sheet with a line going from the text at the edge to the pattern piece… not always! There are some lurking in the middle of the pattern sheet swamp and you may need some patience to hunt them down.
When confronted by a busy pattern sheet, I find each piece and trace around it with my fingers. This might sound odd but when I am tracing a piece I have a general idea of the shape of the pattern piece and don’t make many mistakes.
Seam allowances: This book does not include seam allowances. The layout diagrams indicate how much allowance you should add as this can vary from the hem to the side seams etc. I don’t always add the recommended allowance, I tend to add what I prefer to work with in different areas of the garment – which just comes with experience.
Different approaches: I do think that with any translated book that you need to really think every step through. Not only may there be some issues with meaning and possibly conversion of measurements between metric and imperial, I think that there are many ways to approach garment construction and you need to be mindful of that when sewing outside your ‘usual’ patterns and books.
THE GATHERED BLOUSE
I love clothing that was a touch of quirkiness without being too odd. The Gathered Blouse ticked that box for me.

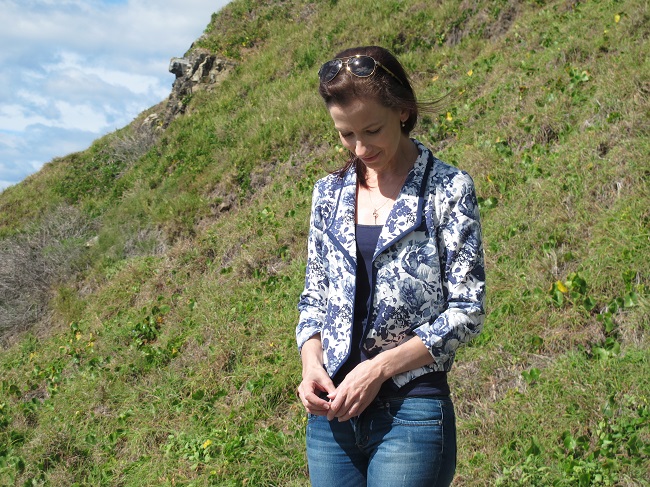
Gathered Blouse – while this is photographed buttoned up I prefer it slightly unbuttoned… that’s how I wear all my shirts.
Gathered Blouse – while this is photographed buttoned up I prefer it slightly unbuttoned… that’s how I wear all my shirts.
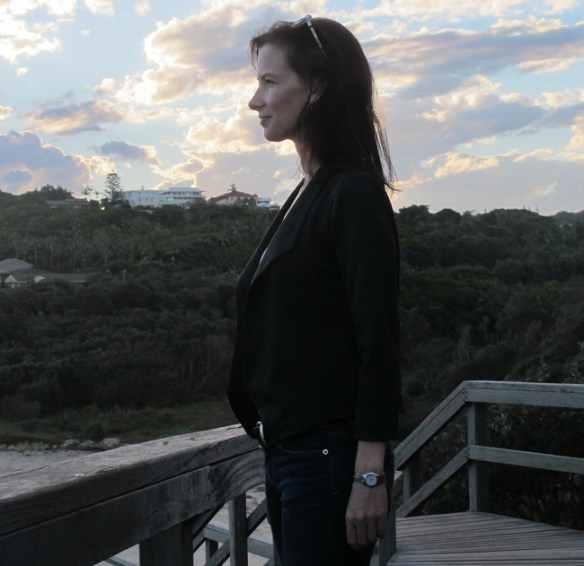
This blouse has a very full back, is quite cropped at the front with a slightly longer back. The collar is rounded and the front pockets are slightly angled. The shoulders are dropped and sleeves arejust below elbow (on me anyway), quite full with pleats at the cuff with a simple finished slit and button cuff closure. The combination of a ‘mannish’ shirt with some soft feminine features was interesting to me. Funnily enough the detail the pattern is named for is not photographed in the book – the gathered back. Unfortunately my shirt got creased in the car – but you can see how full the back of the blouse really is.

Sorry – shirt and car seat was not a happy marriage and my back is creased.
I have always steered clear of patterns without seam allowances for shirts as the accuracy required for creating a good button band, collar band and collar scared me. As I was working with this pattern that had not seam allowances I decided to re-think my former shirt making techniques and took a different approach.

The back is very full and the hemline dropped – strong breeze is blowing. Oops, thought I had ironed this to death but must have missed that last bit of hem!
I decided to use sew-in interfacing rather than fusible for the first time – which has given the collar some lovely structure and I’m quite taken with it now. I traced these pieces directly onto the sew-in interfacing – without the seam allowances. I then added the allowances as I cut out. I then used a fabric glue stick to attach the interfacing to the collar, band etc. This provided me with the exact sewing line and everything went together perfectly… I think I’m sold on this method!

I can’t see myself ever wearing it buttoned up, I always wear my blouses/shirts slightly unbuttoned. I just did this for the blog picture. I know, I spoil you and make a goose of myself far too often.
For some reason I imagined this blouse in a chambray fabric with jeans – a bit of a take on the country girl that I’ve never been. I might have spent two years at boarding school in the country but I was a ‘fish out of water’. That’s a whole other story and not for here in the middle of a sewing blog 🙂
BUT WAIT… THERE’S MORE…
I’ve made two things from this book – I’ll post the other shortly!
GIVEAWAY
I had already pre-ordered this book before Tuttle contacted me so I’m giving this one away. Leave a comment below to be included in the draw.
The draw closes on Sunday 17 May at 6pm (my time EST Sydney/Australia). Open to anyone, anywhere in the world.
Pattern: Gathered Blouse from She Wears The Pants (English version), published by Tuttle Publishing.
Fabric: it’s a mystery fabric (seems to be a chambery, fine linen type fabric) from The Make It Fabrics in Logan, Brisbane. This place is a rather unexpected treasure trove, a tip off from blogless Alison (thank you thank you!). Busy Lizzie was the most obliging chauffeur on a recent trip to Brissie – mwah. Finished with matt metal buttons from Lincraft.
Note: Tuttle Publishing provided this book for preview purposes. All opinions my own. No affiliate links on this post.