Drape Drape 2: No.6 Three-piece deep cowl neck dress

Drape Drape 2: No.6 Three-piece deep cowl neck dress

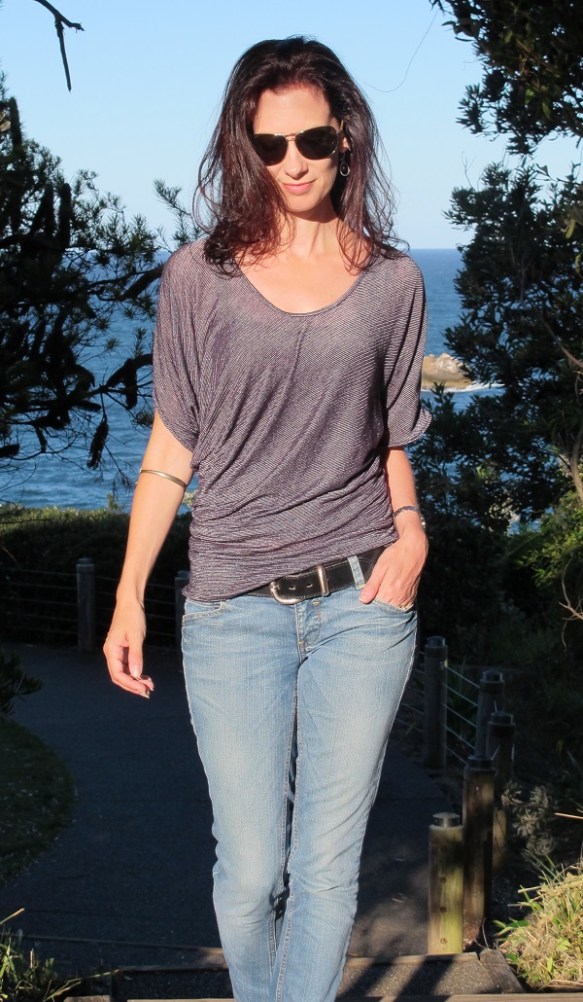
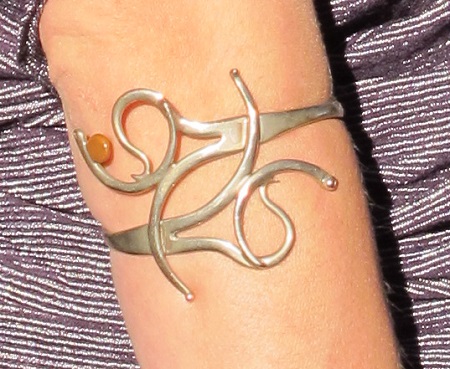
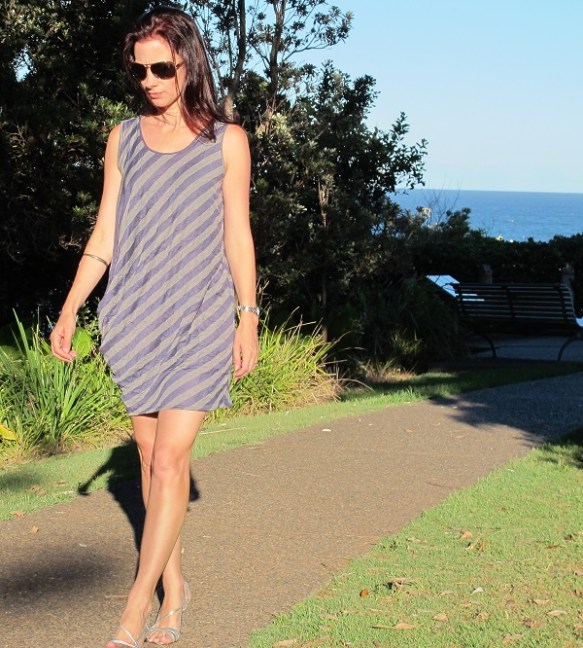
Drape Drape 2: No.6 Three-piece deep cowl neck dress. I have no idea where these arm muscles keep popping out from – I swear I struggle to open a jar of Vegemite most days.

Yes, it’s another Drape Drape project – if you accuse me of being obsessed, I’m not going to argue.

I’ve become rather fascinated by this particular style of clothing. I suspect it’s because it’s not something that I ever imagined wearing. It’s become a personal style journey. I’m rather fascinated. I think I’m falling in love… for now…

Drape Drape 2: No.6 Three-piece deep cowl neck dress

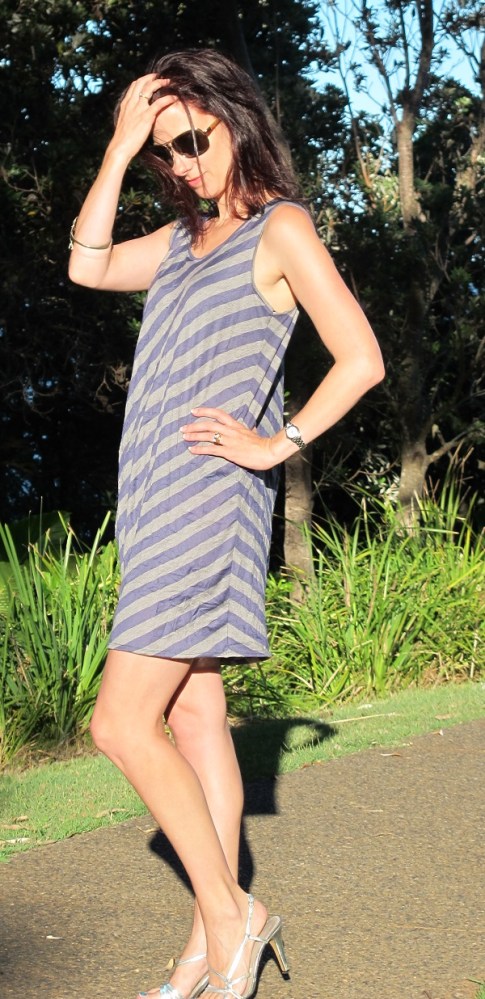
Not quite sure what to do with myself…

I confess Japanese clothing design always used to leave me a little confused. However right now I’m enjoying the visual contradictions it presents. It’s shapeless yet oddly sexy. It’s casually draped yet strangely highly structured.

Drape Drape 2: No.6 Three-piece deep cowl neck dress

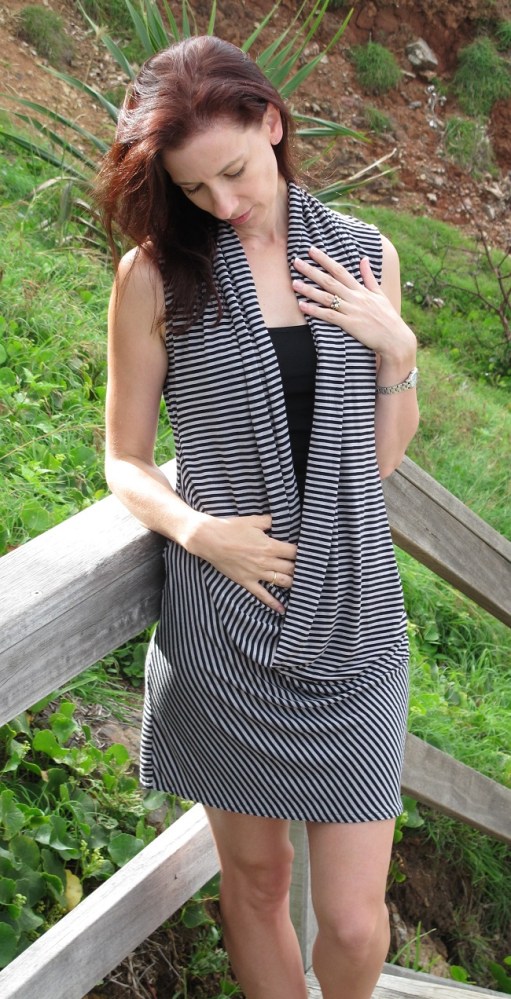
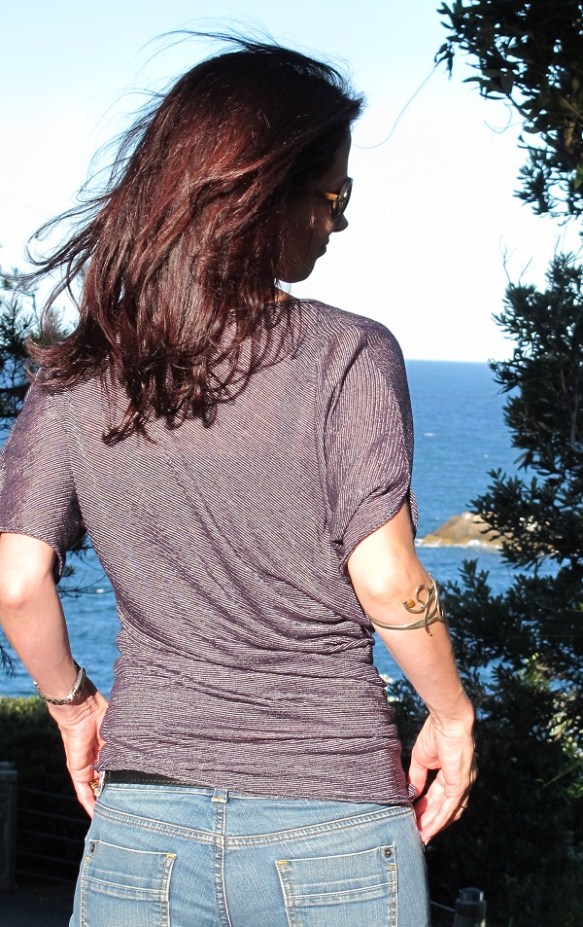
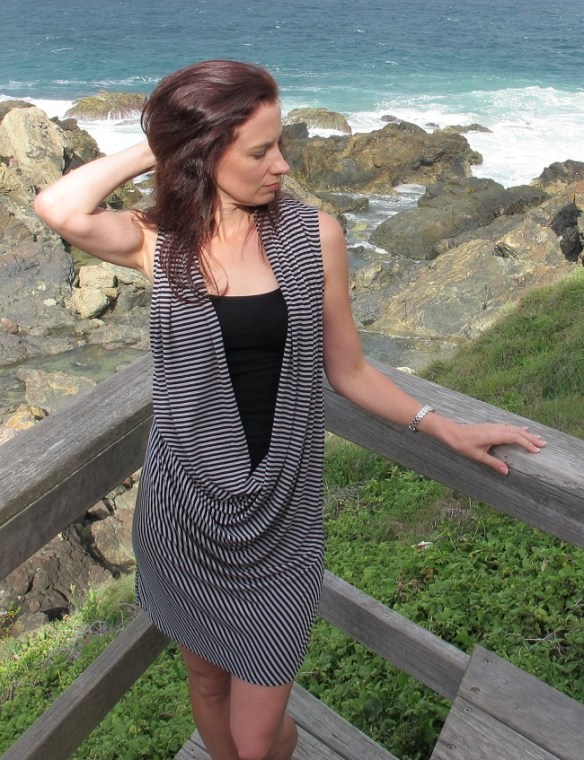
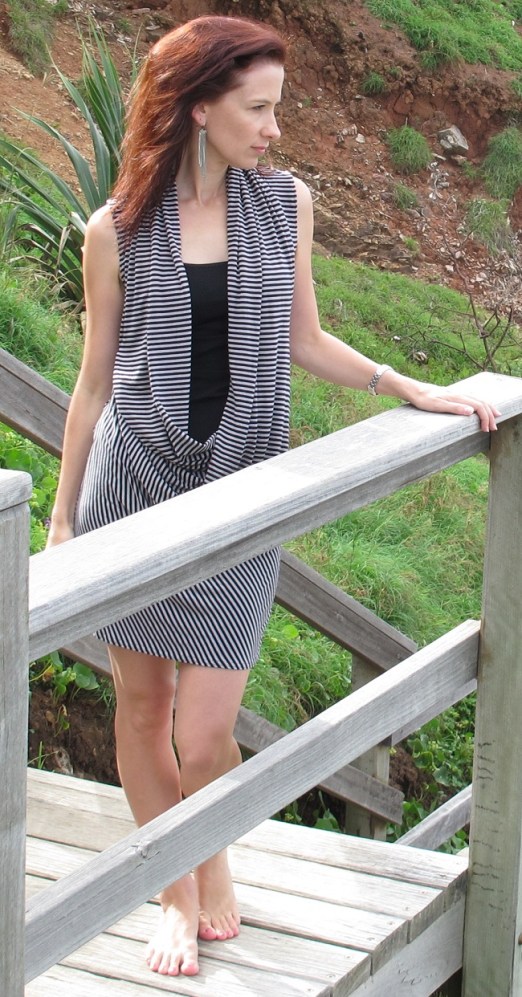
You spend a lot of your time rearranging the cowl in a heavy onshore breeze… fortunately not every stitcher has this weather to deal with. And seriously? This drapes all the way down to my underwear… and I don’t wear granny knickers… just saying…

The different construction and pattern pieces always spellbind me. It’s like a visual cryptic crossword. If you enjoy a puzzle (I certainly do) Drape Drape is for you.

Drape Drape 2: No.6 Three-piece deep cowl neck dress

“Honey does my bum look big in this?” errr yes probably…

While this dress is styled as an extremely revealing piece in the Drape Drape 2 book (picture it with no camisole…) it’s remarkably easy to wear with a camisole. I think a long-sleeved t-shirt and boots could look quite fab in winter… I’ll let you know in a few months…
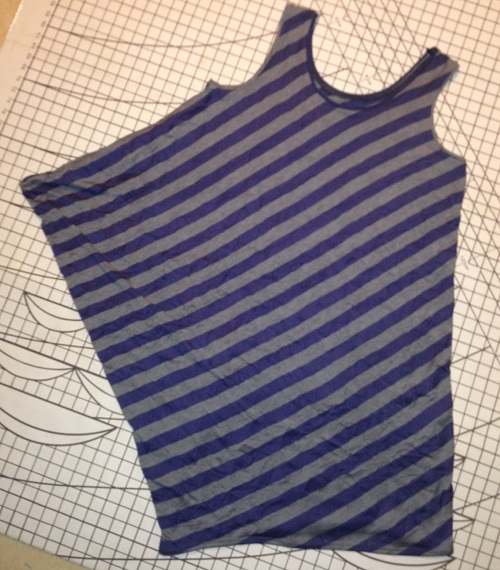
THE DRESS

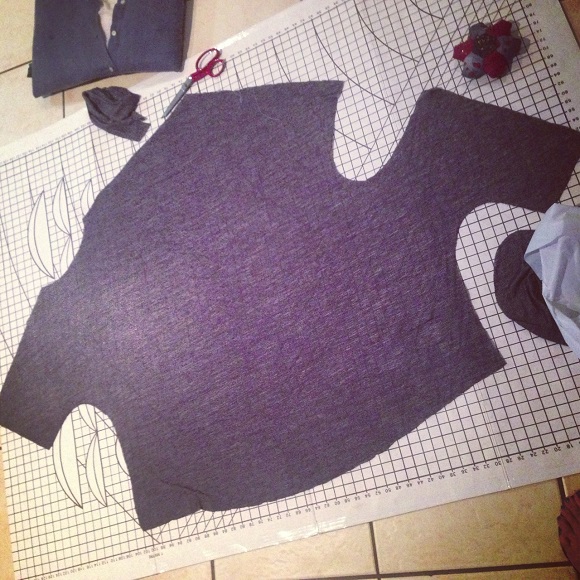
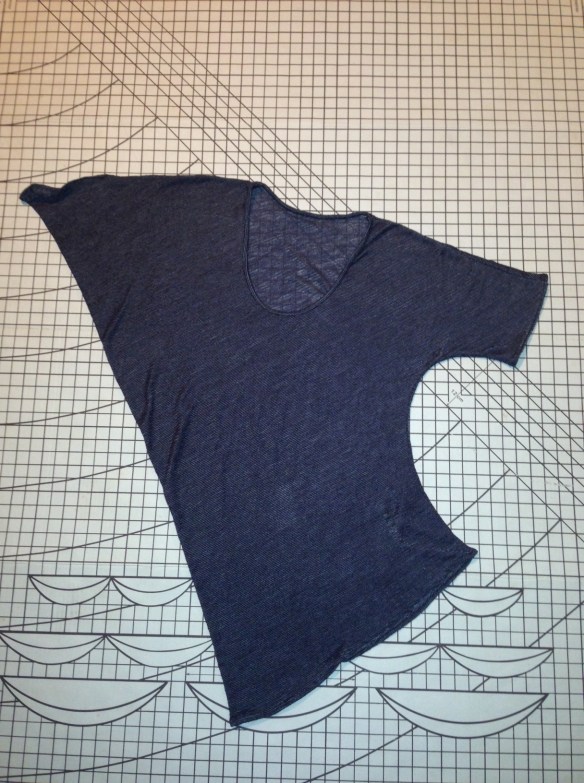
My first two Drape Drape 2 projects, the dress & tshirt, were very simple projects. They look complex but in fact the appearance is achieved through unusual pattern pieces and draping.

Drape Drape 2: No.6 Three-piece deep cowl neck dress
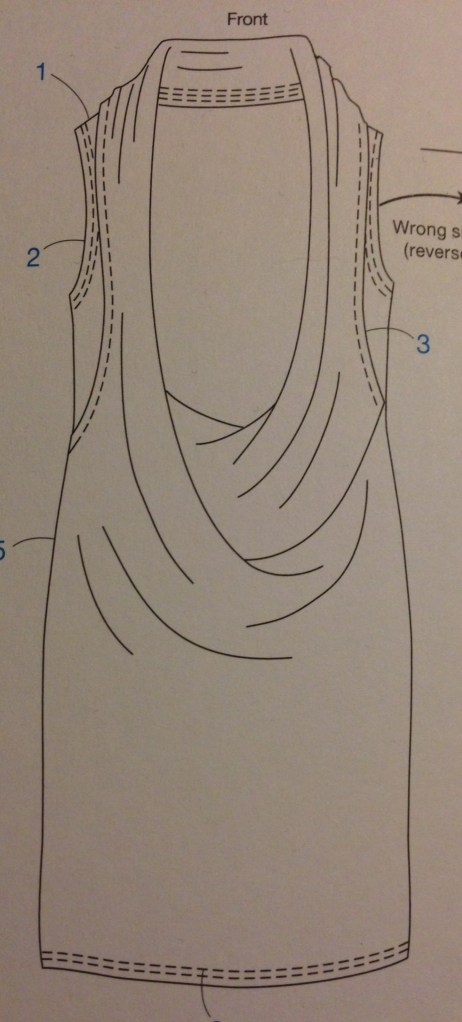
The line drawing – not actually very helpful for construction

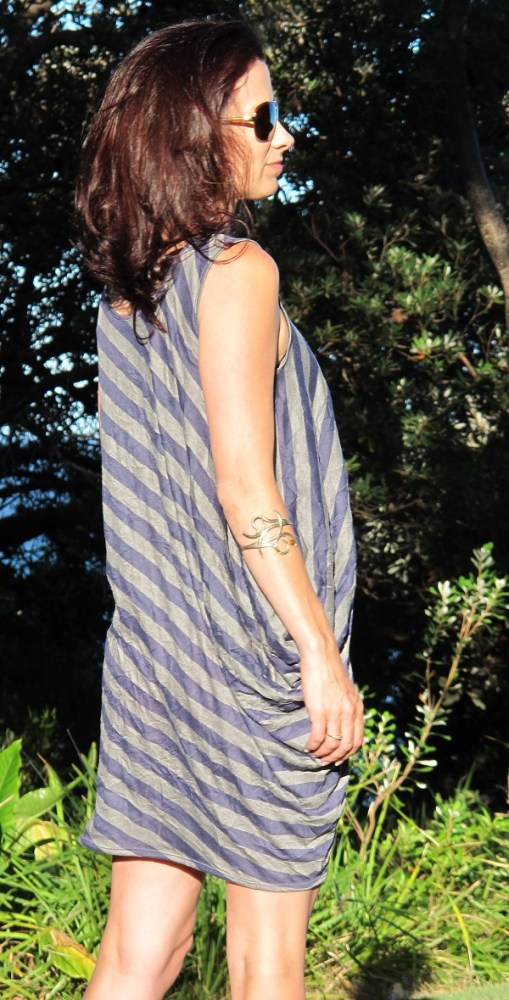
This was another matter. The construction itself was not difficult – once you figure out how that cowl was attached – that’s the tricky element. The cowl and front skirt is actually all one piece. Part of the cowl is attached to the front facing (which you can’t see), another section of the cowl swoops out to the side seams, attaches to the back neckline and one folded end tucks back into the front of the cowl itself.

Drape Drape 2: No.6 Three-piece deep cowl neck dressThe line drawing - not actually very helpful for construction

The cowl and front skirt piece

I know the above explanation makes no sense. Sorry. I think if I hadn’t had a dress form to put the dress on during construction I might have given up – once it was on the form and I had partially pinned the cowl in place across the back neckline, seeing it drape across the dress suddenly made sense.

CONSTRUCTION TIPS?

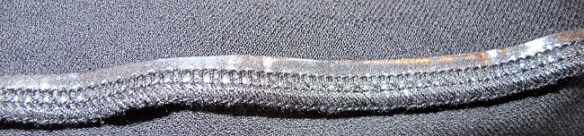
Use a walking foot. Seriously. These things make sewing knits so much easier.

I also added clear elastic to the shoulder seams as there is quite a lot of fabric hanging around that neckline.

LIFE

You know I wasn’t going to use these pictures. The outcome is in no way reflective of ELH’s camera handling abilities. In fact he’s perhaps rather captured me too well.. tired, pensive, reflective… far away… and in all honesty, sad.

I’ve been so very very tired… which explains my sporadic blogging. I’m actually medically tired which isn’t a disaster, it’s good news. When I got the blood tests back earlier today, I was elated – strange reaction but it’s a relief that at some point it ends. Physical exhaustion becomes all consuming – dominating and defining your life, mood and decisions.

Don’t fret on my behalf for goodness sake – I’m quietly content that the mystery exhaustion has been explained. Hallelujah.

Sometimes the beauty of the long bleak cloud of exhaustion is the brilliant sunshine that follows.

Drape Drape 2: No.6 Three-piece deep cowl neck dress

One of those moments…

Drape Drape 2: No.6 Three-piece deep cowl neck dress

Deemed no good by ELH – too clingy… yes because that neckline is soooo modest you need to worry about people looking at your legs.

I usually don’t write such things in this happy little space… however I’m human – we all are…

Pattern: No.6 Three-piece deep cowl neck dress from the book Drape Drape 2
Fabric: grey/black stripe viscose from All About Fabric in Tamworth NSW.

I had intended this for the Sew Sexy Sewalong – I need to take some more photos when I’m feeling more ROARSOME. LOL. I did take some without the camisole… but they are just not quite ‘there’ or perhaps I wasn’t.

If you are in Sydney this weekend for the meet-up – see you there!

Drape Drape 2: No 4 One Piece Scoop Neck Asymmetric Top – it’s love…

Thank you so much! I found all your comments on my last post so encouraging, interesting and a big confidence boost! Mwah.

So without further ado, here’s my second Drape Drape project…

Pattern No. 4: One Piece Scoop Neck Asymmetric Top

I’m completely sure about this one… this could be my favourite t-shirt ever. Slouchy, sexy, loose, scoop neck – and hello sleeves without setting in a sleeve – yes it’s pure magic!

Drape Drape 2: Pattern No 4 Asymmetric Scoop neck shirt
Love this – it’s all sorts of slouchy sexy goodness.
Drape Drape 2: Pattern No 4 Asymmetric Scoop neck shirt

back view

Drape Drape 2: Pattern No 4 Asymmetric Scoop neck shirt

I’m doing you a favour and editing me out!

I think this is a superb slouchy sexy t-shirt. I love the quirky sleeve hem on the slouchy side. I love how it drapes and wraps around my body. It’s just perfect. I could make a million of these.

Construction thoughts

I’ve made the small/medium size.

Again, easy as pie to construct after I studied the pictures. I actually didn’t refer to the instructions once I started. It’s quite simple and logical once you get going.

This is an incredibly fine black/silver lurex striped knit. It wasn’t fun to sew, it curled and the bands were difficult – it was worth it though! I think the shirt would look quite different again in a heavier knit (or even normal weight!) but I do love the softness of this and how it falls across the body.

I attached the neckline the same as I did for No.2 dress and actually slip stitched the binding over the wrong wide onto the overlocked edge by hand. The machine was determined to eat the neckline and I was determined it wasn’t going to happen – as unpicking this would have been impossible. The overlock seam for the doubled over binding strip provided some stability and firmness that was lacking with any other neckline finish.

The knit is so fine I’ve chosen to wear a strappy tank under it – if you follow me on Instagram you will know why! LOL.

Drape Drape 2: Pattern No 4 Asymmetric Scoop neck shirt

Before sewing…

Drape Drape 2: Pattern No 4 Asymmetric Scoop neck shirt

Finished shirt flat. I know looks freaky off but magic on!

And just because I love it so and often wear it in my photos – my favourite bangle…

bangle from the National Gallery Shop in Canberra
it’s made from two old forks! Purchased nine years ago at the National Gallery Shop in Canberra.
Drape Drape 2: Pattern No 4 Asymmetric Scoop neck shirt
So what are you waiting for? Go forth and drape!

Funnily enough Funk Bunny has made one too – so watch her blog for hers!

Pattern: Drape Drape 2: Pattern no. 4
Fabric: fine lurex knit stripe from All About Fabric in Tamworth NSW.

Also see: Sew Brunswick | Top Notch | Sew Smitten | Lula Louise |

Drape Drape 2 – No 2 Dress – tell me what you think…

For Christmas I received Drape Drape from my very thoughtful parent-in-laws (thank you!). I liked it so much I immediately jumped online and purchased Drape Drape 2 and Drape Drape 3… so you can expect some drape bingeing in 2014…

First up is a very simple draped singlet-style dress – or the ‘one piece side drape top’… it’s photographed as a dress in the book and I’m not much of a tunic wearer so it’s a dress for me too! Helen of FunkBunny in Melbourne discovered Drape Drape around the same time… and has made a nearly identical dress! We discussed on twitter how long this dress should be – I think perhaps longer, I’m wondering whether as the hemline rises, the hips look bigger… or is more legs a bonus?

I’m throwing a bunch of images at you so you can see the dress from different angles and in motion… one of the things I enjoy most are bloggers who include lots of images and angles… particularly of the clothes ‘in motion’ after all that’s the reality of wearing them – I like to see how they ‘behave’. Some things look fabulous when you stand still and then hideous with movement. This garment does change with movement, sliding across curves and hanging loose, it’s interesting…

I can’t quite decide what I think about this look on me… I do think that it will be worn a lot in summer, it’s too easy, loose and cool not to wear… but does it suit me? I’m sure you will advise accordingly – please feel free to be honest – I’m interested in your opinion.

Drape Drape 2. Pattern No. 2, the one-piece side drape top

walking…

Drape Drape 2. Pattern No. 2, the one-piece side drape top

walking…

Drape Drape 2. Pattern No. 2, the one-piece side drape top

more walking…

Drape Drape 2. Pattern No. 2, the one-piece side drape top

Showing off the chevron side seam…

Drape Drape 2. Pattern No. 2, the one-piece side drape top

more showing off…

Drape Drape 2. Pattern No. 2, the one-piece side drape top

side/back chevron side – the knit has a sheen and you can see this where the chevrons meet and the colour of the fabric appears to change.

Drape Drape 2. Pattern No. 2, the one-piece side drape top

the ‘drape’ bit

Drape Drape 2. Pattern No. 2, the one-piece side drape top

side/back drape side

Scared of Drape Drape?
Don’t be. If you can sew knits you can conquer these books. Once you wrap your head around the different style of construction, the unusual pieces and trace off the patterns, the projects are mind-bendingly fun.

The finished garment shapes are achieved from either draping (as in this project), gathering, pleating – and a combination of all in some cases. It’s a great exploration in different pattern shapes and fabric behaviour – I’m fascinated I confess.

The sizing is small as it’s Japanese – I’ve cut this as the small/medium size.

Drape Drape 2 - No 2

Pattern piece

Drape Drape 2. Pattern No. 2, the one-piece side drape top

This is the completed dress flat.

The neckline is supposed to be finished with a bias binding style finish. I tried this and it was just impossible with this fabric weight – it’s just far too flimsy. So I unpicked the neckline… which was overlocked. Yes it took forever. I finished the neckline and armholes with bindings ala Sewaholic Renfrew style.

Drape Drape 2. Pattern No. 2, the one-piece side drape top

Neckline – I know my thread is the wrong colour but I still only have red, white & black thread for my overlocker. I know…

Fabric: lightweight ‘crushed’ rayon striped knit from All About Fabric in Tamworth NSW (amazing little shop).
Pattern: Pattern No 2 from Drape Drape 2

Note: I’ve got heels on because I had a quick ‘car change’ as we took photos of another Drape Drape project before this!

SewRetroBatwings – Vogue 1337

This was going to be a classy DVF-inspired wrap dress…

The wrap dress that wasn't - Vogue 1337

The wrap dress that wasn’t – Vogue 1337

Then I woke up the morning I was planning to sew… and decided that the wrap dress had somehow morphed into a batwing mini dress.

Vogue 1337 for Minerva Crafts

Vogue 1337

I’d love to explain my creative process to reach this point – however it was one of my more random, arm-waving last moment decisions… I just suddenly didn’t want a wrap dress… and I needed a retro batwing mini in my life.

Vogue 1337

Vogue 1337

Thankfully Vicki at Minerva Crafts was more than accommodating at the last minute!   This pattern screams 80s to me… massive shoulders, batwings, slender skirt… you know – some times clothing should just be fun… too many people take their threads far too seriously! This is fun – fun to make & fun to wear.

Vogue 1337

Vogue 1337

I think for my first venture into the world of batwings and 80s power dressing, the option of making this in black made moving outside my comfort zone easier. I know lots of bloggers become enamoured of sewing knits – some even appear to be addicted and sew little else. I’m not one of those girls, I’m still grappling with the techniques required for a good finish…

There is a great big long post over at Minerva with more pictures – and information about how I attached the elastic to the sleeves and waistline… go forth and read…

Vogue 1337 - clear elastic

My elastic attachment.

No I didn’t make the self fabric belt… and I changed the neckline to have a narrow binding rather than a facing because the pattern facing is the work of the devil… all the details are over at Minerva 🙂

Pattern: Vogue 1337
Fabric: Black knit from Minerva Crafts.
Kit: available here.

Sweet ‘Lacy’ Sweet Shorts – Pattern Runway

It’s been HOT and I needed more shorts in my life…

Hello Sweet Shorts from Pattern Runway

Sweet Shorts by Pattern Runway

Sweet Shorts by Pattern Runway

Sweet Shorts by Pattern Runway

Sweet Shorts by Pattern Runway – oops sorry – shoulda fixed my naughty front pocket – too much twirling!

I adore this fabric. It’s a cotton/poly blend from Spotlight. I love its lacy embroidered look – and the fact it doesn’t crush like crazy with wear!! I usually would not touch poly-anything with a ten-foot pole but this fabric was too lovely… it whispered ‘Sweet Shorts’ to me as I walked past…

I was tempted to use the reverse as a contrast on the side pockets… but I wanted a simple pair of white lacy-look shorts so steered clear of the contrast, I felt it would ruin the lovely silhouette of this design & distract from its features.

Hello back single welt pockets…

Sweet Shorts - back pocket, single welt

Sweet Shorts – back pocket, single welt. So, so, so close to perfect!

Hello side slash pockets…

Sweet Shorts - side pocket

Sweet Shorts – side pocket

Hello single scallop front…

Sweet Shorts by Pattern Runway

My favourite feature. The front scallop and a high waist is a cute leg lengthener. My pattern matching on the centre seam is not too shabby either.

Sewing Shorts the SewBusyWay

I’m not a muslin maker – unless I have concerns about ease & fit… and shorts always fall into the category for me. I don’t have a lot of meat on me but I have a small waist and a set of hips. I don’t mind my hips… they make my waist look small (looking for the positives people!) – and gave me two huge gorgeous healthy babies.

I did make a muslin of these in size S. I found them to be on the larger side of the scale and sized down to XS. I did try taking in the side seams but then found it was hard to get my hand into the side pocket openings… which sort of defeats the purpose of side pockets… the back also gaped enormously… rather like my Maritime Shorts did at first…

To deal with the back gape, I changed the construction of these shorts.

I split the back waistband in half – adding seam allowances to the centre.

I sew the left-hand side of the shorts and the short inner leg seam. I then attached the waistband in two pieces. Inserted the invisible zip and finished the right-hand side.

I then sewed the crotch seam. I sewed from the front to the back until a few inches below the welt pocket. I then basted the rest of the back seam and checked the fit – I had to take about an inch out of the back as a graduated seam from below the welts to the top of the waistband. Once I was happy with the fit, I sewed the back seam and neatened the seam. I then transferred this amount to the waistband facing, attached it and finished the shorts in the usual way.

This is how I fitted the Maritime shorts. I could have done a massive swayback paper based alteration, redrafted the waistband and so on. However for me this solution works – yes there is a join in the back waistband (which is how the Maritime shorts and Thurlows are anyway) – however for the sake of a great fit I’d forgo the one piece waistband. I’m not saying it works for everyone but it works like a dream for me.

I love the hems. They are faced and give the shorts a lovely finish – and much easier than normal hems!

I did find the instructions for attaching the welt pocket linings confusing… so I just tossed the instructions aside and figured it out for myself. I often find this is the best way to deal with something baffling when sewing. Just puzzle it out using logic, pins and other garments as a reference.

I have a very simple trick when I attach waistband facing. I run a line of basting stitches along the edge of the waistband – so I know exactly where I need to turn the fabric over when I turn the facing to the inside, turn the seam allowance under (using the basting as a guide) and slip stitch the facing to the inside of the shorts. Then I remove the basting. This simple step improves the finish by a country mile – and hastens the ironing and slip stitching process – no guessing by eye or using a tape to check the turn.

Conclusion?

These shorts are not a simple or quick make, there are welt pockets, side slash pockets, faced hems and more. However they are not that hard either. You do need to take your time, possibly make a muslin to determine fit and be patient to achieve a nice finish. They are well drafted and go together beautifully.

I love the flat front, the front seams, the scalloped hem, the back welt pockets, the high waist… fabulous pattern!

I really enjoyed making these. I’ve decided I need a pair in denim…

Windy day!

Windy day!

Sew Neurotic Lizzy

I’ve always shied away for posting too many construction pictures. I’m notoriously hard on myself. That mentality of ‘coulda & shoulda’ done better. I’m tough on myself and always kept my methods & garment ‘innards’ to myself. So brace yourself. This is it.

Note: These shorts are damp and could have been better pressed for these shots… these were immaculate… until a small incident with a small child and red nail polish – I then spilt some nail polish remover on the pocket lining… boo… but you can’t see it from the outside of the shorts – whew. The lining was just bemsilk from the stash.

Sweet Shorts - inside back

Sweet Shorts – inside back

Sweet Shorts - inside front

Sweet Shorts – inside front

You know… I’ve come to the realisation I’m ok. I can sew. I can sew pretty well. I might not be technically trained. I tend to sew via inspiration & intuition. My fit techniques are not the paper-based ones. I think via my hands – I wave my arms when I talk and I think I sew the same way.

I do take my time with construction, I love a complicated pattern. I love to sew it neatly, I take my time to improve and learn new techniques – and sew like a possessed woman of course. However when I get stuck or something freaks me out – I don’t plough on these days. I put it aside. I try it on. I readjust. Try a different placement. I find a solution. I feel hellishly proud of my work by the end and often fall in love with my makes.

I like to take nice photos. I get a vision in my head of an outfit and that’s what inspires me to sew.

Blogging was also made me realise just how beautiful my home town is – so I indulge myself and my readers wallowing in drifts of snow in a different hemisphere! My clothes are a reflection of my lifestyle, climate and personality – this is who I am.

I’ve decided that a passion for sewing, nice pictures, style/fashion obsession, good construction and a generally happy & positive outlook on life despite any challenge that comes my way doesn’t make me a lame sewist… just a different one. Not better or worse, just me. I’m OK with that.

Pattern: Sweet Shorts Pattern Runway
Fabric: Cotton/poly blend from Spotlight, $19.95 a metre, I used 90cm.

Also see: Poppykettle | House of PinheiroDixie DIY | Cirque Du Babe

Oh and we spotted several of these guys on the way home from taking the above photos…

Cute Aussie critters

Cute Aussie critters