Mirri Jumpsuit – Papercut Patterns

Who even am I?

Another blog post! I’m feeling re-inspired, perhaps it’s lovely fabric or I’ve felt the need to try to find an escape from the relentlessness of the last few years!

Papercut Mirri Jumpsuit, teal linen from De Linum

Anyway, the folks at De Linum contacted me and offered me some fabric and a pattern to write a post for their fabric site. I’d don’t’ have the luxury of fabric stores down the road – and this business is based in Sawtell – about a 90 minute drive up the road from me – which in regional Australian terms is almost next door! I love to support local business as small business in regional Australia can be hard yakka indeed. I’ve since purchased three more pieces of linen from them – oops!

I’m also posting this project here (different content) because I was a bit lost when I started to tackle this project with a lack of informative blog posts… I do miss detailed blog posts. Instagram is great for inspiration – but scrolling through hashtags and clicking on captions – and sometimes finding none – is a huge time suck. So hopefully someone finds this useful.

Mirri Jumpsuit, Pattern by Papercut Patterns, Fabric from De Linum. Back View
Mirri Jumpsuit, back view

I stumbled across their teal yarn-dyed linen I was smitten. While I adore blue, I LOVE teal with a passion.

You know I’ve been sewing for YEARS and I still learn little things all the time. For example, yarn dyed simply means the fibres are dyed and then woven – rather than a piece being dyed. The predominant colour is teal and the secondary tone is black. This provides a lovely depth to the fabric. Whatever the process… this fabric is simply divine, hands down the loveliest linen I’ve sewn. It’s vibrant in colour, soft to handle and a dream to sewn.

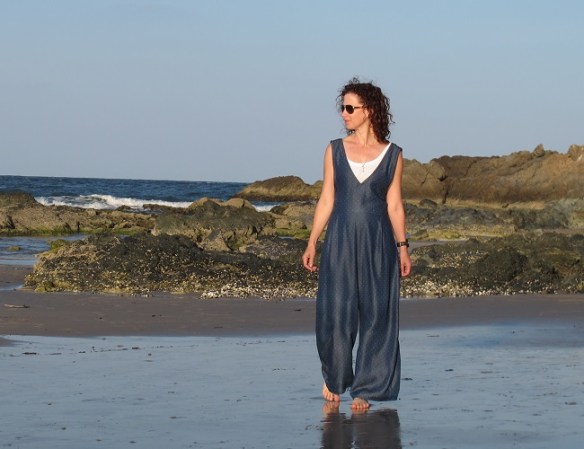
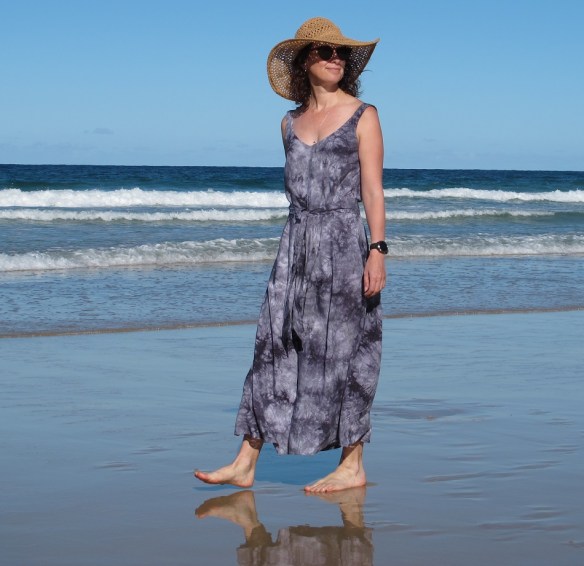
I choose the Mirri Jumpsuit, the twisted bodice appealed to me and given the teal and black weave of this fabric, I think it was a happy marriage of

Outrageously, I omitted pockets. I was worried they would disrupt the smooth line – and I wouldn’t put anything in them (other than my hands) – so why put them in. Plus I saved a decent scrap of fabric I may be able to re-purpose in another garment.

The jumpsuit has a zip closure and a button loop at the neckline.

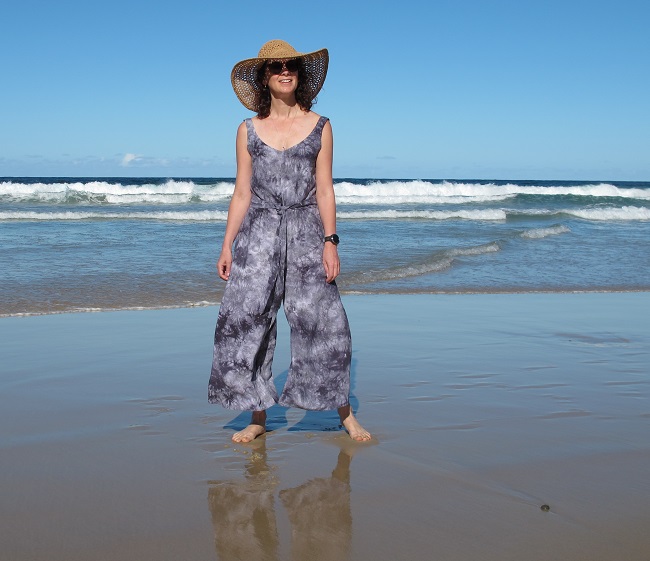
I was interested to discover that this isn’t the type of ‘wrap’ that pulls the bodice tighter to your frame, rather it creates a folded effect. This is because the ties originate from the centre, immediately crossing over so the ‘pull’ effect is less than if the ties originated at the sides… not sure this makes sense! I suspect on someone with a fuller bust, the wrap would look quite different.

Papercut Mirri Jumpsuit, teal linen from De Linum. Sewn by Sew Busy Lizzy
Papercut Mirri Jumpsuit, front view, forgive the sea breeze photo – perils of coastal living!

ALTERATIONS

I basted my pattern pieces together and discovered the torso length was too short. I added an inch to the pants rise. There was no shorten/lengthen line on the bodice which surprised me. I think proportionally adding to both would be my preference. Nevertheless, I’m still very happy with the overall look.

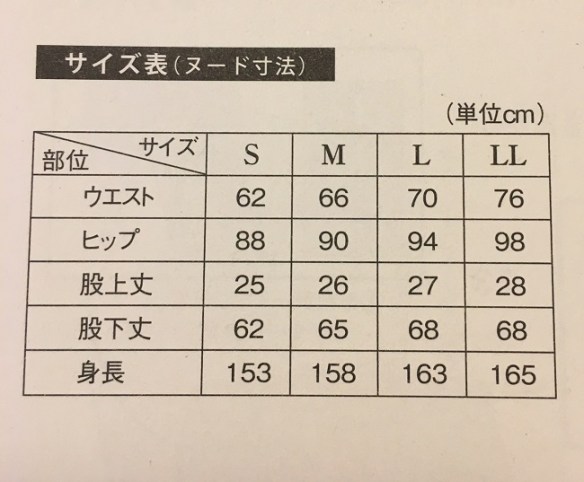
I chose my size based on the body measurements – grading to a larger size between the bodice and my hips.

I am (just) 5 foot 4 inches tall – and have a long torso, shorter legs.

THOUGHTS

Pattern: Mirri Jumpsuit, Papercut Patterns

Papercut have changed their pattern stock and presentation. I always loved their original brown cardboard square packages and heavy duty pattern paper. The instructions on the paper did drive me slightly barmy.

The newer format is on lighter paper – not as fragile as Big 4 patterns. And the instructions in a highly detailed separate stapled booklet. Great presentation and good quality.

Fabric: Yarn Dyed Linen, De Linum Fabrics, Australia

While this fabric was gifted, I loved it so much I went and purchased another 2.5m length immediately… and some aqua linen for a pair of Agnes Pajamas.

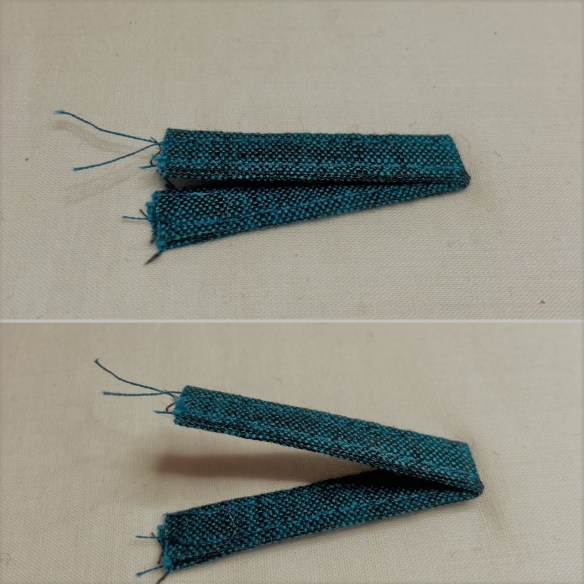
Tool tip: button loops are much more crisp if you pop a clapper on the loop after pressing.

Button Loops. Top: Steam pressed and then using a tailor's clapper. Bottom: steam pressed.
Button Loops – top ‘clapped’ bottom ‘just pressed with a steam iron’.

Details

Pattern: Papercut Mirri Jumpsuit, from De Linum (sold out)

Fabric: Teal Yarn Dyed Linen from De Linum

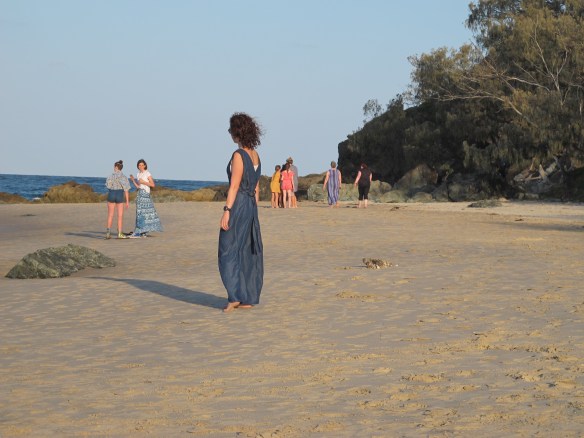
This project made me feel this happy…

Papercut Mirri Jumpsuit, teal linen from De Linum. Sewn by Sew Busy Lizzy

A Tencel Denim Japanese Jumpsuit? Onesie?

Or that time I channeled my inner denim-clad Gumby

Japanese Denim Jumpsuit

Japanese Denim Jumpsuit – just mucking around on Photoshop app on my phone one night – better (unfiltered – perhaps not better!) images follow!

I’ve missed just sewing things for the heck of it. Like so many of us, I am very time poor so I had tried to sew sensible/practical stuff to make the most economical of my time spent sewing.

Turns out, for me, that’s a bit of an inspiration killer. So I’ve decided to revert to my former sewing self and sew the things that tickle my fancy or intrigue me. In all honesty I tend to wear my slightly off-kilter garments the most. Plus I sew because it relaxes me, my yoga is sewing. I make no apologies for that.

And lately it was this that intrigued me. Japanese pattern books are back!

Japanese sewing book

I fell in love with this book a few visits ago to Kinokunya (Sydney) and last time I visited, it was still there. So I decided it was meant to be.

Contents of the book - there are up to two variations on every main pattern.

Contents of the book – there are up to two variations on every main pattern.

And while there are several very sensible and more practical patterns in this book, the pinstripe jumpsuit captured my interest. So I decided to fly with the idea.

Pinstripe office onesie!

Pinstripe office onesie!

Pattern tracing took me a night, however the alterations and procrastination took me at least another two weeks. Not because they were complicated but I did try to talk myself out of this odd outfit choice and procrastinated over the pattern changes.

Tracing

My favourite thing to trace my patterns with is a product called ‘Trace & Toile’ from Spotlight (Australia). At $20 a 10 metre roll, it is expensive. I wait for a sale and purchase several rolls at $10. I don’t sew as much as I used to, the upside to this is that a roll will see me through many patterns.

Trace & Toile

Trace & Toile

While it has it faults – pen rubs off a little, heavier to see through – I love the fact I can baste my pattern pieces together to get an idea of fit. This product gives me a better idea than I seem to achieve with tissue paper fitting – and saves me the trials and tribulations (and precious time) a fabric toile can take. It doesn’t replace a fabric toile but if you don’t think you need drastic alterations you can quickly see if more length etc is needed. Long basting stitches slide out easily and I can cut the pattern pieces and sew in strips to lengthen a pattern or fold//sew shortening tucks to modify a pattern. These modifications become a permanent sewn-in element of my finished pattern which I then make the garment from.

Minor Modifications

These Japanese patterns are drafted for someone only slightly taller than me. As mentioned on previous posts, I am proportionally long through the torso and jumpsuits make pattern modifications a necessity as no-one wants to wear – or see – a jumpsuit wedgie!

Book size chart

Book size chart

I added 1 1/2 inches to the crotch depth, this was intentionally longer than needed as I wanted a casual, very loose jumpsuit to wear during summer. I added 1 inch to the bodice – however found this made the waist too low and I removed it, I might even shorten the bodice if I was to make it again. I should have added some length to the legs as well – I turned the hems up with bias binding as the unfinished length was close to perfect.

Japanese Denim Jumpsuit

Japanese Denim Jumpsuit – front view. Note to self: stand up straight!

I added belt loops and a self-fabric belt. I prefer to wear this looped through the belt keepers and then tied at the back, rather than wrapping it around the front. It created a bit of shape without being pulled in against my waist. Very loose and easy to wear.

Japanese Denim Jumpsuit

Japanese Denim Jumpsuit. Proof that I happily share my beach photos with everyone! I have no shame. Windy afternoon as well – less an ideal for photos but such is life.

I would probably insert an invisible zip in the side seams if I was to make it again. It’s a little wriggle to pull it up and over my hips (note to self, not too many yummy Christmas indulgences this year) – a zipper would help.

I do need to wear a singlet or tshirt under it – however I like the overall/jumpsuit mix, one of the things that attracted me to it.

This is made from tencel denim from ‘the stash’ purchased from a bargain table for the grand sum of $5 a metre… or maybe it was $4 a metre. I also squeezed another Tessuti Sadie Slip dress out of this, similar to this dress I blogged over a year ago – which I love!

Japanese Denim Jumpsuit

Japanese Denim Jumpsuit

Agreed. This jumpsuit is a slight crazy garment. I wore it all day today – the best way to assess a garment’s suitability to your lifestyle is to put it ‘through its paces’. It passed the lifestyle test with flying colours. I love it. It’s a bit oddball but quite unique – and exceptionally comfortable. I am also confident I will not be bumping into any other denim-clad Gumby wannabes in the downtown Port Macquarie. So it’s a win-win for me.

Japanese Denim Jumpsuit

Japanese Denim Jumpsuit. I don’t wear it with the belt tied at the front. Too wrinkly, too obvious. I prefer the belt to just pull it in a little at the back. Mad crazy hair – completely natural!

See it in action? Visit Instagram!

Photographed terribly in the late afternoon sunset last weekend, too much glare and the tencel looks shiny. The Instagram images (or Boomerangs) are much more true to the actual garment and you can see me wiggling in an action shot… life is too short to be too serious… and let’s be honest, I don’t pretend to be a high fashion model!

This isn’t going to be everyone’s ‘cup of tea’ – however it’s mine. I appreciate some will hate it. If we all sewed, liked and wore the same style… well… that wouldn’t be terribly interesting would it?

The thought of wearing a pinstripe onesie to work is still very appealing…

Pattern: No.5 from untranslated Japanese pattern book which loosely translates as “7 Basic dresses” – this jumpsuit also includes as a jumper dress option. ISBN 978-4-579-11570-9
Fabric: Tencel polka dot denim, Spotlight Australia

Amy Jumpsuit – Closet Case Patterns

Amy Jumpsuit, Closet Case Patterns

Amy Jumpsuit, Closet Case Patterns

The Amy Jumpsuit from Closet Case Patterns.

The Pattern

Currently only available as a PDF, there was a lot of excited chatter on social media when it was released. I purchased it as soon as I saw it, which is increasingly rare for me these days. I had been looking for a similar style jumpsuit and since I hadn’t tried a pattern from Closet Case Patterns, I thought… why not?

Described as:

The Amy Jumpsuit is comfort and breezy elegance all in one tidy, minimalist package. With a figure-skimming silhouette and ultra wide, cropped legs, it’s got the soul of a floaty slip dress in the body of a jumpsuit you’ll never want to take off.

Amy features a flattering V-neckline in front and back, with wide shoulder straps designed to conceal bra straps; an invisible side zipper makes it easy to get on and off. Add function with optional inseam pockets, or cinch the waist with a classic tie belt for a more fitted shape.

Yes… I’ve sewn it in exactly the same fabric as my Myosotis Dress – I bought another 3 metres to stash. However it seemed like a good idea to make the Amy in the same fabric so it never hit the stash pile.

Amy Jumpsuit, Pattern by Closet Case Patterns.

Amy Jumpsuit, Pattern by Closet Case Patterns.

Sizing

I decided to sew size 2 based on the advice from Closet Case Patterns of “We also suggest choosing a size based on your bust measurement; there is a lot of ease built into the waist and hip so you probably don’t have to worry about grading between sizes unless you span more than 3 or more sizes between bust and hip.” I’m close to 3 sizes and I didn’t grade between sizes while tracing.. however I did add 1/4in to the outer leg before I cut into my fabric. Call it ‘hip panic’ if you like.

Amy Jumpsuit, Pattern by Closet Case Patterns.

Amy Jumpsuit, back view

I’ve left off the pockets. I don’t often put pockets into fabrics with a soft drape as I’m unlikely to use them as they pull a garment out of line if you put anything in them. I also decided to put in a slightly longer zip as I was concerned about wriggling these up and over my hips. The pattern launch blog post advised: The pattern has optional pockets and a side seam zipper to make it simple to get on and off; we suggest in the instructions doing a quick baste fit if you’re a straight size or narrow hipped because you might find the zipper unnecessary.

I’m glad I did this as I think it would have been a wiggle without the slightly longer zipper and extra width at the hip.

Fitting

I’m quite long through my torso. I added 1/2inch length to the body. I wish I had added more as it is just long enough (I don’t like living in wedgie world when I bend over so prefer a low-slung crotch for these types of garments). I sewed 1/4inch seams at the straps to add a tiny bit more length.

Despite reading the pattern to verify it has 5/8 inch seam allowances, I somehow managed to sew it together with 1/2 inch seam allowances. I am glad I did as this gave me a tiny bit more length.

I haven’t shortened the legs. The pattern is drafted for 5 foot 6 and I am 5 foot 4. I tend to prefer longer garments so I opted for the unaltered longer length leg.

Amy Jumpsuit, Pattern by Closet Case Patterns.

ladylike moments in the Amy Jumpsuit

Thoughts

The pattern has great instructions for attaching the straps and sewing in the invisible zipper and attaching the lining to it. It’s a very neat and clean finish.

Don’t be like me. Sew a muslin/toile if you are long in the torso or wider through the hips, my approach was not smart… just faster and I managed to adjust along the way.

At first I didn’t like this at all, however I’ve worn it all day and it is very comfortable and practical. My daughters like it on me. I don’t think it’s very flattering on me. However that’s never stopped me wearing something on a casual basis! If it’s comfortable and cool, it’s highly likely to become a summer favourite. I think it will be worn unbelted on very hot summer days.

It’s an easy sew.

The front/back neckline is flattering and the wide straps easily conceal bra straps.

The PDF files come with copy shop files, including the essential (for me) A0 option. I would not have purchased it otherwise.

When the waves wash in, I need two hands to lift my hem out of the way… unlike a dress when I only need one hand to save my outfit from a saltwater drenching. Hey, that’s a lifestyle issue for me!

Belt loops, I’d like belt loops. In these photos the belt has slipped to different positions and changes the look of the jumpsuit, making it more or less flattering. I’d just prefer the belt to stay on one place. I might add some thread loops retrospectively… but then again… I probably won’t.

Amy Jumpsuit, Pattern by Closet Case Patterns.

Contemplating how to avoid soggy hems… and my running sock tan lines…

Pattern: Amy Jumpsuit, Closet Case Patterns
Fabric: Jungle Trail Grey, Pitt Trading, 100% viscose.

This post first appeared on www.sewbusylizzy.com

Yesterday I participated in a local running event called Beach to Brother. I ran from the river mouth you can see in the distance to the top of this mountain called North Brother… I only ran the 10km event (you can ran a marathon or half marathon along the beaches before you tackle the mountain)… but the last 2.5kms felt like a marathon to me… so.many.stairs with 500m of elevation – might not sound like much but it was brutal! I may have complained a lot on the way up to the finish line.

North Brother, Laurieton NSW

North Brother, Laurieton NSW