Barkcloth Sundress

Oh my goodness. It has been a while.

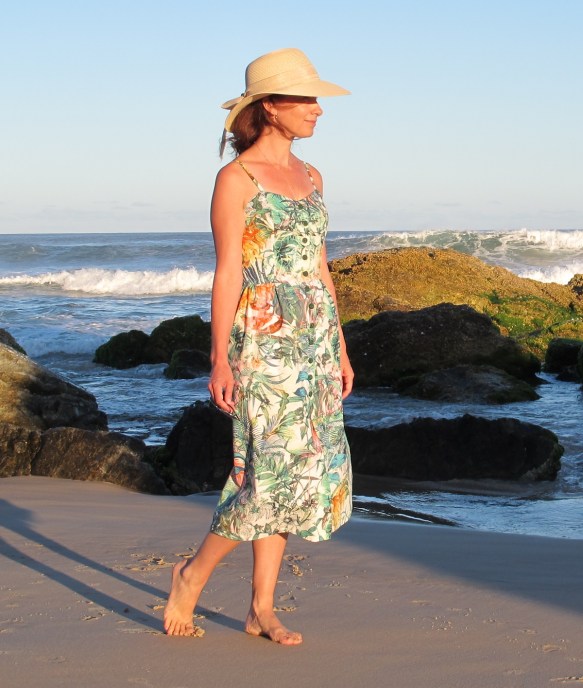
Style Arc Ariana Dress in Cloud Nine barkcloth from Minerva Fabrics Style Arc Ariana Dress in Cloud Nine barkcloth from Minerva Fabrics

Your kids get older and you think you will have more time.

False.

I have less time than ever before.

And I’m strangely thankful that Minerva Fabrics popped its head up and offered me some fabulous barkcloth as it made me put sewing back onto my schedule – I had to sew! I had planned a jacket with this fabric. However when the fabric arrived, I could not get ‘sundress’ out of my head and simply had to make a Style Arc Ariana Dress.

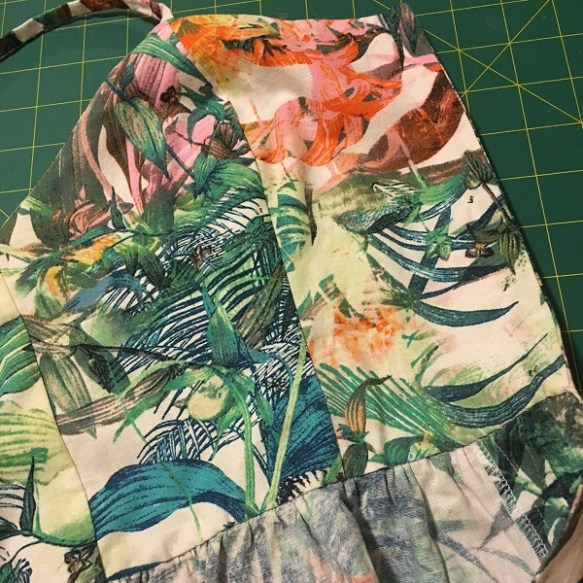
While the fabric was a little too heavy to cope with shirring, after changing the way to elasticise the back panel, my vision of a fun funky sundress became a reality!

Read more on the Minerva Blog about how this ‘shirred’ panel is a little different to other shirring.

My alterations to 'shirr' barkcloth My alterations to ‘shirr’ barkcloth

I totally forgot to publish this post – whoops. However I am delighted to confirm this dress is a firm favourite in my wardrobe and it was in heavy rotation this summer. Lots of people think it is from the popular Australian fashion brand, Gorman… however it’s a Lizzy Original.

Fabric: Cloud 9 Barkcloth, supplied by Minerva Fabrics, UK

Pattern: Ariana Dress, Style Arc.

Style Arc Ariana Dress

It’s been a while!

So let’s start by talking about the new Style Arc Ariana Dress. I sewed on the last button and photographed this in the evening in the final minutes of sunshine. It’s autumn here but still deliciously warm.

Style Arc Ariana Dress

Style Arc Ariana Dress

This pattern was released last week. I have collected a couple of vintage patterns that are quite similar but for a variety of reasons, this one inspired me to sew immediately and so I did!

Style Arc describes the pattern as follows: You will love this gorgeous button through sun dress. The bodice is beautifully fitted. The shaped bust seams and the shirred back allows this dress to fit perfectly and be comfortable to wear. The skirt has gathers falling from the waist and has two large patch pockets. Not after a dress? You can make this one as a midriff top too!

This was only intended as a ‘test run’ version, I’ve often struggled through Style Arc patterns and instructions – and I wasn’t sure if I would like the style on me. So I raided my stash and came up with this lovely cotton/linen which seemed perfect for the task – and I’ve rather fallen in love with it!

Style Arc Ariana Dress – image courtesy of Style Arc

The Pattern

I purchased the PDF version, which only comes as an A4 print-at-home option. I contacted Lena of Iconic Patterns and she created two A0 pages from the pattern for $10 which I had printed at the copy shop – all done in less than 24 hours. Expensive solution but I was impatient and haven’t felt such an urge to sew for ages! I couldn’t bear to wait for a paper pattern in the post.

Apparently Style Arc will provide an A0 file if you request it. Call me petulant but I don’t think you should have to ask for something which most other independent pattern designers now provide (thanks for listening Carolyn) or that they could provide but chose not to in the initial purchase. It’s absolutely Style Arc’s right to make that business decision but I’m also entitled not to like it. I chose to use resources available to me to be able to print it in an easy-to-use manner – as soon as possible! Thanks Lena.

Style Arc Ariana Dress

Style Arc Ariana Dress – lots of buttons… I think they cost me more than the fabric!

INSTRUCTIONS

Sparse at best! That said, Style Arc are notorious for their very brief instructions. If you can sew and have experience in different garment construction it’s not a bother – if you don’t … it is. So I would not recommend this pattern for beginners.

I found the instructions were adequate but I think many might chose to do some things slightly differently.

I found the instructions to attached the shirred panel to the bodice very brief and I figured out a way to do this by myself.

I didn’t like how the bodice was attached to the skirt – or at least the way I read them. perhaps style Arc assume you will figure out the best way to do so – rather than giving you a method. The way the shirring panel was created meant I had to do some unpicking to obtain a neat result on the inside of the bodice. I sewed the skirt to the outer bodice and then slip stitched in the lining into place along the waistline.

SHIRRING

Style Arc Ariana Dress - back view

A shirred back panel. Easy to create IF you know how!

If you are hoping to find detailed shirring instructions in this pattern – you won’t. There are some diagrams but they don’t actually tell you “how to shirr”. You need to figure that bit out by yourself.

I have shirred before but if you are looking for helpful hints, this Craftsy post helps. Google and YouTube will be your sewing friends if you have never shirred before.

Style Arc Ariana Dress - bodice back

Style Arc Ariana Dress – my shirring is not perfect but I only intended this to be a ‘test run’ and experimented a bit!

I find it impossible shirr with my front-loading bobbin case fancy-pants Bernina. Instead I borrow my daughter’s basic Singer machine that has a top-loading bobbin. I hand-wind the shirring elastic onto the bobbin and increase the stitch length. I also find gently providing some tension at the back of the fabric as it goes under the sewing foot helps pull the fabric and result in a more even and neat shirr. That said, I think the shirring experience varies vastly from machine to machine – do a test run first… the panel has 29 rows of shirring!

POCKETS

It has large patch pockets however I didn’t have quite enough fabric to make pockets so I opted to leave them off. I think it would be a lovely feature in a solid linen.

LIKES

  • A classic sundress.
  • It’s very comfortable. Not too fitted on me but not a shapeless sack.
  • Not too many pieces and quite quick to construct… if you can get yourself through the brief instructions and figure out a few construction issues.
  • Some might be deterred by the shirring. However it is a narrow panel and it makes the bodice fit nicely. I like it.
  • The bodice is fully lined. I chose to use the shell fabric as the lining. Many of the other patterns I have considered have a facing to finish the top edge. I think I might try one to see how it compares.
Style Arc Ariana Dress - bodice lining

Style Arc Ariana Dress – bodice lining. The other bonus of having the lining and shell the same – I could choose which pieces to use on the outside and avoid ‘flower’ bewb’

  • I like the neckline shape and strap placement.

DISLIKES

  • Construction as per instructions. I would approach construction slightly differently next time around.
  • A4 PDF pattern or a paper pattern and having to wait impatiently for delivery. I believe US customers can purchase copy shop PDFs from Amazon.

DETAILS

Pattern: Style Arc Ariana Dress, can be purchased as a paper or PDF version. I sewed a straight size 6 with no alterations.
Fabric: Cotton/Linen blend – Still available online – my piece was a remnant bin find for $12 for a 1.7m piece.

Style Arc Ariana Dress

Also excellent for clambering over rocks

I’ve been absent from ‘blog land’ for quite some time – for a range of reasons. As you can see, I’m still here and kicking despite last year’s massive health crisis. I’ve also sewn quite a few other garments and knitted a jumper… blog posts to come… sooner rather than later I hope. More about my damaged carotid artery adventures later.

Style Arc Ariana Dress

Style Arc Ariana Dress

… or there is the Jessica Dress

I’ve almost purchased the Mimi G Jessica Dress several times.

At the moment Mimi G is giving away her Jessica Dress pattern which is quite similar to this dress in many ways. You do need to sign up to her database in order to receive an email to download a copy. I’m not sure how long this offer lasts for… so delay at your peril. It has bodice facings and the skirt button front is looks like it is finished differently. Busy Lizzie (another sewing blogger & friend) recently posted her Jessica Dress on instagram which she had added a shirred panel to. Bonus – gorgeous chevron stripe bodice! I downloaded this pattern today – it comes with an A0 option.

This blog post first appeared on http://www.sewbusylizzy.com

Spring – Style Arc Cara top (as a dress)

I magically dropped off the face of the blogsphere. I’ve been sewing but had very little time to sit and write.

Spring is here... finally!

Spring is here… finally! Here’s a dress to celebrate.

I decided to share this dress with you today – it’s the first weekend of the Australian spring and that makes me feel disgustingly cheerful. While my winters are not particularly cold, I always wave them goodbye without a shadow of regret in my sunshine-lovin’ heart.

The Spring Dress Journey…

Before you see more dress photos… here’s the story behind this project.

I’ve got little love for the off-the-shoulder look that has been haunting the retail stores and sewing blogs. Some of my sewing friends will be stifling their laughter to see me in an off-the-shoulder dress/top at all, given my distinct lack of enthusiasm/bewilderment for this 2016 fashion trend.

I enjoy puzzling out what I don’t like about certain looks – and sometimes how to interpret a look to be more ‘me’.

After much internet cruising and considering, I realised what I mostly didn’t like about the off-the-shoulder look was the necklines gathered with elastic. When I saw a few Style Arc Cara Tops made up (see end of post for links), I was curious about the flat band across the front of the front and the use of elastic at the back to provide the tension to hold the top in place. So I decided to investigate – by making one of course. This is a very simple top to make – and it uses very little fabric. An ideal stash buster!

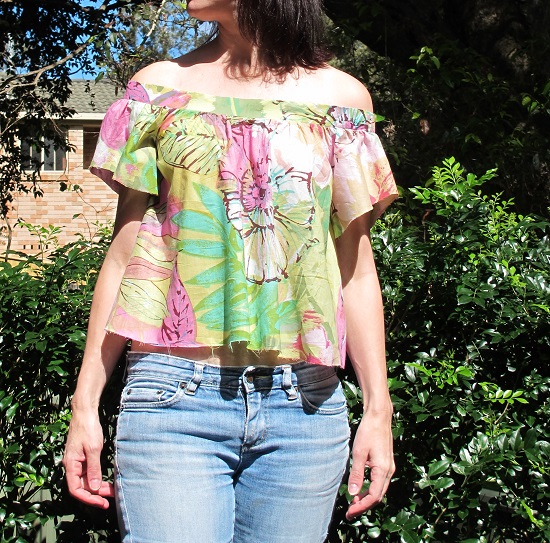
The Style Arc Cara Top test run (still unhemmed)

The Style Arc Cara Top test run (still unhemmed) in cotton voile. My oldest tattiest jeans… I care not, I love them… I was surprised to not ‘hate’ this top when I made it. If I decide to make this wearable… I’ll add lace when I hem it, it is too short for my long-waisted self!

The Style Arc Cara Top test run - I found I needed to shortern the elastic just a little to pull the front band firm against my upper chest.

The Style Arc Cara Top test run – I found I needed to shorten the back elastic just a little to pull the front flat band firm against my upper chest.

Once I made this top, I immediately had an idea to turn it into a dress. A maxi dress that was soft and feminine, demure and slightly revealing all at the same time.

Once I had this idea in my head, I couldn’t shake it and I needed to ‘sew it out of my head’ so I could move onto other projects.

Style Arc Cara Top as a dress - I had this dress in my head and it's been fun and rewarding to see it come to life.

Style Arc Cara Top as a dress – it’s been fun and rewarding to see this dress emerge from my head and come to life.

THE FABRIC

The fabric I used is a gorgeous large floral woven rayon from Spotlight (Australia). It is very flimsy and a little sheer however the gathering helps disguise most of the transparency. This dress won’t last forever… however nor will the off-the-shoulder look.

Style Arc Cara Top as a dress - back view

Style Arc Cara Top as a dress – back view

THE SKIRT

To create the skirt I simply used all the fabric remaining (I purchased 3.5m for this project of 135m wide fabric – noting a sewed a size 4 top and my height is 5 foot 4 inches). I used to the bottom width and curve of the top to cut the waistline and simply cut the skirt with a generous a-line flare heading toward the hem. I added a little to the width of the front skirt piece to enable me to create a front split. I then cut the front piece in 1/3 and 2/3 pieces so the split would sit over one thigh. I find these maxi skirt splits the easiest and most graceful to walk in.

Style Arc Cara Top / Dress - I think this is a style that I would always fiddle with when I wear

Style Arc Cara Top / Dress – I think this is a style that I would always fiddle with when I wear

I sewed the waist seam with a 25mm seam allowance and then pressed it up into the bodice, machine down the edges to create a channel for the elastic waist. I will probably wear this with a narrow woven belt but left it off for these photos.

The entire garment is French seamed. The edges of the front split are turned under twice and sewn down the length of the skirt so no raw edges can be seen.

Style Arc Cara Top - and it doubles as a wind sock!

A windblown Style Arc Cara Top / Dress – and it doubles as a wind sock!

The hem isn’t as straight as I would wish… however in the photos, walking and moving about in it, it doesn’t appear to be dreadful so I’ve forgiven myself for that indiscretion.

The top is quite ‘blousy’ very loose and full – and it is the look I was after. Just soft, feminine and loose.

This dress isn’t a work of art, it’s not my best sewing due to the fragile fabric… but it’s soft and pretty – and sometimes that’s enough for me.

Pattern: Style Arc Cara Top (purchased from Etsy). Size 4.
Fabric: Floral woven rayon, Spotlight Australia. Available online.
Location: Lighthouse Beach, Port Macquarie Australia

Also see: Very Purple Person  |  My Dress Made  |  Creating in the Gap | Thornberry on Instagram, I couldn’t find it on her blog.


Style Arc Taylor Skirt

aka Attack of the Crazy Butt Chevron!

I think this skirt will polarise people. It’s a love-hate garment. Some people will love the design and others may get a cold shiver from the back seam… and maybe even the front one!

I couldn’t resist this pattern and purchased it along with the Kylie Top – which I made for my Mood Fabric project.

Style Arc Taylor Skirt, image courtesy of Style Arc http://www.stylearc.com.au/

Style Arc Taylor Skirt, image courtesy of Style Arc http://www.stylearc.com.au

I was immediately drawn to the intersection of the vertical and sloping stripes. I absolutely love a bit of ‘crazy’ when it comes to stripes, checks and plaids. I DON’T like badly matched patterns however I do love designs that play with the patterns and create interesting lines.

There isn’t too much to say about this skirt. It is

  • easy and fast to make
  • striking to wear
  • Knit fabric
  • Pull-on – elastic at the waist and no zipper/fastenings

My photos were taken ‘on the run’ in a recent lunch break – I’m EXTREMELY time poor at the moment… but that’s another story. And I have a few marks on my legs and feet due to recent field hockey escapades (yes, I didn’t know I played hockey either – that’s another story!). I cut off quite a lot of my hair recently – it had to go and I feel better for it (another story). I also didn’t manage to tuck my top in neatly, creating a few ‘bumps’ – so in essence, this is crazy, rushing, manic, working mum, dishevelled me!

Anyway, this is me, mid-construction, going ‘holy back seam!‘ Followed by a raging internal debate about how did my butt look in this, could I live with those stripes and could I manage to wear something that drew so much attention to my nether region!
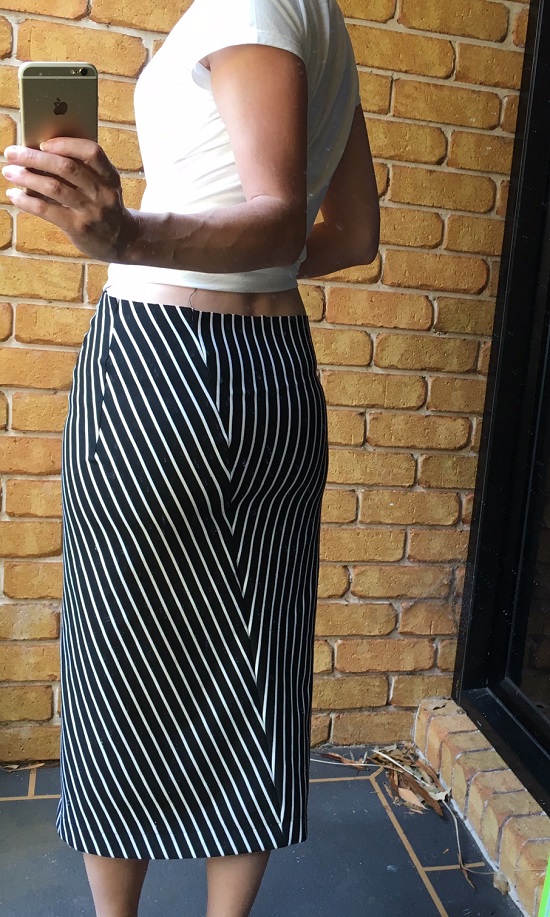
Me having a slight ponder mid construction... "Holy Back Seam!? Can I wear this?" Taylor Skirt, Style Arc

Me having a slight ponder mid construction… “Holy Back Seam!? Can I wear this?”

Anyway, more about the ‘butt seam’ later…

FABRIC

I found some rather firm striped ponte at my local Spotlight, I purchased 70cm as stated in the pattern yardage requirements. This might well be enough for a plain fabric but it’s not enough if you are planning to muck about with the stripes. Fortunately my fabric was double-sided and I managed to squeeze it on (just – there is a little bit of selvage in my seam!). 

I should have assumed I needed more for stripes but perhaps I’m used to Big 4 patterns that tell you to allow extra yardage for that sort of thing.

This resulted in much swearing and a mini tantrum

This resulted in much swearing and a mini tantrum

PATTERN

This is an EASY pattern to make.

There are two darts at the side waist. There are just two pattern pieces. You sew the darts; sew the two pieces together; top stitch the front seam; attach the elastic, turn it to the inside & top stitch it down; and then hem the skirt (I used a twin needle on my Bernina for my hems and stitching down the elastic). That’s it, more or less.

The Taylor Skirt sides are shaped with a dart. There is no side seam.

The Taylor Skirt sides are shaped with a dart. There is no side seam.

Yes, the instructions are ‘Style Arc Sparse’ but if you have any sewing experience I don’t think you are going to have any issues. I barely read instructions for patterns like this!

excuse the creases at the waist... I'm swivelled around because clearly I can't stop looking at that seam either!

excuse the creases at the waist… I’m swiveled around because clearly I can’t stop looking at that seam either!

Let’s talk about that ‘butt’ back seam. There are a few stripes in there (on my butt – just to make sure you don’t miss them) that don’t meet up. Given the shape of the seam (or my butt) and probably fabric’s stripe spacing/sizing, there was no way to make these meet. I did try! It’s not perfect however I can live with it as the chevron, as an overall effect, is well matched. However if you hate it – I understand why. It’s going to polarise people. Just do me a favour, and try not to spend hours inspecting my butt… as it’s starting to get awkward now LOL.

THOUGHTS

This is a long skirt… I actually cut an inch off before I hemmed it. I still feel it hits my leg in a bad spot and makes my legs look clunky. However I do think it needs to be long in order to achieve the visual effect.

Taylor Skirt, Style Arc

Taylor Skirt, Style Arc

I think it needs something with some firmness to the fabric, however it needs a good amount of stretch so you can walk!

The front opening split does bother me a little. When I look down, it doesn’t sit perfectly flat which drives me a little mental. However from most angles it looks OK so I’m trying to ignore that little quirk. It would also be the body of the ponte – it is quite firm  however I like how it “holds everything in place” if you get my drift. 🙂

I’d definitely consider making this again as a work skirt. I actually don’t own any knit skirts and this is comfortable. I do love the funky stripes and think it might be a contender as a work wardrobe option. I just have to just remember to take smaller steps (I walk/stride/run like an elephant on speed) and be more ladylike. Chances are slim. The skirt will just have to learn to adapt.

It is very fast and easy to make. I did fiddle with the back seam and also the hem however you can make this up in no time at all.

It uses a very small amount of fabric and I think would look great in a plain or textured fabric with contrast top stitching on the front seam – perhaps the back as well.

Love or hate it – it is impossible to ignore.

Pattern: Style Arc Taylor Skirt, size 8 (purchased on sale, I paid about $8.40)
Fabric: Ponte from Spotlight (not available online). 70cm (not really enough for the striped option) $5.40
Other: Top is just an old RTW, Rocket Textured Pumps from Jo Mercer.

Note: I HATE sticking together A4 sheets – give me an A0 pattern sheet any day!


PS: there is a book review and giveaway on my post: Stylish Remakes
Post update: I published this & left for work, wearing this skirt. My colleagues love it. And no they didn’t realise I’d made it!

Style Arc Kylie Top

I was curious when I first read about hacci knits, so when I happened across some in the online Mood Fabrics Designer Fabrics store I decided to take the plunge and see what the fuss was about.

If you haven’t heard of this type of knit, the following is how they are described on the Mood site:-

“For those who are not familiar with hacci knits, they are a newer type of small denier knit that utilises a weft knitting technique which results in little to no torquing (a force that tends to cause rotation in the yarns). Hacci-baby knits are characteristically lightweight and sheer. With a phenomenal 4-way stretch, use this ribbed jersey fabric for stylish, sheer cardigan sleeves, fabulous tees, draped dresses and more! This material may require a lining depending on the application.”

When I received this knit, I realised that Mood had not exaggerated it – it is indeed sheer. After much thought, I decided that I would not be comfortable wearing it as a single layer so set to finding a pattern with a layered feature. There are several options in the various in-store catalogues, however I really liked the hi-low and angled back feature of the Style Arc Kylie Top overlay.

Hacci knit from Mood Fabrics NY. Pattern: Style Arc Kylie knit top.

Hacci knit from Mood Fabrics NY. Pattern: Style Arc Kylie knit top.

I was conscious of how delicate the fabric was – so I decided to use a lightweight fusible knit tape on all of the seams. I used my Bernina’s stretch stitch and followed it up with a narrow serged seam on my Brother serger. It might sound like overkill but as the seams are somewhat visible due to the sheerness of the fabric, I wanted them to be as strong and even as possible. I also used lightweight fusible knit tape on the neckline to make sure it kept its shape. The neckband is cleverly sandwiched between the layers and the sleeves are just a single layer of fabric.

Hacci knit from Mood Fabrics NY. Pattern: Style Arc Kylie knit top.

Hacci knit from Mood Fabrics NY. Pattern: Style Arc Kylie knit top.

The Kylie top features turned-under hems on the sleeves, overlay and body. I decided that I would use a narrow roll hem (using my serger) on the edges to achieve a delicate fluted effect. I also crossed over the overlay at the back – rather than joining them with a seam and then hemming the pieces. I felt the double or triple weight of fabric would be too heavy for the lightweight nature of the knit.

Hacci knit from Mood Fabrics NY. Pattern: Style Arc Kylie knit top.

The perils of beachside living – onshore breezes can play havoc with draped garment features!

I’ve sewn rolled hems on lightweight jerseys before and been surprised and pleased at how well they have held up over time.

This fabric is a really butter soft knit, composed of 97% rayon and 3% spandex. It is very stretchy but not difficult to work with. However I would advise you to be gentle to avoid your edges stretching too much during the construction process.

I ordered 1.5m in Ivory and while the Kylie Top requires 2m, I just squeezed this out of the 1.5m making a size 6.

Pattern

I purchased this as a PDF from the Style Arc Etsy store. I’ve taken to taping my patterns together by using a large sliding glass door at the back of our home – the light behind the glass means that it is relatively easy to line the edges of the sheets together without the need for trimming (except when I need a pattern detail that gets hidden in the overlap – then I trim).

It’s no secret the Style Arc patterns are brief – and they are for this however if you have made a t-shirt before this is not a difficult make. The main difference is the neckband is sandwiched between the two layers of the top.

The under top is quite fitted but it’s nicely balanced by the looser upper layer.

I think you may risk quite a bulky neckline (four layers of fabric) and shoulders (two lots of shoulder seams) in a heavy knit but it’s perfect for those lighter knits.

Fabric: Ivory Hacci Knit from Mood Fabrics NY, 1.5 yards
Pattern: Kylie Knit Top – Style Arc

Note: for this post I received a fabric allowance from Mood to make something of my choice. I blog it over at the Mood Sewing Network blog, then on my blog. All opinions my own.