HOODIES FOR NICE GIRLS… Vogue 8854

I made a hoodie…

Vogue 8854 hoodie - mysterious

Vogue 8854 hoodie – for a ‘nice’ girl

I can’t be a bad-ass cos it’s a Vogue hoodie. Yes the hoodie for ‘nice’ girls… from the latest season release from Vogue.

I used a Marc Jacobs knit that I picked up in Sydney’s Surrey Hills The Fabric Store last month. It’s divine. Soft and cuddly. Navy on one side and royal blue on the other. And a screaming bargain at just $8 a metre. Yes, yes I know you are really jealous now… I only needed 1.6m for this top!  I got the pattern for about $7 (including postage in a major indulgence haul from BMV).

Vogue 8854 hoodie - neck closed with toggle

Vogue 8854 hoodie – neck closed with toggle

Rachel of MyMessings in Twitter suggested making it fully reversible with flat fell seams… completely awesome idea… I eventually came to the conclusion the fabric would be a little thick (the fabric! not me thank you very much!). Good decision. I snapped two needles making this hoodie (or maybe it’s more of a bad ass hoodie than I thought).

My biggest dilemma was whether navy should be on the outside or inside. I know! Decisions!! I nearly put navy on the outside. However I have quite a few dark jeans and felt the royal blue was more versatile… and sometimes a huge chunk of shapeless navy or black just looks… well… shapeless.

This is absolutely nothing fancy (except the dead posh fabric of course) about this. I love the contrast colour that you see inside the lower back hem, hood and neck facing.

Vogue 8854 hoodie - back view

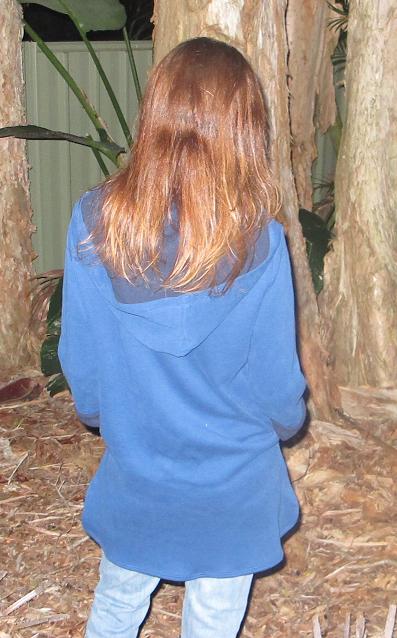
Vogue 8854 hoodie – back view

I found the hem went a little wavy/wonky but I’m not too concerned. I think it will settle down with some wash & wear. Again I think the weight of the fabric is an issue here… but it’s so snuggly all is forgiven. Despite being quite thick fabric, it’s very soft and drapey.

It’s extremely comfortable, easy to wear and I think will be a casual winter favourite. It’s not fancy wear but hey, everyone needs a little ‘slouch’ in their life right?

Vogue 8854 hoodie - hood up

Vogue 8854 – hood up

  • I turned under the inside edges of the neck facings. They just looked untidy unfinished or overlocked.
  • I flipped over the fabric to get a contrast on my neck facing when the toggle is undone. I thought from the look of the pattern only one facing would be revealed. Doh! Not true (although I could be a little neater in my styling – this was a slap on the nearest jeans/footwear and run into the backyard photo shoot). I don’t mind it so much as I figure it’s going to be done up most of the time. Note to self: stop trying to be tricky.

    Vogue hoodie - all the guts - no glory

    Vogue hoodie – all the guts – no glory. Still need to tidy up the end of the neck/hood seam. It was tough to sew through the thickness of the fabric neatly.

  • I used a wooden toggle instead of a button – a suggestion from ELH.
  • I omitted the snaps which are to hold the flap down more firmly. I just think they would look messy with the neck open.
  • I used a twin needle on the hem and cuffs. Yeah I know, dead fancy for a hoodie right?
  • I set the sleeves in flat because… well it’s just so much easier! There is no gathering in the sleeves. I attached the sleeves and then sewed up the sleeve and side seams in one go. Why make life hard for yourself?
  • I love this fabric and I like the cuffs turned back so the contrast inner shows. I haven’t stitched these back as I want the length for the colder winter days. Yes, tragically I live somewhere where winter isn’t really that cold and this will probably be quite snug most days…

    Vogue hoodie - neck open

    Vogue hoodie – neck open.

  • I hand-stitched the outside bottom of the neck opening down, rather than edge stitching along the bottom edge as the pattern says. I found the edge stitching was very obvious due to the thickness of the fabric. It created a giant puffy indentation. Not so fancy. I also stitched a little further up the bottom of the opening as I did not want to put little press studs to close the opening. I just thought it would look messy when the toggle was undone.

I figure if I get sick of the ‘bum flap’ as I have nicknamed it, I can always shorten it a little.

Next time I am fortunate enough to make it to The Fabric Store, I am going to pick up some lightweight Metalicus wool fabric, or NZ merino knit. I think this would make a gorgeous t-shirt weight top. Almost like a tunic… I suspect this is the sort of fabric Vogue have used in their top.

Good news? I’ve got the same fabric coming my way at Christmas courtesy of my mother-in-law. 🙂 this time it’s soft pink and fawn… not sure if it’s another hoodie or a jacket… I’ll have to wait ’til it talks to me…

Random interesting facts about hoodies: Madalynne recently posted about hoodies and a little about their origins.

IN OTHER SEWBUSY NEWS…

Whole Wheat Cardigan

Whole Wheat Progress, the back

I’m knitting a cardigan… I think… I had a major brain explosion and couldn’t nut out the pattern. When I woke up one morning this week and went ‘Doh! You IDIOT’ (and that was being nice to myself – I can knit I’m just not very good at it – and of course I’ve chosen a pattern with lace and cables… see My Messings… I’ve been in love with this pattern ever September she posted it as a consideration in her knitting adventures… she went on to knit Miette.. and has now started Whole Wheat by Alexandra Charlotte Dafoe (you can pick up the pattern for $7 on Ravelry – where I am SewBusyLizzy if you wanna be friends) … I decided I could not live without it anymore either.Now I have figured out the pattern I don’t know what my problem was…. other than being ridiculously tired of course…

Funny… I can sew a dress with boning, lining and underlining but knitting is hard!

Final picture – taken by Miss 9 at bedtime on the iPhone…

Hoodie shot by Miss 9

Hoodie shot by Miss 9

Now I have to go and cut out a corporate jacket for Miss 9 who is starring as the corporate b*&^% who tries to outsource the elves work at Santa’s workshop. Cheery Christmas stuff…

Managing a Sew Busy Life

I’ve had the rather challenging life lately. Life seems to be a slow-motion avalanche swamping me at the moment. In the midst of my less-than chillaxed life, sewing has been a real refuge from the onslaught of reality.

Sewaholic Alma: sneak peek

Sewaholic Alma: sneak peek. It makes me giggle that I have tweeted this image a few times…

In the past couple of weeks, I have made a gorgeous new Alma blouse (yes pictures soon, have patience people! I have provided a sneak peek above) and a muslin for MariaDenmark’s new trousers.

MariaDenmark 301 – Winnie Wide Legged Trousers

MariaDenmark 301 – Winnie Wide Legged Trousers

Maria and I met through Twitter and it’s been fabulous. She’s got me to sew an a-line skirt (in fact I’ve made two I just have not had a chance to take pictures due to the life avalanche – which I have been feeling very bad about), a t-shirt and now trousers.

Maria sent me her trousers pattern just before it was released – to test instructions, notches etc. Life shortly thereafter delivered a quite spectacular landslide and they took me a little longer than usual.

However I’ve finished my very rough muslin. The fabric only cost me $4 and it’s a polyester twill – which sounds horrid but it’s got an excellent drape. Given my first Thurlows I thought it best to be cautious with my cash!

Maria’s new trousers are wide-legs. Despite my love of hussy-length skirts, I have always adored wide-leg trousers. And these are perfect. I can’t wait to find some nice fabric and make them again! The junk trunk is happy.

MariaDenmark Winnie Trousers: muslin back

MariaDenmark Winnie Trousers: muslin back

Please excuse the appalling pictures taken on the iPhone at 11pm! And the unironed pants… and I’m standing slightly lopsided… and they are unhemmed!

These trousers have just 12 pieces – compared to the 21 pieces for Sewaholic Thurlow. Now I really like the Thurlows but the simplicity of Maria’s design appeals to me – and I love the fit. I took my sides in a tiny bit too much and will add belt loops next time.

Maria directed me to a Threads online tutorial for doing the fly front zipper and it was magic! Life changing stuff! My fly front zip went in perfectly!

Maria is running a pants ‘fit-along’ at the moment so if pants have scared you, don’t be afraid. These pants are easy peasy. Grab a pants pattern, learn some new stuff about fitting your booty. I’ve just got to figure out how to get the back waistband to fit perfectly and then my life will be complete 🙂

And my Apronalong prize arrived today! Thank you Karen 🙂 x I love it – even the wrapping paper/bag!

Apronalong prize!

Apronalong prize!

BUSY LIVES

This weekend’s #sewingsocial got me thinking. About sewing, about being busy. And about managing all those things (It was ironic that I had to stop scrubbing the kitchen floor to participate).

Busy is a catchcry of today’s world. We are all so busy (or in my case sew busy and so busy!). I personally don’t think I’m any busier than anyone else. Or that the things in my life are more important or demanding than anyone else. I think it’s all about perspective. The things that we do in our lives are important to us as individuals and make us who we are – our values, priorities and ambitions.

I often get asked how I manage everything. I don’t know, it’s just how my life is and I just get on with it – not much else to so about it really is there? I get outta bed (some days more reluctantly than others) and just plod my way through life.

I have a fulltime job. I am married with two children. I don’t have a cleaner for my house. I cook our meals, we rarely have take-away. My kids do after-school activities. I squash in a weekly grocery shop. I have a high-maintenance dog. I sew. I blog. I tweet. My husband has one night out a week at ‘boys night’. We go to Sydney to see family now and then. Not spectacular but it’s busy all the time – like most people’s lives. I often don’t sit down until after 9pm every night and I’m back up at 6.15am.

And I sew. I often get asked ‘how do you find time to sew?’ Good question but the better one is ‘why do I find time to sew?’

In the midst of family dramas, workplace upheavals and sick children, sewing provides me with a centre. When I sew, trace patterns, cut out, it’s almost like the world’s chatter shuts up. I think ‘suffer’ from the ability to have a very singular focus, I am VERY goal-driven. So doing something completely unrelated to the demands of my life actually means all that ‘essential’ life stress disappears for a time. I am only listening to the pattern, the fabric & thread, the hum of the machine and the hiss of the iron.

It’s something I’m choosing to do. I can stop sewing at any time and there is no yearly review, letter to the editor, customer complaint, call from the school, no heart attack, no sick child if I stop.

I think if your hobby stresses you out – you need to get some perspective on it.

Does it matter if you do a blog post today? If your zipper is a bit wonky? Your bound buttonholes need some work? Not really.

Chillax peeps. It’s just fabric, thread and a few notions. Just enjoy it for what it is. Pretty stuff, fresh challenges of your choice and connecting with like-minded people.

Does sewing relax you?

PS – thank you for all the lovely birthday wishes – the old gal appreciates it xox

HALLOWEEN – TWO LITTLE GHOULS

In my childhood world there was no Halloween, yes we knew about it but it wasn’t something that really was celebrated in Australia.

It’s only been in the last few years that you can now expect a door knock and little faces begging you for yet more sugar.

This year I have relented and will let my girls do a little ‘trick or treating’. The eldest was so excited that she coaxed/coerced her grandmother into helping her sew a costume on the recent Tasmania trip. They did an excellent job! My only contribution to this outfit was stitching on the droopy sleeve ends – the instructions were rather unclear and I think Grandma was also a little worn out by the excitement of Miss 9!

We snapped some snow shots while at the holiday house (as snow is a novelty for us!)

Halloween Costume 2012 - made by Miss 9 and Grandma

Halloween Costume 2012 – made by Miss 9 and Grandma

Halloween Costume 2012

Halloween Costume 2012 – made by Miss 9 and Grandma

She is my daughter so she insisted that she have a few more shots taken at home as she had finished accessorising the outfit. Yes, that’s my girl!

The witch and the vampire

The witch and the vampire

The little munchkin of the house is in the Halloween fun – but wearing a hand-me-down black velvet dress. We shall accessorise her Halloween look with some dripping ‘blood’ down her chin as she wants to be a vampire. Yes, it’s not enough that she sucks money from my wallet, she want your blood (and lollies) too!

While in Tasmania in early October, I stumbled over a poster in the fish ‘n’ chip shop on the Friday night I arrived. Hooray!

So after a brief stint at Salamanca Markets on Saturday morning (closing early due to bad weather on the way)…

Salamanca Markets, Hobart

Salamanca Markets, Hobart. Mount Wellington looming in the background

Grandma (my mother-in-law) and I took off to Frock Up Hobart. It was small but fabulous. They occur all over the place – check out their website for more details if you are an Aussie.

It was mainly clothes. Some very expensive clothes – I could not even find a price on this dress but the cherry necklace was $460… but the use of the border print is fabulous and would be easy enough to replicate…

Vintage Sundress

Vintage Sundress

There were a few patterns and magazine but not many. I did pick up this cute 1950s magazine…

Vintage Magazine

Vintage Magazine – no patterns but lots of lovely pictures!

I also found this little blouse pattern in my size, or close enough. Hopefully the pattern is kind to me as I would love sleeveless one with some capri pants!

Vintage blouse pattern

Vintage blouse pattern. I love the owner’s name! Thanks Lynette 🙂

My mother-in-law also bought me a super special birthday present… but you will have to wait until November 20… as it’s my birthday dress! Oh, it’s sooooo lovely….

Happy Halloween everyone!

And I hope those how have been sheltering from Sandy are safe. x

Colette Peony – weed or blossom?

Colette Peony - a summer frock

Colette Peony – a summer frock

Colette Peony – I haven’t quite decided whether it’s a weed or a blossom in my pattern stash. Should it stay or should it go? (This dress is also appearing over at Rhinestones and Telephones right now).

Colette Peony was my first indie patterns purchases when I started sewing again. I bought it direct from Colette, waited weeks for it to arrive – in the meantime I made my Frolicking Frock and my beloved Tardis Skirt, which have all been major wardrobe winners. If I had started with this pattern, I might have given up sewing before I even got started again.

I made this as this dress for Sew Colette 2.0 which is hosted by Sarah, Erin and Rochelle. I was not thrilled when Peony was voted as the October project – I was desperately wanting it to be Oolong – I even have the pattern – thank you Sew Squirrel! I didn’t intend to participate but when Sarah was tweeting about needing a guest blogger I thought ‘hey I’ve just made a smokin’ boned, lined and underlined Gertie wiggle dress – how hard can Peony be?‘ hmmmmm, HARD!

Peony is rated as an easy project. It’s not hard to sew together. However, it is difficult to fit. This pattern has clearly been designed for someone with a completely different build than me (and most people it seems) and modifying the pattern can be hard work for some of us. So here is a little story about my battle with the Peony…

MAKE A MUSLIN!!!!!

If you make this pattern, you absolutely must make at least a bodice muslin. I consider myself a base jumper in the sewing world and rarely muslin anything (a small benefit of being built like a coathanger I guess). I had seen enough of this pattern in blogworld to know that it might be a tough customer – it needed more than courage and a parachute to prevent a crash landing. I think the biggest issue is the position of the waist and bust darts. I re-drew and re-stitched the darts five times on my muslin. I drew lines all over it and eventually created something that kinda sorta fits.

FRONT BODICE SOLUTION

What did I do? After four unsuccessful dart moves, I looked at my made-by-me dresses that do fit well and looked at their bodice darts. My Passport dress and Simplicity 2444 have waist darts however instead of running at a 90 degree angle to the waistline, they start closer to the centre of the waistline and are slightly angled outwards from the waist and towards the side seams. I transferred this dart rotation to my muslin. I simply dropped the waist darts down a little and rotated them outwards a little. I also raised the bust seams a little. Hey presto – a much better fitting bodice.

DON’T FORGET THE BACK BODICE

In my excessive excitement I did not spend enough time fussing over the back. Once I sewed up the dress I found that the back is still too wide. Alas. If you are having this problem I did google this problem and found a very helpful post from Symon Sez referring to Madalynne’s post explaining the relationship between the back and front neckline width. Next time (if there is a next time) I’m going to modify the back piece using this theory.

Colette Peony: back view

Colette Peony: back view

MY SUMMER PEONY

Fabric

I think with any seasonal dress colour choice is important. I’ve never felt very summery in grey or black. Nor do I feel wintery and cosy in minty greens and vibrant blues (I must admit I am not a fan of the colder months – and we don’t even get a frost where I live).

It’s interesting but I’ve never worn yellow – ever. Thanks Kat for encouraging me to give this hue a try via Twitter – this fabric has been intended for a Cambie but there is always another Cambie somewhere… I confess there may be a little more left in my stash…

My fabric is a butter yellow cotton eyelet. Obviously Peony wasn’t giving me enough grief so I picked a fabric that required lining and underlining.

Lining and Underlining

Using the skills I picked up making the wiggle dress and reading Gertie’s book, I underlined the yellow eyelet with some white broadcloth from the stash. Underlining is quite easy. You do need patience! Rather than paraphrase someone else – why not check out Gertie’s blog and see how she underlined the Colette Crepe bodice. In a nutshell you baste the fabrics together around the edges and baste along the dart lines. This is a very imprecise description. I think pictures work better!

Colette Peony underlining the bodice

Colette Peony underlining the bodice

I guess some people may be wondering why I chose broadcloth to underline, rather than silk organza or cotton batiste? I was planning to omit the sleeves as I wanted a Summer Peony and thought if the bodice had more structure the neckline and armholes would sit better.

The bodice is underlined – so the two fabrics are treated as one. I lined the skirt – so the lining is attached at the waist and then hangs free.

Skirt Length

People complain about the Peony skirt gathers – but I love the skirt. It’s a gentle a-line and I think if you pick a a fabric with some drape, not too much, it hangs beautifully. I can see that a poplin, sateen, quilting cotton etc might not be so flattering. I added a full 2 inches to the skirt length. I think it compliments the wide boat neckline better than the shorter skirt. The extra weight might also help the gathers hang better I suspect.

Colette Peony: lengthening the skirt

Colette Peony: lengthening the skirt

The Sleeves – or not!

In an email discussion with Sarah I planned on writing a post about ‘summerising’ Peony – after seeing Lladybird’s rockin’ gingham summer Peony in February this idea has been sitting in the back of my mind.

I’ve always felt a little left-out of the sewalongs as everyone else always seems to be in a different season to me! So this was to be my southern hemisphere version of the Peony – if you are feeling miserable as the temperature descends on the other side of the world, I’m happy to channel summer over here on my blog for you! Free of charge!

I had planned to create armhole facings and write a post about them. While I was making up this pattern, I decided that as the shoulders are quite narrow that it would be better to use bias binding instead – otherwise the shoulder would become quite bulky with layers of fabric. I did add the neckline facing as the pattern directs but ripped it out. The underlining, shell fabric and facings make the neckline at the shoulders very bulky and unattractive. So I unpicked it and replaced it with binding that I cut from the un-eyeletted (yes of course that’s a word) fabric along the eyelet fabric’s edges.

My shoulders did get a touch sunburnt at the beach when we took photos – so I missed the sleeves! Leaving off the sleeves makes the dress much cooler and better for my climate – which features hot and humid summers! Not good weather for growing Peonies 🙂

I simply stitched bias binding to the outside of the armholes on the right side, turned the binding to the inside, concealing the raw edges and slip stitched it down to the underlining.

Piping

I decided to highlight the white underlining/lining that is peek-a-booing through the eyelet by adding a piped white waistband. I’ve never inserted piping before – and had always thought it was waaaay tooooo hard. Not true. Check out Colette’s online tutorial about how to add piping to your projects…

Colette Peony, inserting the waist piping

Colette Peony, inserting the waist piping, it’s so much easier than you think!

Colette Peony: with a piped waistband, back view

Colette Peony: with a piped waistband, back view

The Fit

Verdict – does my dress fit perfectly? No. Do I mind? Actually no. I love it with my belt to cinch in the waist – even if it does hide the lovely piping! I don’t really like close fitting summer frocks, they get sticky and clingy. I put this on this morning, took the kids and dog to the beach, splashed in the water, dug some holes, we took the blog photos – and I’ve worn it all day. It’s a lovely comfortable dress. No it’s not perfect… but neither am I…

Accessories

I always think about how I am going to wear my project as I sew it. What necklaces, shoes, earrings, hats will work with it. I find this really helps inspire the process and makes finishing it all the more fun.

Lladybird created a gorgeous crochet rose brooch for her Gingham Peony. Stitch & Witter paired her’s with a bow belt.

I’ve just paired mine with a belt from a bargan bin ($5 – I love it!), some wooden beads from a hippy shop which cost me a huge $2.50 and a straw hat which was a birthday gift from a friend. Accessories really finish any outfit – made-by-me or otherwise. Think about the people whose dress sense you admire – often it’s those little touches that really make them stand out in a crowd. Think beyond your dress, your can take a simple shape or fabric and make it sing with a well placed or chosen accessory.

This soft yellow it is easy to wear and I feel like a little dish of lemon sorbet! It’s a girly dressy summer dress.

I think yellow may appear in my wardrobe more regularly – thanks Kat!

Colette Peony, a piped wiastband

Colette Peony, a piped wiastband

The Images

There has been some hearty comment in blogland about how we put together our images, Catherine Daze and ::Paunnet::, wearing footwear we usually don’t, make-up and colour editing our images… So for the record, there photographs have just been cropped a little so I’m not so lost in the frame, no colour changes have been made, I’m not made-up, I did wash my hair that morning but I wash my hair every day – so this is me, untouched and barefoot on my beach – untouched.

I don’t tend to take a lot of photos with my mug (Aussie slang for face) in it. Like most people I’m not a huge fan of pictures of myself and… well I’m blogging about the clothes, I’m no oil painting, it’s all about the dress!

Why would you bother with photo editing when you are as handsome as this chap who was busy today giving tourists beach rides! Look at those lashes!

Camel rides on Lighthouse Beach

Camel rides on Lighthouse Beach

I know you love my little neighbours… so when we spotted this chap in a tree across the road one morning last week and we took a picture for you!

Koala, Australia

Koala – how do they sleep on such tiny branches with such bootilicous backsides?????

I had been stuck in a bit of a sewing/life rut for a few weeks- for a whole lot of reasons that don’t deserve precious sewing blogging space. Good news: I’m feeling like I’m getting back on my feet… I’ve got two Maria Denmark skirts to share… some treasures from my Tasmanian trip… a wonderful package from Pretty Grievances… a magazine that I won from The Perfect Nose’s blog. So I’m back 🙂 Thank you for your encouragement and comments…

Pattern: Colette Peony, size 0. Purchased form Colette Patterns (now I purchase all my indie patterns from Sew Squirrel – a much better option if you live in Australia!! Thank you Sarah!!)
Shell fabric: Butter yellow cotton eyelet from Spotlight, reduced form $32/m to $6 on the bargain table!
Bodice underlining: white broadcloth. Skirt lining: White bemsilk.

hmmmm and I really need to fix up that back hem…

GERTIE’S LITTLEST WIGGLE (Butterick 5814)

Butterick 5814 - my little wiggle

Butterick 5814 – my little wiggle (and a tad smug)

AKA the Ladybird dress – thanks Bimble & Pimble! That’s all I think about when I see this! Totes!

So Butterick 5814 is finished – well nearly, I confess I still need to slip-stitch the hem up but I figured I could get away with it in the photos!

Butterick 5814 - my little wiggle

Butterick 5814 – my little wiggle accessorised with a smirk. Yes, I love those shoes too…

I had to do some modifications post bodice construction. I thought it was going to fit and then once I sewed it all up and put in the zip it was just a little tooooo revealing in the bosom department. It was kinda sliding across, very low-cut and revealing – I am not your classic wiggle figure. More of a slight shimmy. I’m sure if I was a full-figured lass, or more of a wiggle, it would not have been an issue.

Butterick 5814 - bodice interior

Butterick 5814 – bodice interior. Whoops camera strap. That’s my post construction ‘hack tack’ on the righthand side.

I made a 6 in the bodice and I still had to heaved the surplice bits over a good inch on either side, tapering out to zero at the waist. This pulled the bodice sides (which cross over) across more tightly and I feel more confident in it with this rather dodgy bodification. Hey, it works and from the outside you can’t really tell. Even when I am really drunk I don’t take my clothes off in public 😉 so the interior is not such an issue LOL.

Butterick 5814 - bodice exterior

Butterick 5814 – bodice exterior

It’s not the best way to modify the dress, post construction (listen… can you hear Gertie screaming “make a muslin first you silly woman” yes yes Gertie but I am a base jumper in the sewing world – take a leap of faith and see what happens) however you can’t tell from the outside and I think it did less damage that a truckload of picking.

I would try making this again, modifying the little bodice piece that the tucked side attaches to and pulling a substantial piece of the bodice that crosses under into the side seam on an angle. I would make it in black – it would be a smokin’ LBD.

Butterick 5814 - my little wiggle

Butterick 5814 – my little wiggle. This is how I look after a few drinks…

If you are a curvy girl I think this could really work on you.

It was fun to make. I found it came together beautifully and the interior of the bodice looked amazing (until my hack post-construction tack). I got a bit stuck on the boning as I had never tackled that stuff before. I ended up taking the boning completely out of its cover, edge stitching it down and then re-inserting the boning. Worked perfectly.

Butterick 5814 - back - whoops bra strap

Butterick 5814 – back – whoops bra strap. Sorry should have straightened myself up for that photo.

I was really disappointed with how the zip was inserted. It looks OK on the outside but the inside is not very neat. I felt after the immaculate bodice construction the zip insertion was a little ‘blah’ and I would do it my own way next time. I kept re-reading the instructions thinking “that can’t be it” but ended up using them anyway (in a leap of faith) but was not pleased with the result. Compared to the Cambie finish, it’s just not as tidy, But then the Cambie is perfect :-).

I made a 6 up top and an 8 for the skirt, I think I could have made a 6 all the way through.

Butterick 5814 - skirt puff!

Butterick 5814 – skirt puff!

The sleeves are tight and come right under your armpits.

Butterick vintage 2739 - there is one of those flounce things!

Butterick vintage 2739 – there is one of those flounce things!

Not good for a hot sweaty day. The flappy thing is necessary, without it you will end up with a fabulous but bouffy bunch of pleats curving across your stomach, excellent if you like the bloated or pregnant look, so the flappy bits are essential. I started out thinking they were odd but I really like them now! Then I saw this vintage pattern on eBay today. Vintage waist flappy things!

It’s also a tricky dress to wear a bra with. You might be able to go without with all the boning but I need one to give me some shape. Possibly sewing one into the dress might work…

I love how the skirt is underlined, I have never underlined anything before so it was a great learning experience. Now I better understand why you might underling something, how underlining can change the shape of a garment, how the tack the pieces together and tack the darts etc before actually sewing. It’s time consuming but worth the extra work.

My photos aren’t great, it was just too windy to do beach photos today sorry – and I would look a little freaky on the beach in this.

I had planned to wear is to ‘high tea’ event but chickened out. I’m a bit sorry I did as this would look fabulous with a black hat! My Twitter friends helped out and we ended up picking the beloved Cambie. I got busy in the morning and made two Lisette bows (great idea from Sewmelove and HouseofPinheiro via Twitter this week) and trimmed my hat and handbag to match (thank goodness for keeping scraps). I was nominated for ‘best dressed lady’ along with two of my friends. Three of us were nominated in the top ten from a field of 150 ladies. No I didn’t win but I bet no-one else had made their own dress 😉 A short black lace dress won the day.

High Tea Sewaholic Cambie

High Tea Sewaholic Cambie

High Tea Sewaholic Cambie - accessories

High Tea Sewaholic Cambie – accessories

More blogs posts to come this week – blogger awards, Tasmania trip finds and more…

And if you are wondering about the gorgeous plant in the background of the Gertie dress pictures it’s called a Bottlebrush – yes not only do us Aussie have creatures with built-in pockets (marsupials!) we also have kitchen utensils in the garden. LOL.

Talk soon!

Pattern: Butterick 5814 purchased from Sew Squirrel
Fabric: shell: taffeta from Spotlight’s bargain table $10 a metre. Lining: black bemsilk