The Tunic Bible – a review & giveaway (part 1)

(Giveaway now closed)

My sewing is behind schedule. As much as I don’t like to think the my life requires a schedule, the simple reality is when you are working fulltime with kids and a hobby blog… a degree of planning is necessary!

Lately my life has been dedicated to juggling a fulltime job and my eldest daughter’s very busy dance schedule and her participation in the local dance eisteddfod. More about the dancing & dancewear in another post – as I ended up making more than ‘just’ a tutu!

Today I’m here to review the new book The Tunic Bible: One Pattern, Interchangeable Pieces, Ready-to-Wear Results by Sarah Gunn and Julie Starr.

Julie Starr is well known for her gorgeous contributions to Pattern Review and Sarah Gunn needs little introduction to the online sewing world courtesy of her blog Goodbye Valentino and Mood Sewing Network – in fact she was one of the first sewing bloggers I discovered. Together they have written The Tunic Bible, a huge achievement and exciting development for them both! Congratulations.

Julie Starr and Sarah Gunn, authors of The Tunic Bible

Julie Starr and Sarah Gunn, authors of The Tunic Bible

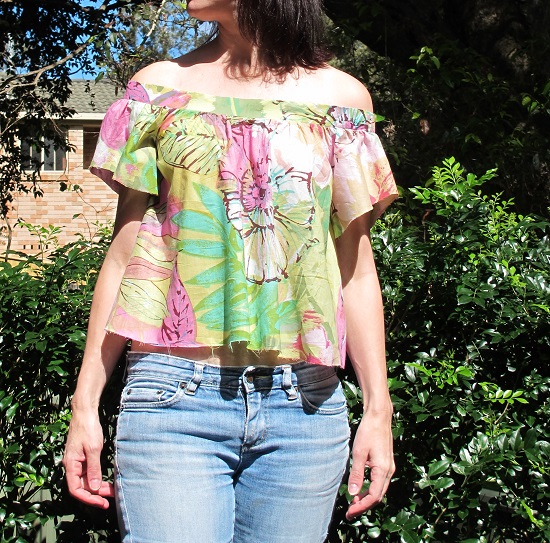
I’m in the middle of making up my ‘tunic’ from this book and decided not to rush and to share it on a separate post because…

  1. I like to finish my project thoughtfully and neatly; and
  2. focus on the book.

I think it’s easy to just look at garment and not really know what you might be purchasing when you buy a book on impulse after seeing one garment from it.

I’ve been provided with a digital copy to review. I confess I do find it difficult to read a book online or on my ipad so I ended up printing it out in mini booklet form so I could get a general sense of the layout and feel. The paper copy is still on it’s way

MY FIRST IMPRESSIONS

Now like many of you I suspect, I thought… how on earth do you write a book about tunics? I thought that because my ‘notion’ of a tunic is a garment that finishes at upper to mid thigh, a placket style neckline – with or without sleeves. And as a general rule – modest.

And yes, the tunic as you know it is definitely this book… alongside a seemingly endless array of tunic, and dresses – mini/maxi in this book.

the-cover

or if you prefer to see them on ‘real’ people…

Sarah Gunn & Julie Staff (centre) ... that long print maxi dress sold me on the versatility of 'the tunic' if only I could find suitable fabric.

Sarah Gunn & Julie Staff (centre) … that long print maxi dress sold me on the versatility of ‘the tunic’ if only I could find suitable fabric.

WHAT’S COVERED

I’ve decided to include the Contents page from my ‘review copy’ so you get a good overview of what is covered in this book.

contents-page

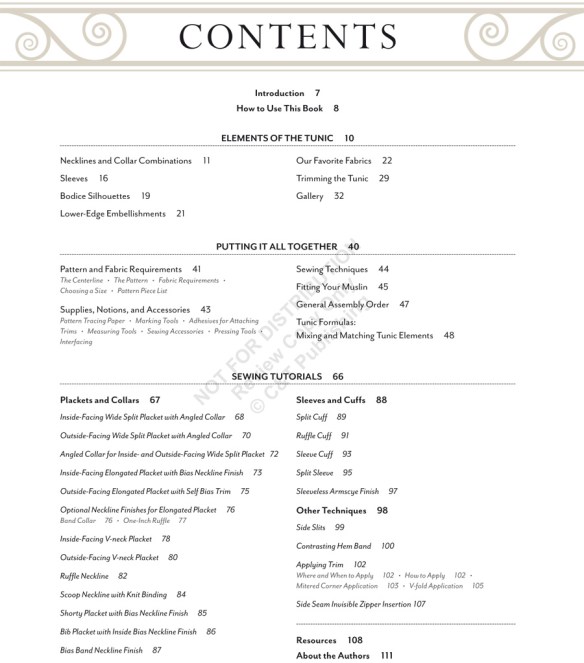
Contents: The Tunic Bible by Sarah Gunn & Julie Starr


The books does provide you with a full overview of all the possible options – and each version of the ‘tunic’ is accompanied by a description of the different style ‘elements’ that have been used as well as the type of fabric, trimming and embellishment.

There is a array of necklines and collar types to consider, sleeves (including a puffed and split sleeve), fitted vs loose silhouettes and how to embellish and trim your tunic. They also cover suitable types of fabrics – the options range from silk and linen to lace and knit options.

There is also a gallery of home sewing personalities who have made up a wide range of ‘tunics’ in all lengths, fits and fabrics. The book itself is packed with a huge range of different tunics – there must have been A LOT of sewing going on during the making of this book! I believe Sarah and Julie sewed approximately 60 tunics between them.

Tunics from The Tunic Bible by Sarah Gunn & Julie Starr

There’s more to a tunic than meets the eye

CONSTRUCTION

The pattern is provided full-size on a tear-out jumbo sized sheet. Hooray for not printing off A4 sheets and sticking them together!

There is a ‘general assembly order’ provided with an order of construction provided and also a seam finishing order.The construction instructions to me are more than adequate – however if you are an absolutely beginner you make want to google a few things BUT if you have basic sewing knowledge the book provides adequate guidance through the contruction of all the different elements: the types of plackets, collar finishes (including a ruffle of course – I would expect nothing less from Sarah!).

I wouldn’t say that there is ‘fitting’ advice in this book – other than the suggestion to make a muslin, what to check and a resource list on where to source support for alterations. I think this is adequate as it is not sold as a tunic fitting bible and fitting is such a varied and complex area unto itself.

RESOURCES

The book concludes with a range of physical (largely US based) and online fabric & trim stores, Sewing and alterations resources, online classes and links as well as sewing with speciality fabrics.

SIZING

I’ve been guilty of not to think to include sizing in my book reviews – and I always should. I’ve made the mistake of buying patterns that I fall outside the range of and I think it’s easy enough to do! So The Tunic Bible covers the following size range.

  • Begins at XS: Bust 33in/84cm, waist 28in/71cm, hip 35.5in/90cm
  • Finishes at XXL: 47in/121cm, waist 43in/109cm, hip 49.5in/126cm

FINAL THOUGHTS

I admit to being somewhat skeptical about 100+ pages on tunics – and I’m delighted that my skepticism was unfounded. I found the book interesting and inspiring – and a nice change from pretty dresses (as much as we all love them – me included).

There is a truckload of visual inspiration due to the large number of photographs and tunics that have been constructed for this book. This comprises more than half of the book – and reminder being dedicated to the construction of the tunic elements (yes, there are a lot of options!).

I think it may be a good starting point for someone who wants to experiment with a fairly simple base pattern to try a range of fabrics, trims and let their imagination run wild. The book does offer you a range of options to consider to make a unique garment each time.

For me, I can see a few simple tunic shift dresses for summer and perhaps a floaty version with sleeves as a beach cover-up. I look forward to seeing the book in person.

GIVEAWAY

Now the giveaway – every stop of the blog tour has a copy to giveaway. Note it will be a hard copy for the US-based winners and an electronic copy for those based outside the US.
Would you like a copy? To go in the lucky draw, leave a comment below and you might just win yourself your own Tunic Bible (courtesy of C&T Publishing). The lucky winner will be announced October 11! Where else can you enter the draw?
Or if you can’t wait, you can grab one at C&T Publishing – all new customers receive a 30% discount by signing up on their website and the ebook is now available.

Note: for this post I received a digital copy of the book The Tunic Bible from C&T Publishing to review. All opinions my own.

This post first appeared on www.sewbusylizzy.com


The Tutu – On Stage (part 3)

Zoe in her tutu. Yes, she is talking about the second already

Zoe in her tutu. The photograher cropped and zoomed this image for me.

It’s not quite finished here. For some silly reason I thought 100 Swarovski crystals would suffice. It needs a lot more. There are none on the skirt here and it needs it!

I have 1440 Swarovski hot tip crystals winging their way to me from Hong Kong. Yes, they will take hours to apply. I’ve come this far – what’s a few more hours?

Seeing it on stage in the small dance school concert confirmed that the light does hit the tiny crystals beautifully, creating a gentle glimmer as she moves. Like a silvery ice-encrusted piece of airy fairy floss.

She wore it to dance with the tiny tots – essentially leading them through their performance.  I’ve blurred them out because I can’t put them here for obvious reasons – but they were so sweet. Absolute stars that entranced the audience. They were ‘music box dolls’ and I guess Zoe was the big ‘doll’.

with the tiny tots

with the tiny tots

She will wear it again to dance solo… but its first outing wasn’t about her but those little cherubs.

A little like the tutu wasn’t about me but all about her.

Pattern: Dani Legge of Tutus by Dani
Materials: Spotlight, Australia
@fabphotosport@fabphotosport: Fab Photos, Port Macquarie

Thanks for hanging in there on my tutu posts!

Also seeThe Workshop | The embellishment

The Tutu – Embellishing (Part 2)

I’ve learnt a lot about how I like to work/design during this process. Not just for tutus but many projects. In particular how much I enjoy detailed projects and slow sewing.

I also embraced my inability to stick to a plan. I’m actually not a huge fan of ‘plans’ as I think you can be so doggedly pursuing a plan you might miss a magic opportunity.

I confess I will take the longest, toughest road if I think it will take me where I ultimately want to be.

The Embellishment Journey

What a long & winding road this stage was!

I listened at the June tutu workshop and studied all the recommended plate decoration techniques – and then ended up simply doing what felt/looked right to me.

I also considered my daughter’s physical build (slight) and how she dances (light on her feet) when considering my options.

The Plate/Skirt

Just for fun – this is what the underside of the skirt looks like…

tutu skirt underside

I’m pleased I just used two layers of pink and grey. It’s not overkill on the contrast but from above adds a lovely sense of depth to the skirt that you will see later in this post

Often you would decorate the tutu by using the bodice fabric to create a plate that suits over the net plate, to ‘blend’ the bodice into the skirt. The proportions are covering 1/3 or 2/3 of the plate.

I did this, hand sewed decorative braid to the edges… and hated it. It looked heavy and clunky. So I threw it away (saving the braid of course!). I think the pile of the velvet and how the colour changes as the light hits it didn’t help either. It just didn’t seem to blend with the bodice at all. I thought it made the bodice look like a quirky teacup! 

Tutu with lace overlay and velvet plate

Tutu with lace overlay and velvet plate. this is the velvet plate folded in half but you get the idea!

Sorry, I forgot to take a photo of just the velvet plate on the skirt – clearly that decision required no consideration! I also tried layering lace and various braids on and around the velvet piece but nothing worked.

So I tried with just the lace. Despite the beautiful lace fabric, it looked heavy and dull gathered over the skirt. This had been my original concept. I happily threw it out the window – not the lace… just the idea!

Tutu with a lace overlay

I trimmed the lace motifs away from the mesh fabric, sat them on the plate and pinned them on the bodice. Suddenly I was happy. I loved the look of the lace floating on the pink. I decided that the pink netting and bodice weren’t jarring together and blended nicely by running the lace from the bodice into the skirt/plate. It was the only decorative design I could settle on.

Tutu with cut-out lace motifs

Tutu with cut-out lace motifs. I loved this lace layout but the shape of the lace motifs didn’t lend themselves to an overall design.

How to attach the lace? I tried glueing it to the flat net plate. Yuck. So messy! I didn’t like how it dulled the silvery tone of the lace eithe. I tried machine stitching, I didn’t like the visible stitches.

So I tried hand stitching and trimming away the mesh – thanks Jen The Stitcher & Gatherer! Finally I was happy – and relieved!

It achieved a pretty ‘floating’ effect and seemed to best suit the soft colours of the tutu. I used the scalloped edge of the lace fabric and the lace motifs of the fabric itself. These have been hand stitched into a flat circle of netting – with an oval cut in the centre around the leotard/bodice. I focused on achieving the right shape around the outside of the net circle to match the tutu plate, I trimmed the waist ‘hole’ just before I attached it.

Yes, it was a time consuming activity. I took the circle of netting to work and did a little stitching during my lunch breaks. My colleagues have long known I’m a bit of a sewing eccentric! I think they struggled to see how this flat circle of netting was going to become an integral part of the tutu!

I attached the flat circle of embellished netting at the base of the bodice – but to the netting not the velvet. I also to the outer edges of the top tutu layer… with tiny individual stitches… yes, single stitches. This allows the waist the stretch a little without popping stitches and around the outer edge to keep the ‘lightness’.

I just love how those few layers of  darker pink & grey have created a 'depth' to the skirt

I just love how those few layers of darker pink & grey have created a ‘depth’ to the skirt

Bodice
I attached the lace to the bodice trailing it across the bust and onto the skirt. 

My daughter loved the asymmetric sweep of lace across the bodice. It also suited the lace motifs which were not symmetrical and couldn’t not be mirrored down the bodice front as the wrong side was slightly duller than the right side.

I made her try it on at this stage to check the bodice lace wasn’t doing anything odd when the velvet stretched.

At this point she said “you know Mum, this is a really good tutu. And it’s a really pretty one. I didn’t think it would work in these colours. I was wrong (laughs) & that’s hard for me to admit.”

I laughed too. And felt relieved. The work was paying off!

I left the lowest part of the bodice lace stitching until after I had attached the skirt decorative plate. This meant to could stitch the lace to trail onto the skirt and blend the two section together.

Bodice lace attachment

sometimes I trimmed in blocks as ls I sewed, it helped inspire me and it was easier to ‘pick up where I left off’

Gems or crystals?

I listened to the advice about glueing gemstones – which you can buy by in the hundreds at Spotlight quite cheaply – instead I bought a hot tip applicator ($22 from eBay – thanks to the advice of Stretchwear by Sam who sews for dancewear & for dance schools & I met at the June workshop) and invested in hot fix Swarovski crystals.

I had played with what colored gems might look like but, for me, they added heaviness to the airy feel as well as introducing new pink tones. 

It might seem minor but I had an idea in my head of my lithe daughter appearing to dance in a piece of fairy floss that sparkles as she moves, with light shimmering on the grey/silver lace. That it wasn’t about the decoration as much as how the light hit her & reflected on stage. She’s very light on her feet and I wanted that quality to be reflected in a dainty, romantic tutu.

more playing: tutu with coloured gem stones

more playing: tutu with coloured gemstones

My decorations aren’t so much about being a statement in itself. My decision was to make the delicate lace sparkle as she spins. Like frosting.

I chose clear Swarovski crystals. And once the rest arrive, hopefully I will achieve the sparkling ‘frosting’ that is in my head.

Swarovski Hot Fix Crystals. I ordered  100 - nowhere near enough!

Swarovski Hot Fix Crystals. I ordered 100 – nowhere near enough! I have 1440 on their way from Hong Kong as I type! this bodice should have many, many more crystals attached to the lace soon. So hard to photograph velvet, lace & crystals!

The difference between glueing or machine stitching the lace is minimal from a distance. Perhaps sparkle paint on the lace may have been just as effective. However I know and can appreciate the difference. And that’s enough for me. I wasn’t producing a commercial tutu for sale this was a labour of love. And so I stitched and I will fiddle for hours with tiny crystals and the hot tip applicator.

Advice?

Be prepared to change direction & be patient. I often left it on my dressform for days which I pondered the next step.

I took lots of photos on my iPhone and poured over them in a gallery as this was the easiest way to compared visual changes to the design.

Decide whether your project, tutu or garment, is a fast or slow project. I embraced it as a labour of love & challenge so I poured a lot of time & thought into it. Not a commercially viable use of time BUT sewing is my hobby. So I indulged myself.

I did sweat it out at the end as my daughter announced she would wear it to a dance school concert – and suddenly I had two weeks to finish! 

In many ways I am glad she did that. While I enjoy hand sewing… it was tedious work. This forced me to knuckle down and work to a deadline. Fortunately I had made my design decisions and had half stitched the plate lace. I set up the ironing board in the living room so I could stand while working and not be isolated in my sewing room.

I tucked a piece of hard board inside the leotard to make the stitching easier. However I found the easier thing to use was a shallow stainless steel bowl – so I was stitching the lace onto a curve rather like the curves of a human body.

Stitching in the living room -  a glass of wine and beeswax to stop the endless thread tangles as I worked in ever-changing directions

Stitching in the living room – a glass of wine and beeswax to stop the endless thread tangles as I worked in ever-changing directions


All this work & thought!
Is it perfect? Not by a long shot! It’s a learning process and I have enjoyed the challenges along the way (ok sewing the skirt not so much!).

I’ve created something beautiful & useful. Something my daughter loves and feels great in – and something that makes me feel proud.

The final tutu coming up next!

Also see: The Tutu Workshop

The Tutu – Workshop (Part 1)

If you follow me on Instagram, you might have noticed that ‘unselfish sewing’ has reared its crystal-encrusted dancewear head. Sorry. Not sorry.

Due to the length of the project I’ve broken it up into several posts – I won’t drag them out over weeks. One a day for three days.

I finally (after 10 years) dipped my toe into sewing my daughter’s dancewear. I’d seen enough ugly garnish dancewear to deter me… but in the end curiosity got the better of me.

I started with a tutu. I know, nothing like jumping in at the deep end! However I jumped in with a life buoy – or rather a tutu sewing workshop.

I had been web stalking an Australian tutu maker Dani Legge as I’d been pondering this adventure for a few years and my pattern research always seemed to lead me back to an Australian: Dani Legge. She’s a bit of a legend in the tutu world, particularly the stretch tutu.

When I saw a tutu workshop with Dani pop up on facebook, that was based on the Gold Coast in June, I decided to sign up.

There were two options, sewing a traditional tutu over five days (patterns by Suzanne Dieckmann of Tutus That Dance) or Dani’s stretch tutu over two days.

While the immediate choice seemed to be a traditional tutu from a sewing point of view for myself. I thought “this isn’t about me” (first step in selfish sewing recovery).

After a discussion with my 13-year-old daughter who would be wearing the tutu, I opted for the stretch tutu class. She finds them more comfortable and didn’t think the visual difference was enough to sacrifice comfort – and she’s growing. A stretch tutu will go the distance and can be sold/handed down to another dancer.

The Concept & Materials

While I initially planned for a claret/gold/cream tutu, I had a sudden burst of inspiration and created a pink/grey/silver tutu instead. My daughter thought it was a hideous concept but said “well I don’t like pink but it’s your first one & it won’t be very good anyway. So better to make that first and then my dream claret one next.” Ah…. such faith she had in her mum!

I decided to use stretch velvet (against the advice of Dani but complying with my daughter’s wishes) and layer three colours of netting into the plate:- light pink, dark pink & grey. I found some lovely silvery grey lace/net fabric. All fabrics from Spotlight, Australia.

I was the only one at the workshop sewing with velvet & I did curse myself a few times for being pigheaded. Such is life!

My materials - stretch velvet, silver lace and dark pink, light pink & grey netting

My materials – stretch velvet, silver lace and dark pink, light pink & grey netting

I won’t lie, the velvet was difficult. And while I was told to take ‘lining’ for the tutu, I interpreted that as stretch lining. However what I needed was just plain old Lycra. Fortunately a lovely lady had extra and provided my lining on the day. And it wasn’t what I think of as lining, more of underlining – two layers to give the tutu more body.

The tutu plate is made from netting – not soft fluffy tulle. Stiff stratchy netting from Spotlight… about 12 metres of it. You want tough netting so the plate doesn’t collapse.

The silver/grey net/lace fabric I ended up using differently to my original vision – part of the creative journey!

The Leotard

I’m glad I did this course as it gave me the confidence to sew more than a tutu. I’ve gone on to sew a unitard and a jazz ‘cheerleader’ style outfit for my daughter. I still have a contemporary outfit to go.

Nothing dramatic to report about the leotard – except we left the crotch seam open to attach the netting plate.

All the seams are top stitched – with my ‘lightening bolt’ stitch on my Bernina.

The entire leotard is underlined or lined with plain pink lycra – except below the waist which is just one layer or plain lycra – not velvet. The velvet pile can cause odd effects when the light hits it… and there are some places you don’t want ‘weird’ distracting shine if you get my meaning! So no velvet below the waist.

I also didn’t sew down the back straps – this was the very last thing I did before my daughter wore it!

The tutu leotard - minus the plate

The tutu leotard – minus the plate

The Tutu Plate

Everyone asks how much netting I used. I used around 10-11 metres, maybe less. There are eight rounds of netting sewn on. Each round is created by cutting across the netting’s width (150cm) four times and then sewing these into a 6 metre long strip. Each strip becomes progressively narrower as you sew the layers (sewing on the upper layer first).

So once you add up 8 times 6m of netting strips… yes, that’s a lot of netting to sew to the bottom of a leotard!

I gathered each layer using fishing line. This is a great method, particularly for this as the netting gathers as you zig-zag over the fishing line – and more or less slides out after you have attached to to the leotard. More or less because nothing is ever that easy!

However I would recommend using fishing line to gather a tough fabric like netting (some use dental floss for this purpose but fishing line comes in huge cheap reels!) especially long lengths as 1) it doesn’t snap like thread can under pressure, and 2) if you run out of thread while attaching the fishing line you can just start zig-zagging over the fishing line again where you left off. How do you do it? Simply put the fishing line down on the fabric, set your machine to a decent width zig zag, hold onto the fishing line behind your machine foot and off you go – and by placing a little tension on the fishing line in front of your foot as it is feeding through, you will discover the material tends to begin gathering behind the foot as you sew. Magic! You can adjust the gathers easily enough afterwards.

As the day progressed, my machine slowly began to disappear under the layers of netting and my shoulder ached from pushing the netting away and pushing the leotard and netting under my machine foot!

Attaching the netting - at this stage I thought "this isn't going to be that hard" Little did I know!

Attaching the netting – at this stage I thought “this isn’t going to be that hard” Little did I know!


The first layer of darker pink and then grey

The first layer of darker pink and then grey


Top layer of light pink, followed by darker pink, grey, darker pink and then the lower levels of light pink. I wanted to avoid a bumble bee look so went for teh subtle effect to achieve depth in the plate

Top layer of light pink, followed by darker pink, grey, darker pink and then the lower levels of light pink. I wanted to avoid a bumble bee look so went for teh subtle effect to achieve depth in the plate rather than high contrast


Drowning - and tired - and desperate at this stage!

Drowning – and tired – and desperate at this stage!

I snapped five needles in the last two rounds. I was not happy and desperately wanted to quit with about 3 inches to go. Seriously. This is when I was very relieved to be at a workshop as I might have thought it was too hard, that my tutu was going to look awful anyway – but Dani is quite calm & zen about tutu-traumatized students and got me through it.

Needle tips everywhere! I think I found them all!

Needle tips everywhere! I think I found them all!

Finished – exhausted and ‘over it’

I just tossed it aside at this point and walked around in circles.

I just tossed it aside at this point and walked around in circles.

OMG – this is a real thing!

The untagged tutu - fluffy!

The untagged tutu – fluffy!

Tagging the tutu

Dani uses a tagging gun to wrestle the plate into submission. A traditional tutu you would hand baste together with a supportive hoop. I would love to learn this – maybe next year!

After the few hours of wrestling and attaching netting, steaming and tagging the tutu together was surprisingly fast and gratifying. Within 30 minutes I had a tutu to decorate.

Not my tutu - however the upper layers are held out of the way and you start at the smaller lower layers first. Steaming and tagging in a staged process.

Not my tutu – however the upper layers are held out of the way and you start at the smaller lower layers first. Steaming and tagging in a staged process.


Tagging

Tagging

My disasters

Sewing my velvet pieces together the wrong way – the first seam! Unpicking stretch is tedious. Unpicked velvet is nightmare inducing as it marks!

I sewed my leg elastic to the wrong side. Yes, had to unpick that as well!

Breaking FIVE needles.

Final thoughts

Tutu sewing is exhausting! The leotard bit is comparatively easy compared to the epic wrestle of attaching a tutu plate to the leotard. I thanked the sewing gods every stitch for my walking foot and a relatively weighty tough Bernina.

To be honest, without that workshop and the amazing patient and calm Danni, I wonder if I would have had the faith in myself to push through the final, swear word-riddled final stages. I often felt defeated, exhausted and doubted myself.

I highly recommend a workshop for even just the companionship and encouragement that comes with a group learning experience.

Is it the best sewing I’ve done? No. However it’s my first tutu. It’s a learning experience!

However, the tutu journey didn’t end here… I packed my tutu pack in the car and went home to decorate/embellish it.

Next up – the Creative Process!


Spring – Style Arc Cara top (as a dress)

I magically dropped off the face of the blogsphere. I’ve been sewing but had very little time to sit and write.

Spring is here... finally!

Spring is here… finally! Here’s a dress to celebrate.

I decided to share this dress with you today – it’s the first weekend of the Australian spring and that makes me feel disgustingly cheerful. While my winters are not particularly cold, I always wave them goodbye without a shadow of regret in my sunshine-lovin’ heart.

The Spring Dress Journey…

Before you see more dress photos… here’s the story behind this project.

I’ve got little love for the off-the-shoulder look that has been haunting the retail stores and sewing blogs. Some of my sewing friends will be stifling their laughter to see me in an off-the-shoulder dress/top at all, given my distinct lack of enthusiasm/bewilderment for this 2016 fashion trend.

I enjoy puzzling out what I don’t like about certain looks – and sometimes how to interpret a look to be more ‘me’.

After much internet cruising and considering, I realised what I mostly didn’t like about the off-the-shoulder look was the necklines gathered with elastic. When I saw a few Style Arc Cara Tops made up (see end of post for links), I was curious about the flat band across the front of the front and the use of elastic at the back to provide the tension to hold the top in place. So I decided to investigate – by making one of course. This is a very simple top to make – and it uses very little fabric. An ideal stash buster!

The Style Arc Cara Top test run (still unhemmed)

The Style Arc Cara Top test run (still unhemmed) in cotton voile. My oldest tattiest jeans… I care not, I love them… I was surprised to not ‘hate’ this top when I made it. If I decide to make this wearable… I’ll add lace when I hem it, it is too short for my long-waisted self!

The Style Arc Cara Top test run - I found I needed to shortern the elastic just a little to pull the front band firm against my upper chest.

The Style Arc Cara Top test run – I found I needed to shorten the back elastic just a little to pull the front flat band firm against my upper chest.

Once I made this top, I immediately had an idea to turn it into a dress. A maxi dress that was soft and feminine, demure and slightly revealing all at the same time.

Once I had this idea in my head, I couldn’t shake it and I needed to ‘sew it out of my head’ so I could move onto other projects.

Style Arc Cara Top as a dress - I had this dress in my head and it's been fun and rewarding to see it come to life.

Style Arc Cara Top as a dress – it’s been fun and rewarding to see this dress emerge from my head and come to life.

THE FABRIC

The fabric I used is a gorgeous large floral woven rayon from Spotlight (Australia). It is very flimsy and a little sheer however the gathering helps disguise most of the transparency. This dress won’t last forever… however nor will the off-the-shoulder look.

Style Arc Cara Top as a dress - back view

Style Arc Cara Top as a dress – back view

THE SKIRT

To create the skirt I simply used all the fabric remaining (I purchased 3.5m for this project of 135m wide fabric – noting a sewed a size 4 top and my height is 5 foot 4 inches). I used to the bottom width and curve of the top to cut the waistline and simply cut the skirt with a generous a-line flare heading toward the hem. I added a little to the width of the front skirt piece to enable me to create a front split. I then cut the front piece in 1/3 and 2/3 pieces so the split would sit over one thigh. I find these maxi skirt splits the easiest and most graceful to walk in.

Style Arc Cara Top / Dress - I think this is a style that I would always fiddle with when I wear

Style Arc Cara Top / Dress – I think this is a style that I would always fiddle with when I wear

I sewed the waist seam with a 25mm seam allowance and then pressed it up into the bodice, machine down the edges to create a channel for the elastic waist. I will probably wear this with a narrow woven belt but left it off for these photos.

The entire garment is French seamed. The edges of the front split are turned under twice and sewn down the length of the skirt so no raw edges can be seen.

Style Arc Cara Top - and it doubles as a wind sock!

A windblown Style Arc Cara Top / Dress – and it doubles as a wind sock!

The hem isn’t as straight as I would wish… however in the photos, walking and moving about in it, it doesn’t appear to be dreadful so I’ve forgiven myself for that indiscretion.

The top is quite ‘blousy’ very loose and full – and it is the look I was after. Just soft, feminine and loose.

This dress isn’t a work of art, it’s not my best sewing due to the fragile fabric… but it’s soft and pretty – and sometimes that’s enough for me.

Pattern: Style Arc Cara Top (purchased from Etsy). Size 4.
Fabric: Floral woven rayon, Spotlight Australia. Available online.
Location: Lighthouse Beach, Port Macquarie Australia

Also see: Very Purple Person  |  My Dress Made  |  Creating in the Gap | Thornberry on Instagram, I couldn’t find it on her blog.