The Little Red Dress (McCalls 6433) & the Pick My Pattern idea…

I enjoyed this project so much I’m feeling inspired to run a little sewalong/blog swopfest called “Pick My Pattern.”

What you talkin’ about Lizzy?

Well, here’s the story, Anne from Pretty Grievances sent me this pattern a little while ago. She thought it would look nice on me (clearly getting me into animal print wasn’t enough to satisfy her!). Apart from being the sweetest thing to do, it was lovely to have someone throw a dress into the virtual sewing change room to try!

from my personal stylist

from my personal stylist – the woman who got me into animal print!

Funnily enough I had looked at this pattern many times and not teetered over the brink with my online cart to purchase it. I suspect slightly more frivolous choices might have won the day… what me buy pretty dress patterns? NeverOK, only every other month…

This whole experience reminds me of going shopping with my friends, or rather when I used to go shopping with my friends! We would all troop into a shop, try on clothes – often trying on clothes that others suggested for us. And sometimes that’s when you find the best clothes of all – the things that you don’t think are you… but your friends know they are…

PICK MY PATTERN CONCEPT

I think maybe a bit later in the year (there are soooo many sewalongs on at present my head is spinning!) and after my trip to London  (did I mention I’m going to London soon LOL), it might be a fun activity. People nominate, I conduct a random draw aka Kris Kringle style and people pick a pattern for another person. One pattern is relatively cheap to mail internationally… compared to fabric anyway!

MY DRESS

I have not got around to hemming this Pick my Pattern creation yet but here are some pictures to share.

My Little Red Dress: front view

My Little Red Dress: front view

Next time around I think I will lift the neckline a little, as when I put this on I keep doing this…

My Little Red Dress - gape!

My Little Red Dress – gape!

I think I need a cut the back a size smaller. It feels a little roomy across my back but fits reasonably well across the bust, waist and hips. I made this in a crepe-type fabric, it’s fairly bulky and I think this has caused issues under the arms, the seam is quite thick and heavy. The sleeves are double thickness – and this fabric is reasonably heavy – making for three fabric thicknesses in the armhole seam. That’s a whole lotta fabric to contend with.

My Little Red Dress back view

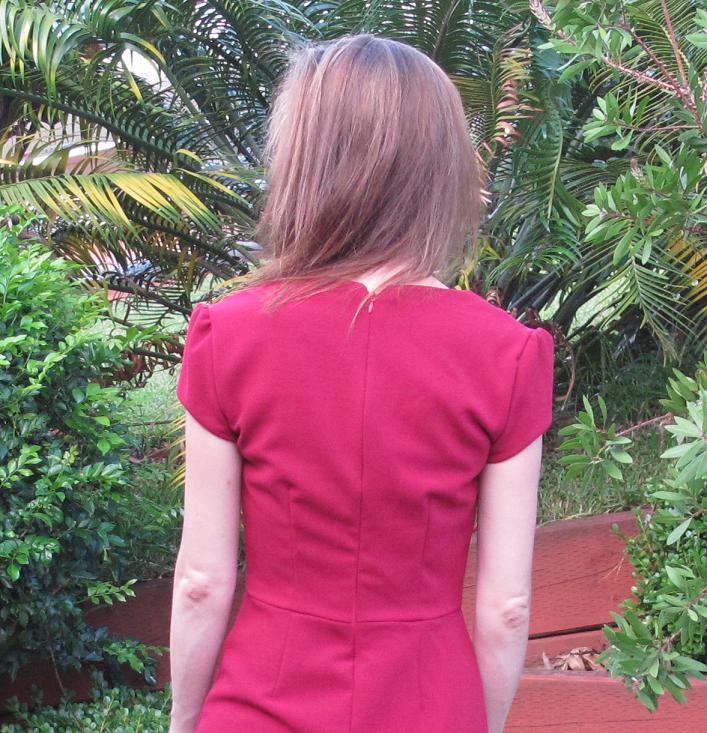
My Little Red Dress: back view

I love love love the skirt pleats – how cute are they! I think next time I might make the sleeveless version in black. I think this is the most work-friendly pattern I’ve made up and I think black would be very practical. I made the very stupid mistake of inserting a slightly smaller zip than suggested (hey it was in the stash – I can hear you tsk tsking Winnie). It’s a bit of a wiggle to get off. Worse I made the mistake of trying it on one morning just after I got after the shower and it was VERY humid. The lining stuck to my skin (I had not catchstitched it down at the waistline, I know I know, more gross stupidity) and the lining tore along the zip as I pulled it off. Stupid weather!

Despite the fititng mishaps (hey not everything is going to be a winner first time! Plus the fabric was on sale so no tears there) I think this pattern is a great shape. I love the shape and the style. I have this tiny sneaking suspicion that the swayback poses of the model have something to do with the neckline of the dress being so low and how the shoulder pleats cause the sides of the neckline to gape a little. It could just be a SewBusyLizzy body flaw… I think having the back slightly more narrow and the neckline a tiny bit higher would alleviate this gaping problem. Then again I checked out the McCalls website and the models have similar fitting issues. I think the depth of the neckline needs to be raised. I don’t think this is a modesty thing. I honestly think the depth & shoulder pleats create an issue together.

I did really like the instructions with this pattern. They are very clear and better still they have quite a good outline of how to tissue fit the pattern.

So thanks Anne for picking my pattern. I think I will be making this one again – always a good sign that it’s a winner!

SEWBUSYLIZZY NEWS UPDATE

I feel like I haven’t had any time to myself lately – which is kinda true. I’ve managed to squeeze in the odd 15 minutes here and there (when you are fitting it in around dinner, bathtime, dressing for work and more it is very frustrating and exhausting) and made a muslin of a vintage dress pattern… out of a doona/duvet cover… and it’s actually not that bad! More on that soon…

Oh and I also made a gorgeous shirtdress… well I like it!

WHATCHA THINK?

And what to you think of the Pick My Pattern concept? Hot or Not? Would you be interested in participating?

Oh La La – hello Charlotte Skirt By Hand London

Simple is sometimes more sexy than complicated. Hello gorgeous pencil skirt simplicity in the form of Charlotte, from By Hand London.

Charlotte By Hand London Pattern Envelope

Charlotte By Hand London Pattern Envelope

I think stitchers can be guilty of overwhelming ourselves with delicious pleats, tucks, darts, bias cut stripes and more – me included! Coco Chanel is quoted as having once said “before you leave the house take one thing off.” Without the time to trawl the internet for the exact quote, I like the essence of the thought. I’m not saying rip off your blouse by any means, although you might have some followers that works for (who knows!). There is a lot of value in taking a moment to simplify a little, whether it’s accessories, clothing details – or even life.

I have been TRYING to exist on a pattern & fabric diet due to the upcoming London trip in April/May (two months away today!). This has been semi-successful (there have been some major slip-ups but I’m vastly improved on 2012). I had a moment of weakness in January and when I saw Oonaballoona’s fabulous Elisalex, I weakened. Oh, it just looked like FUN! I went to Sew Squirrel to order ASAP. It was OUTTA STOCK. Ah, saved by self-indulgence of other stitchers! Bless you Aussie stitchers. Then I got a DM on Twitter from the By Hand London girls asking if I would like to try their patterns. Yes Ma’am. So here she is – Charlotte.

Charlotte By Hand London package

Charlotte By Hand London package

OMG this is the CUTEST packaging I’ve seen. It comes in an envelope – with this gorgeous little peek-a-boo print on the back of the envelope when you pull the sleeve out. The booklet is cute as a button…

AND you get this label.

By Hand London label

By Hand London label

OK enough squeeing and let’s get back to the very serious business of sewing – cos it’s v.serious as we all know. No fun at all… ever… (OK I’ll let you squee just once more…. done yet?).

Do I like it? Yes. Do I love it? Yes.

Oh isn’t there like a million of pencil skirts out there Lizzy?

Well, yes there is. Some of them have tucks, pleats and all manner of wonderous frippery. I have several patterns in my stash and have not got around the making them up, they looked like a lot of work for a pencil skirt silhouette. I saw this and felt inspired.

I just love the simplicity. So simple yet it manages to pack a visual punch. I like the longer pegged length, the eight long shaping darts and I love love love the high high waist. Some have cut it shorter but the length appeals to me. I feel mighty fine. And in some cases sexy as hell. Yes it’s possible to feel this way without hanging my legs out for public viewing.

I’ll admit when Charlotte first popped onto the bloggin’ scene I was like ‘meh it’s a pencil skirt’, then I saw Rachel and Lladybird rockin’ the pencil skirt and I realised that hey Lizzy! Pencil skirts are actually one of your most beloved and worn wardrobe items – maybe you should make one. Durr.

I was once a huge tomboy, it was unusual to see me out of trouser/fitted shirts or jeans(I’m still addicted to jeans, I feel a million bucks in them). Over time I guess my confidence and self-acceptance has grown. I look the way I do and I’m OK with that. Along the road to physical self-acceptance (I think my personality is set in concrete, I fight it to no avail) I learnt to not take clothes too seriously (fabric yes, clothes no), to experiment and have some fun. I discovered dresses where not just ‘special occasion’ items, skirts were kinda cute and even accessories had a place in my life!

It was interesting that my eldest daughter – who is turning 10 next Monday… how did that happen – and she is just under my chin! She’s making me older and shorter every day she is alive!… anyway I digress. She asked me why the Charlotte skirt made me look so much taller than I really was. So we had a discussion about clothing styles, visual wardrobe tricks and more. She’s actually a really snappy little dresser. She’s got a sweet fey boho style which is perfectly appropriate for her age. I have no interest in her growing up too quickly but there is a place for a bit of sage advice. I often wish someone had taught me to master my curly hair…

Charlotte the First - my muslin. Not too shabby for a 'chinese tablecloth'

Charlotte the First – my muslin. Not too shabby for a ‘chinese tablecloth’. No hemming this is an experiment and not wearable. It’s back in the sewing room being re-worked into another vision! The Sewaholic Alma doesn’t ‘go’ but it’s just what I was wearing while sewing!

This is my muslin because I was a little nervous about the fit – needlessly. This fabric is a random shiny upholstery jacquard. No give whatsoever. The Ever-Lovin’ Husband (ELH) commented that while the skirt was nice… but I looked like I was wearing a Chinese tablecloth. Hmmmm! I didn’t put a walking slit in the back and I was walking like a little hobbled but shapely lady! Skirts without walking slits are akin to crippling me. I’m rather famed for my short stature which doesn’t seem to match my stride or walking pace – be warned London ladies – I travel at high speed!

Here is Charlotte The Second (with walking slit) – aka Racy Lacy (I can hear you laughing Boris)

Charlotte The Second: By Hand London

Charlotte The Second: By Hand London

Love.

It kinda looks fancy. It’s just a bonded lace I picked up at Spotlight in a 40% off sale. I really liked the black/black version (much more conservative) but it had no stretch. This base fabric is stretch and perfect for a Charlotte experiment.

The lace was bonded slightly off kilter which made pattern matching the seams tricky. They are not perfect but they are OK. I still need to pull the waistband in a little. The fit is a little roomier than my muslin, I think due to the stretch in this fabric… something to keep in mind for next time. I think I will baste the side seams next time and nip them in as required before committing to ‘serious’ stitches.

Charlotte the Second - the junk trunk

Charlotte the Second – the junk trunk (I know it’s not a ladylike expression but it’s stuck with me ever since my Thurlow post…)

I decided to have a little fun with the hem. This stuff doesn’t fray so rather than doing a straight hem I trimmed around the lace motifs. This decision meant the skirt was either going to be long or around knee-length. I like the contrast of long and lacy – a little bit sexy and a little bit conservative.

Charlotte The Second - the hem

Charlotte The Second – the hem. Please excuse the blue toenails I always forget I’ve let the kids paint my nails and suddenly remember on Monday morning as I walk out of the door to work…

I didn’t line it. I’m saving that ‘fancy stuff’ for my emerald-green wool crepe. Oh I can’t wait to sew it up! An op/charity shop purchase at $2 for 1.5m of New Zealand Merino Wool Crepe. To Grandma wherever you are – I love you for stashing it. Yes I’m still punching the air with glee… oh and I have the loveliest lace blouse to go with it…

Elisalex… I’m so curious to try this pattern, I’m just waiting on some fabric… I have a vision…

Note: I would love Charlotte even if I had paid for it. In fact I would be stoked I had purchased it. I’m not inclined to make something over and over but this one makes me feel that way. Easy, lovely fit, flattering. Love. Love. Love. Thank you By Hand London for asking me to have a try!

I’ve kinda been in love with the Charlotte version with the quirky hem frill in the floral. *sigh* I think we are meant to be… don’t think I’m a waist peplum girl. I’m old enough to remember it – so I’m not going back there… I’m leaving that for the youngsters…

Charlotte Floral - so cute!

Charlotte Floral – so cute! Image: By Hand London

Pattern: Charlotte, By Hand London. Available in Australia from Sew Squirrel (where I go to indulge – so much more fun than chocolate). Or the UK types can get it direct from By Hand London.
Top: Grace Hill from Ezibuy (years ago, rarely worn cos it’s too racy and low-cut for demure me)
Shoes: Jane Debster (on sale a few years ago cos I’m a cheapskate who resents full price)

SewManCushions…

What the???

Has some random dude taken over the SewBusyLizzy blogging space??

Fear not! This is perhaps my most random and left-of-field project to date! Yes, weirder than my aprons (although no Harbour Bridge or Opera House). I’m OK with that (even if you are freaking out right now!). I swear there are pretty dresses just around the blogging corner, just bear with me.

Ages and ages ago I blogged that I had a huge pile of men’s shirts that were too good to throw out but I didn’t know what to do with them. Lots of people made great suggestions but I didn’t feel motivated. I just have plenty of gorgeous fabric in my stash!

I left the pile of shirts in the corner of the lounge room for… errrrr…. some time….
Then as I was cleaning up the loungeroom and moaning about the grotty cushion covers, I had the oddest idea.

No I didn’t think about WASHING the covers – that would have been boring and not involve sewing. Dur.

I looked at the shirts and I looked at the cushions. And THE MAN CUSHION was born.

The Man Cushion Family

MAN CUSHIONS!

It’s not a design masterpiece. It’s not even a sewing masterpiece. And I don’t care. Yes as outrageous as that is – I don’t. They are fun to make, cheap to make and hugely useful!

This is just DIY home decor for zilch expenditure.

As it turns out… they are rather cute set – in a checkered/manly kinda way and the kids love them. They have pockets which you can store all manner of things in. The remote control, your favourite toy, notes and more. I know, this is revolutionary! Home decor with pockets. I am a sewing rock star!! (Pause for the street parade, confetti, trumpets and presentation of the key to the city).

The best thing of all with this mindlessly simple project is the cushion cover has a built-in opening – you do not need to make a buttonhole, stitch on a button or insert a zip. Yes people, it’s already there! (More celebration and accolades). Are you sold yet?

Here goes the most obvious sewing tutorial in the history of sewing blogs…

SewBusyLizzy gives you THE MAN CUSHION…

The Man Shirt

Step 1: The Man Shirt. Iron it first (yes, painful but it makes life easier)

Man Cushion: Layout options

Step 2: Layout options. This is my plan for Man Cushion No. 5. Yes radical button placement.

Man Cushions: Layout Options 2

Step 2: Layout options. I’ve decided to make the buttons off-centre for this Man Cushion. This saves unpicking the pocket and re-sewing it. If you centre the buttons, you will find that the pocket ends up in the seamline of the cushion. You also need to be mindful of the armhole seams, buttons and collar/neck when deciding your placement.

Man Cushions: Cutting out the cover

Step 3: Cutting out the cover. Use your old cushion cover as a guide. Remembering to add 5/8 inch all around for your seams.

Step 4: Now flip one of the pieces over and place the two pieces right sides together. Adding the tags into the seamline if you like, folding them inhalf and matching the raw edges.

Step 4: Now place the two pieces, right sides together and pin around the edges. If you like the tags, unpick them and sandwich them between the pieces with the raw edges matching.

Step 5: sewing it together

Step 5: sewing it together. Don’t forget to remove the pins as you go. There is no need to pivot at the corners, just sew from end to end – you can even run off the end if you are feeling crazy. I don’t worry about pins when I make these cushions covers but if you are not an experienced stitcher you might feel more confident if you pin all around the edges of the cushion first. You can double stitch the seams if you think they need reinforcing.

Step 6: Finished!

Step 6: Finished! Now just undo the buttons and slip in your cushion insert….
Note: I used contrasting thread so you could see the stitching. I also ran this through the overlocker for the sake of neatness this is not necessary.

Man Cushion Complete! Some of the 'finer' details...

Man Cushion Complete! Some of the ‘finer’ details…

The Man Cushion Family

The Man Cushion Family. We have a brown leather couch. It’s boring but a heaven-sent when you have small messy children!

I have visions of these in a Hawaiian shirt series, cowboy-style with press studs, a lumberjack-style flannelette set and more. How cool would these be in a holiday house, a man cave or for your camping/picnic set?It’s perfect use for those old business shirts with slightly stained collars and cuffs because you just chop them off, beloved shirts that are really past wearing in public but can’t bear to part with – give them a new useful life!

You could get fancy and sew trim into the seams, put the buttons at the back – either way I just prefer the kookiness of these as they are. It’s quite hilarious when people sit down, stuff a cushion behind their back, pull it back out and go ‘hey… is this… like a shirt or something??‘.

Miss 9 loves these so much, I got a large female shirt from the charity/op shop and some old fancy serviettes (it had no chest pocket – outrageous, wardrobe discrimination!). I’m working on a girly version for her bed. Watch this space….

And I WILL draw that McCalls jacket pattern giveaway this weekend. I will!!

Made-by-Me in Tasmania

Great Lake, Miena Tasmania

Great Lake, Miena Tasmania

I’ve been away for a week in Tasmania. Just a quiet week, not too much sightseeing as I’ve been to Tasmania five or six times now! The holiday house is located in the central highlands of Tasmania, it’s in a little town which is basically composed of little holiday houses and very few permanent residents, it’s trout fishing country so many are shacks more than houses – quite quirky and charming in their ramshackle way.

It was nice to have a slower holiday, it helps you stop and see the little things that you might otherwise zoom by…

Pretty little flowers in the park at Cressy

Pretty little flowers in the park at Cressy

Little Australian bush flowers

Little Australian bush flowers

Most of the clothes I wore on holidays were made-by-me. I’m never sure if it’s the novelty factor of wearing my made-by-me clothes or just that they are nicer than my RTW that means they are always my first choice in the morning. The nicest thing happened in Deloraine, Tasmania. I was wandering along the main street, wearing my Lonsdale with red flats and my Whole Wheat slung over my arm. A little elderly lady was sitting in her car, she flung open her car door and stopped me to tell me how gorgeous she thought my clothes were – that I was ‘quite the picture’. Once I explained I made my clothes, we then had a lovely chat about how much she adored making her own clothes too. That was a real holiday highlight for me!

Maria Denmark Day-to-Night Top and Whole Wheat Cardigan from Ravelry

Maria Denmark Day-to-Night Top and Whole Wheat Cardigan from Ravelry

My MariaDenmark and Sewaholic clothes got a lot of wear – and my Whole Wheat cardigan, my first knitted project in YEARS was in regular rotation.

Sewaholic Lonsdale and Whole Wheat cardigan

Sewaholic Lonsdale and Whole Wheat cardigan – in King Solomon’s Cave, Mole Creek Tasmania. It’s 9 degrees down here all year round! I’m cold but not quite freezing in this picture…

We took some lovely pictures in the caves but WordPress keeps reverting them to the wrong orientation. *sigh* patience required.

Maria Denmark Birgitte Top and Yasmin Yoke Skirt

Maria Denmark Birgitte Top and Yasmin Yoke Skirt. I made this top from a $1 skirt from a second-hand stall

You will notice a new little skirt has popped up. This is the Maria Denmark Yasmin Yoke skirt.. It’s a simple make and very easy to fit as you go along. I’m not thrilled with this fabric although I like the pattern. The fabric is a butter suede and while it looks and feels lovely from the outside, it’s a bit ‘sticky’ on my skin – it really needs to be linted (note to self: remember that when you use the blue butter suede in the stash!). I think I will try making this up in some lightweight demin, it’s very easy to wear as it doesn’t sit too high on your waist.

I also made up a black/white stripey top from Maria Denmark’s Birgette pattern. I cheated on this t-shirt. I made it from a $1 skirt I picked up at the school fete. It was a long tube skirt and too big for me. I cut the body pieces so the skirt hem was the t-shirt hem. I also have not bothered to hem the sleeves. I don’t think this sort of stark stripe is my thing, it’s a bit harsh. Anyway for $1 I’m not too perturbed – I love the t-shirt pattern, I like the negative ease.

We saw lots of little creatures in Tasmania. It really is the place to see Australian wildlife, once you get away from the towns and cities. On the way to house on the first night we saw four Tasmanian Devils, a Spotted Eastern Quoll, countless wallabies, two wombats and more – meaning we had to drive slowly to avoid hitting them! No doubt they were driven to the roadsides in search of food as much of the country we drove through once we got the to Great Western Tiers which has suffered in the recent bushfires.

A little echidna trying to mind his own business

A little echidna trying to mind his own business

Mother Nature can be harsh…

Maria Denmark day-to-night dress, take 2 - side view

Maria Denmark day-to-night dress, take 2 – side view

Maria Denmark day-to-night dress - take 2

Maria Denmark day-to-night dress – take 2

The above dress is my second Maria Denmark Day-to-night dress – I found this amazing knit at Lincraft, it’s a rayon knit, lovely and light (and it was half price in the recent sale). It was intended to be a Sewing Cake Tirsmisu – and while there are so many lovely Tiramisu’s out there in the blogsphere, I’ve yet to find a fabric that screams Tiramisu to me. SewImpatientLizzy!

I’ve worn this dress a lot, out and just around the house, it’s so comfortable and flattering. And yes, it really takes about 60 minutes to make!

Whole Wheat Cardigan was a star of the trip – thank you Rachel for your encouragement! My cardigan is not quite perfect, in fact I’ve nicknamed it my Amish Cardigan – I once read that the Amish always incorporated one mistake into their quilts as only God is perfect. I am very much not perfect so I incorporated many mistakes! 🙂

Sewaholic Cambie and Whole Wheat cardigan

Sewaholic Cambie and Whole Wheat cardigan. This is waaay to early in the morning for me. PLus I didn’t take a hair dryer away – yes! A real holiday!!

I nearly finished a cardigan for my daughter – I’m knitting the sleeves now and then just the button bands to go. This pattern is Langston from Ravelry, a really sweet little cardigan. I knitting it with a Paton’s wool called Romance. It’s a yummy merino/cashmere blend and I picked it up at Lincraft just before I left for holidays. It was marked down from $9 a ball to $3.99 – like it’s meant to be. I started it once I got through airport security with my needles, I was worried some nasty airport man would make me rip the knitting off!

Langston from Ravelry

Langston from Ravelry

I’ve learnt so much about knitting in the last month. Thanks to YouTube and Google, I’ve mastered cables, SSK, the Magic Loop technique and more. If you can knit plain and purl stitches but think that knitting a cardigan or jumper is beyond you – it’s not true. I watched several YouTube videos and have vastly increased my knitting abilities. Don’t underestimate yourself. If you are determined you can do anything!

Ravelry has been a relevation to me. It’s like facebook for knitters and crocheters, an amazing source of inspiration, patterns (lots of free ones at that!) and more. It’s free to join so if you are curious go and have a look! And you can friend me – my name is SewBusyLizzy (yes I’m imaginative!).

I arrived home to the most amazing package from Blogless Anna (go and check out her adorable parrot blouse). I’m actually speechless – she sent me some fabric which she picked up at The Fabric Store’s recent sale. She said she got it home and realised it wasn’t her. So she sent it to me – it’s SoSewBusyLizzy that I’m refraining from wrapping myself up in it and rolling about on the floor. Thank you Anna – I adore it!! I have a couple of ideas how I’m going to use it… once I stop patting it.

More on that in my next blog post – along with a couple of sewing goodies I discovered at the Evandale Market in Tasmania. Plus I got a couple of really exciting emails while I was in Tasmania as well! Watch this space 🙂

Not a Fashion Star… just me in a cute jacket… & McCalls 6611 giveaway

So begins The Year of the Jacket…

McCalls 6611 - Fashion Star

McCalls 6611 – Fashion Star

Nothing like starting 2013 with a little bit of reality TV – hello McCalls Fashion Star, 6611.

McCalls 6611 - side view

McCalls 6611 – side view

I’m still on holidays but I was missing the blog so decided to write up this post, while sitting in the holiday house in the central Tasmanian highlands (well when you live at the beach where do you go for holidays!?!).

This jacket started when Suzy Bee Sews blogged her version of this jacket. Her’s was not a happy story – so much so that she gave away the pattern. And I won it. After sewing so many indie patterns, it didn’t occur to me that the pattern would not be in my size. Doh! I must be really perverse, as despite Suzy’s tales of woe and not having the pattern in my size, I immediately became obsessed with making this jacket.

Next time a BMV sale came around I took the opportunity to get the pattern (and maybe a few more…) and when walking through Spotlight one day this gorgeous cotton sateen literally threw itself off the rack and into my arms, pleading to find its moment in the sun as McCalls 6611, who was I to say no?

McCalls 6611 - back view

McCalls 6611 – back view

So the outside of this jacket is a floral cotton sateen. I used a contrast cotton sateen for the drape lapels and peplum lining, the body is lined with cotton batiste and I used bemsilk for the upper sleeves (to make it easier to slip on) and the contrast sateen for the lower sleeve lining (more on that in a minute). Yes it’s a bit of a hodge-podge on the inside, partially to do with the fabric stash offerings and my alterations.

This is a simple jacket to construct. I only made a few changes to the pattern.

I cut the back as one piece. It’s supposed to have a seam down the centre of my back, however I didn’t want to cut up the pattern more than necessary.

McCalls 6611: inside jacket back

6611 inside jacket back

I serged the front lining seams and then decided to top stitch these seams… just because I felt like it 🙂 I also serged the jacket front shell seams as I didn’t want them shifting about. I simply neatened the back seams, clipped and ironed them open as directed by the pattern.

I cut the lining slightly wider around the armholes as I thought it would allow for more movement up and around the seamlines. A while ago I saw a blog tutorial on Sewaholic, A Fashionable Stitch or perhaps Grainline’s blog on how to alter pattern pieces for a jacket lining. I wasn’t quite so exacting, i just recalled the post as I was cutting and I just did it by eye! When I get home I’ll look up the tutorial and amend this post with a link.

I also set the sleeves in flat… this is the easiest (and happiest) way to put in sleeves. I learnt this from A Fashionable Stitch during the 1880 sewalong. Great technique – try it!!

6611 inside jacket lining

McCalls 6611: inside jacket front

McCalls 6611: inside jacket shell front

While this was an easy jacket to construct, I spent quite a bit of time pondering the sleeves. They felt overwhelming in the floral print. I almost chopped them off to 3/4 length. However I’m a girl who likes to keep her options open, so I decided to leave the length but use the contrast cotton sateen for the lower sleeve lining. This way when I roll the sleeves back, the sleeves match the lapels which I think looks nicer than seeing common-as-muck bemsilk. I think I’ll always wear this with the sleeves rolled back – I love the informal look – but the option is there for full length if I like or an evening turns chilly (I am now too old and sensible to shiver in the name of fashion).

To my eye the cropped jacket length is better balanced with cropped or slightly shorter sleeves, particularly in this busy print. I considered cuffing the ends but I love jackets with the sleeves shoved or rolled up the forearms. It appeals to my casual sense of style (…that’s if I have something you can call style).

While this pattern does not call for lining fabric, it appears you use sateen or something similar throughout, I think it would be very stiff hence the use of bemsilk and cotton batiste instead (which came from the stash).

I love the peplum as it gives me some shape. I do think the jacket would be great with a button closure, maybe a button and loop, as the lapels don’t really ‘drape’ and I like the look of it closed with the contrast lapels, they don’t look so great flopping around as they are rather pointy than soft and floppy.

Do I feel like a Fashion Star. Nah, not so much – I’m only 5 foot 4!

McCalls 6611 - lapels

It will pain you to know that we took these pictures in my lunch break. This location is our Town Green (riverside) and is all of 90 seconds walk from my desk.

…and one bad hair day shot for laughs… I’m waiting for that sponsorship call from a shampoo company…

McCalls 6611 - bad hair day

McCalls 6611 – back hair day

OK finally what you have been waiting for sooooo patiently, reading my rambling and skimming over my pictures….

Want to be a Fashion Star too? As you know the start of my journey to make this jacket began with the wrong size. I’ve been emailing Suzy and she is cool bananas with the giveaway (thanks Suzy!). So if you would like to join the McCalls 6611 congo line please let me know in the comments below. The giveaway is for size range 14-22

Suzy also sent me a sensational little package of vintage patterns – I’ll blog them when I’m home again – thank you Suzy I love them!! I’ll be home again soon enough.